background image

28

TROUBLESHOOTING

 TIPS

Troubleshooting Tips ...

 Before you call for service

Problem

Possible Cause

What To Do

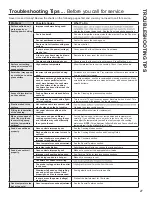
Oven does not work or 

appears not to work.

Plug on range is not completely inserted in 

the electrical outlet.

Make sure electrical plug is plugged into a live, properly grounded 

outlet.

A fuse in your home may be blown or the 

circuit breaker tripped.

Replace the fuse or reset the circuit breaker.

Oven controls improperly set.
Oven is in Sabbath Mode.

Features section.

“Crackling” or “popping” 

sound.

This is the sound of the metal heating 

and cooling during both the cooking and 

cleaning functions.

This is normal. 

Why is my range making a 

"clicking" noise when using 

my oven?

Your range cycles the heating elements by 

turning relays on and off to maintain the 

oven temperature.

This is normal.

Clock and timer do not work.

A fuse in your home may be blown or the 

circuit breaker tripped.

Replace the fuse or reset the circuit breaker.

Plug on range is not completely inserted in 

the electrical outlet.

Make sure electrical plug is plugged into a live, properly grounded 

outlet.

Oven controls improperly set.

Oven door is crooked.

The door is out of position.

Because the oven door is removable, it sometimes gets out of 

position during installation. To straighten the door, re-install the 

Cleaning" section.

Oven light does not work.

Light bulb is loose or defective.

Tighten or replace bulb.

Pad operating light is broken.

Oven will not self-clean.

The temperature is too high to set a self-

clean operation.

Allow the oven to cool and reset the controls.

Oven controls improperly set.

See the Cleaning the Oven section.

The probe is plugged into the outlet in the 

oven.

Remove the probe from the oven. 

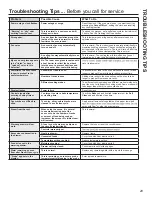
Oven will not steam clean.

Display flashes HOT.

Allow the oven to cool to room temperature and reset the 

controls.

Oven controls improperly set.
Oven door is not closed.

Make sure you close the door to start steam clean cycle.

Excessive smoking during 

clean cycle.

Excessive soil or grease.

Press the 

Cancel/Off

 pad. Open the windows to rid the room of 

smoke. Wait until the 

LOCKED

 light goes off. Wipe up the excess 

soil and reset the clean cycle.

Excessive smoking during 

broiling.

Food too close to burner element.

Lower the rack position of the food.

Oven door will not open after 

a clean cycle.

Oven too hot.

Allow the oven to cool below locking temperature.

Oven not clean after a clean 

cycle.

Oven controls improperly set.

See the Cleaning the Oven section.

Oven was heavily soiled.

Clean up heavy spillovers before starting the clean cycle. 

Heavily soiled ovens may need to self-clean again or for a longer 

period of time.

"LOCK DOOR" flashes in the 

display.

The self-clean cycle has been selected but 

the door is not closed.

Close the oven door.

DOOR LOCK light is on when 

you want to cook.

The oven door is locked because the 

temperature inside the oven has not 

dropped below the locking temperature.

Press the 

Cancel/Off

 pad. Allow the oven to cool.

“F— and a number or letter” 

flash in the display.

You have a function error code.

Press the 

Cancel/Off

 pad. Allow the oven to cool for one hour. Put 

the oven back into operation.

If the function code repeats.

reconnect power. If the function error code repeats, call for service.

Display goes blank.

A fuse in your home may be blown or the 

circuit breaker tripped.

Replace the fuse or reset the circuit breaker.

The clock is turned off.

See the Special features section.

Oven or cooktop will not stay 

set.

Function error.

power. If repeating, call for service.

Call for service.

Summary of Contents for PCS940

Page 1: ...0 Oven Controls 12 Settings 13 Options 14 Sabbath Mode 15 Oven Racks 16 Aluminum Foil and Oven Liners 17 Cookware 17 Cooking Modes 18 Probe 19 Cooking Guide 20 WiFi Connect and Remote Enable 21 CARE A...

Page 2: ...ery GE Appliances product and we think you will too Among other things registration of your appliance ensures that we can deliver important product information and warranty details when you need them...

Page 3: ...he foot is engaged Re engage the anti tip bracket if the range is moved Failure to do so can result in death or serious burns to children or adults Tip Over Hazard WARNING Anti Tip Bracket Leveling Le...

Page 4: ...LIANCE WARNING GENERAL SAFETY INSTRUCTIONS Cont or disconnect the power supply at the household distribution panel by removing the fuse or switching off the circuit breaker be left alone or unattended...

Page 5: ...arp instruments rings or other jewelry and rivets on clothing ceramic Cooktop Cleaner and CERAMA BRYTE Cleaning Pad to clean the cooktop Wait until the cooktop cools and the indicator light goes out b...

Page 6: ...protective coating of any kind should be used in or around any part of the oven WARNING WARMING DRAWER SAFETY INSTRUCTIONS Some models cooked foods at serving temperature Bacteria will than 2 hours F...

Page 7: ...ss communication equipment installed on this range has been tested and found to comply with the limits for a Class B digital device pursuant to part 15 of the FCC Rules These limits are designed to a...

Page 8: ...sition You may hear slight clicking sounds during cooking indicating the control is maintaining your desired setting Be sure you turn the control knob to OFF when you finish cooking Dual and Triple Su...

Page 9: ...ou are using Place your Induction designed cookware on the cooking surface Turn element s On Place your induction designed cookware on the cooking surface Touch and hold On Off pad about half a second...

Page 10: ...on the WARMING ZONE should be covered with a lid or aluminum foil When warming pastries or breads the cover should be vented to allow moisture to escape The initial temperature type and amount of foo...

Page 11: ...m reputable sources These are available from manufacturers such as Ball and Kerr Flat bottomed canners are recommended Use of water bath canners with rippled bottoms may extend the time required to br...

Page 12: ...o turn the timer off press the Timer pad 8 Oven Light Turns the oven light on or off 9 Lock Controls Locks out the control so that pressing the pads does not activate the controls Press the Lock Contr...

Page 13: ...ipe Conversion will automatically convert the regular baking temperatures entered to convection bake cooking temperatures when turned on Note that this option does not convert convection bake cooking...

Page 14: ...erature Press the Options pad and select Cook Time and minutes Then press Start Enter Delay Time Some models time when you want the oven to start Select a desired temperature Press the Options pad and...

Page 15: ...ture changes Starting a Timed Bake 1 Press the Bake pad 2 If the desired temperature is 350F use the 6 through 0 number pads to select a cooking time If a cooking temperature other than 350F is desire...

Page 16: ...ided with your oven Remove the rack from the oven remove debris in the side tracks with a paper towel shake the graphite lubricant and place 4 small drops on the two bottom tracks of the left and righ...

Page 17: ...and ceramic pans heat slowly but retain heat well These types of pans work well for dishes such as pies and custards Air insulated pans heat slowly and can reduce bottom browning CAUTION Do not use a...

Page 18: ...not necessary to preheat when using this mode To use this mode press the Conv Roast pad enter a temperature with the number pads and then press Start Enter Baked Goods The Baked Goods mode is designe...

Page 19: ...Proper Probe Placement 2 Place the food in the oven and connect the probe into the probe outlet in the oven 3 Set the desired cook mode Bake Convection Bake or Convection Roast 4 Program the probe tem...

Page 20: ...d o m i H l i o r B d i o v a e c u a s n i d e t a o c r o d e d a e r b f I 2 i H l i o r B lower oven For best performance when broiling center food below the broil heating element Broil Lo Bake 2...

Page 21: ...et and download apps 3 You will need to know the password of your home WiFi router Have this password ready while you are setting up your GE Appliances oven Connect your GE Appliances oven 1 On your s...

Page 22: ...the interior or exterior of the oven Clean with a mild soap and water or vinegar and water solution Rinse with clean water and dry with a soft cloth When cleaning surfaces make sure that they are at...

Page 23: ...between 3 00 and 5 00 hours by using the number pads to enter a different time and pressing Enter For heavily soiled ovens the maximum 5 hour clean time is recommended If you wish to use the default...

Page 24: ...for Ceramic Cooktops rub the residue area applying pressure as needed 4 If any residue remains repeat the steps listed above as needed 5 For additional protection after all residue has been removed p...

Page 25: ...the surface of your cooktop not covered by the warranty unless the spill is removed while still hot Special care should be taken when removing hot substances Be sure to use a new sharp razor scraper...

Page 26: ...and lifting the door To remove the door 1 Fully open the door 2 Pull the hinge locks down toward the door frame to the unlocked position A tool such as a small flat blade screwdriver may be required 3...

Page 27: ...rface may appear discolored when it is hot This is temporary and will disappear as the glass cools Plastic melted to the surface Hot cooktop came into contact with plastic placed on the hot cooktop Cl...

Page 28: ...n the oven Remove the probe from the oven Oven will not steam clean Display flashes HOT Allow the oven to cool to room temperature and reset the controls Oven controls improperly set Oven door is not...

Page 29: ...he oven to take longer to preheat Remove items to reduce preheat time Number of racks in oven Adding more racks to the oven will cause the oven to take longer to preheat Remove some racks Different co...

Page 30: ...fects with this appliance EXCLUSION OF IMPLIED WARRANTIES Your sole and exclusive remedy is product repair as provided in this Limited Warranty Any implied warranties including the implied warranties...

Page 31: ...information The following products and more are available Accessories Accessories Small Broiler Pan 8 x 1 x 13 Large Broiler Pan 12 x 1 x 16 Parts Oven racks Oven elements Light bulbs Cleaning Suppli...

Page 32: ...Appliances ca or call 1 800 561 3344 during normal business hours Remote Connectivity For assistance with wireless network connectivity for models with remote enable visit our website at GEAppliances...

Page 33: ...ce 40 Ustensiles pour les tables de cuisson 42 Commandes du Four 44 Param tres 46 Options 46 Mode Sabbat 47 Grilles 48 Papier d aluminium ou autres Rev tements de Four 49 Batteries de Cuisine 49 Modes...

Page 34: ...GE et nous pensons que vous le serez aussi Parmi de nombreux b n fices l enregistrement de votre lectrom nager nous permet de vous d livrer d importantes informations et de d tails de garantie quand...

Page 35: ...r de graves blessure ainsi que le d c s d enfants ou d adultes AVERTISSEMENT Crochet Anti Basculement Pied de mise niveau pour les cuisini res Cuisini res int grables et encastrables AVERTISSEMENT CON...

Page 36: ...du four ou toutes autres parties du four sauf si indiqu dans le manuel Les rev tements de four peuvent capturer la chaleur ou fondre ce qui provoquera la d t rioration du produit ainsi que des risques...

Page 37: ...outeaux les instruments aiguis s bagues ou autres bijoux et les rivets des v tements Utilisez CERAMA BRYTE Nettoyant pour plaque en c ramique et CERAMA BRYTE Lingette Nettoyante pour nettoyer les plaq...

Page 38: ...les r sidus alimentaires du four Un exc s de graisse pourrait prendre feu et la fum e pourrait endommager votre domicile Si la fonction d auto nettoyage fonctionne mal teignez le four et coupez l ali...

Page 39: ...cette gamme a t test et d clar conforme aux limites d un appareil num rique de classe B conform ment la partie 15 des r gles de la FCC Ces limites sont con ues pour a fournir une protection raisonnab...

Page 40: ...age pour chauffer des aliments froids N utilisez pas la commande de r chauffage pendant plus de 2 heures La ZONE DE R CHAUFFAGE WARMING ZONE qui est situ e au milieu et l arri re de la surface en verr...

Page 41: ...e Arr t environ une demi seconde Une sonnerie doit tre entendue avec chaque touche de n importe quel contr le Le niveau de puissance peut tre s lectionn de l une des mani res suivantes 1 Faites glisse...

Page 42: ...Max avec les touches num riques et appuyez sur Start Pour de meilleurs r sultats tous les aliments de la ZONE DE R CHAUFFAGE doivent tre couverts d un couvercle ou d une feuille d aluminium Lorsque vo...

Page 43: ...sources sures Pour pourrez les retrouver chez les fabricants comme Ball et Kerr Les cocottes minute fond plat sont recommand es L utilisation de la cocotte minute avec un fond d eau peuvent augmenter...

Page 44: ...e Timer Minuterie 8 Lumi re du four Allume ou teint la lumi re du four 9 Lock Controls Verrouillage Verrouille le centre de contr le afin que si l on appuie sur les touches cela n active pas les comma...

Page 45: ...tres Plus More et D sactivation automatique Auto OFF pour activer ou d sactiver cette fonctionnalit F C Fahrenheit or Celsius Le contr le du four est r gl pour utiliser les temp ratures Fahrenheit F...

Page 46: ...poisson la farce la volaille et le porc ne devrait pas tre laiss pendant plus d une heure avant ou apr s la cuisson La temp rature ambiante favorise la croissance de bact ries dangereuses Assurez vou...

Page 47: ...tour n est donn pendant le changement de temp rature un thermom tre de four peut tre utilis pour confirmer les changements de temp rature D marrer une cuisson minut e 1 Appuyez sur la touche tactile B...

Page 48: ...nt graphite fourni avec votre four Retirez le portoir du four retirez les d bris dans les rails lat raux avec une serviette en papier secouez le lubrifiant graphite et placez 4 petites gouttes sur les...

Page 49: ...tre utilise pour r cup rer des d bordements en pla ant une feuille sur une grille inferieure quelques centim tres en dessous de la nourriture N utilisez pas plus de feuille n cessaire et une jamais r...

Page 50: ...lisez le mode Frozen Snacks Produits Snacks Congel s quand vous cuisinez des snacks congel s sur deux grilles simultan ment Ce mode comprend un cycle de pr chauffage pour pr parer le four la cuisson m...

Page 51: ...e dans l aliment voir Positionnement Correct de la Sonde 2 Placez les aliments dans le four et connectez la sonde la prise du four 3 R glez le mode de cuisson souhait cuisson au four cuisson par conve...

Page 52: ...rveillez votre plat pendant le gril Pour obtenir de meilleurs r sultats placez les aliments sous l l ment chaud du Gril 2 Broil Hi Gril Max Broil Lo Gril Min Bake Cuire 2 ou 3 1 ou 2 Bake Cuire Dinde...

Page 53: ...voir ce mot de passe pr t pendant que vous configurez votre four GE Appliances Appareils compatibles Apple ou Android et r seau WiFi domestique requis Connecter votre four GE Appliances 1 Sur votre sm...

Page 54: ...si que l Acier Inoxydable Noir N utilisez pas de nettoyant four nettoyants abrasifs ou de forts nettoyants liquides des ponges d acier des tampons r curer en plastique ou des poudres nettoyantes l int...

Page 55: ...peut tre modifi entre 3h00 et 5h00 en utilisant les touches num riques pour entrer une heure diff rente et en appuyant sur Entrer Pour les fours tr s sales le temps de nettoyage maximum de 5 heures e...

Page 56: ...angle d environ 45 contre la surface de verre et gratter la salet Il sera n cessaire d appliquer une pression sur le rasoir afin d enlever le r sidu 3 Apr s avoir gratt avec le rasoir taler quelques...

Page 57: ...utions particuli res doivent tre prises lors du retrait de substances chaudes Nettoyage de la Table de Cuisson Suite SOIN ET NETTOYAGE Nettoyage de la table de cuisson sonde Sonde Le thermom tre de la...

Page 58: ...Rebranchez l alimentation lectrique du four SOIN ET NETTOYAGE Lumi re du four porte du four Lumi re du Four La porte est tr s lourde Soyez prudent lorsque vous retirez et soulevez la porte Ne pas sou...

Page 59: ...t tre faible Erreur dans le choix des ustensiles de cuisine Utilisez un aimant pour v rifier si les ustensiles sont compatibles avec les plaques induction Utilisez une po le plate et compatible avec l...

Page 60: ...section Fonctions sp ciales Voir la section Utilisation du four Remplacer le fusible ou r initialiser le disjoncteur Assurez vous que la prise lectrique est branch e sur une prise de courant correctem...

Page 61: ...le fusible ou r initialiser le disjoncteur Voir la section Utilisation du tiroir chauffant Ceci est normal Lors de l utilisation du four il est normal de voir de la vapeur sortir de l vent du four Si...

Page 62: ...ie de la cuisini re ne fonctionne plus en raison d un d faut de mat riaux et de fabrication Durant cette garantie limit e d un an MC Comercial fournira gratuitement toute la main d uvre et le service...

Page 63: ...rite 17 x 1 x 19 1 4 Pi ces D tach es Grilles de Four El ments de Four Ampoules Produits de Nettoyage Lingettes CitruShine Stainless Steel Cr me de Nettoyage en Acier inoxydable CERAMA BRYTE Lingettes...

Page 64: ...s jours de l ann e aux Etats Unis GEAppliances ca ou appelez le 1 800 561 3344 pendant les horaires ouvrables Connexion Distance Pour obtenir de l aide sur la connectivit r seau sans fil pour les mod...

Reviews: