2
Installation
27" Grill Cart Assembly
• Two 7/16" wrenches
• 3/8" wrench or socket
• Phillips head screwdriver
• Rubber or wooden mallet
• Gloves to protect against sharp edges
10-24 Nuts
Phillips
Head
Screws
#10 Washers
USE
8
EACH
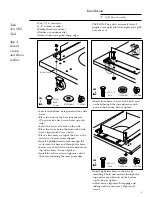
• Locate the bottom/base panel and one side
brace.
• Place the front of the base towards you.
(The front side has 6 screw holes on each
side.)
• Select the caster with lock on the side.
• Place the caster below the front side of the
base, aligned with 4 screw holes.
• Place a side brace on top of the base at the
left side with screw holes aligned.
• Install 4 phillips head screws through the
caster into the base and through the brace.
• Secure screws with flat washers and nuts on
top of the brace. Do not tighten.
• Install the other caster to opposite end of
the brace following the same procedure.
Bottom Panel
1/4-20 x 1/2
Bolts
1/4 Washer
1/4-20 Nuts
USE
4
EACH
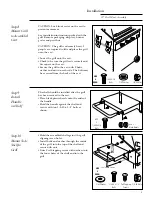
• Install front brace to base with 4 bolts and
washers through the top and secure with
nuts on the bottom. Do not tighten.
1/4-20 x 1/2
Bolts
1/4 Washer
1/4-20 Nuts
USE
8
EACH
• Install right side brace to the base by
installing 8 bolts and washers through the
top and secure with nuts on the bottom.
Again, do not tighten.
• Adjust brace alignment by tapping and
sliding until corners meet. Tighten all
screws.
CAUTION: The grill is extremely heavy. 2
people are required to lift and place the grill
onto the cart.
Tools
You Will
Need
Step 2:
Install
Casters
and Braces
to Base


