


49-80693
19
CARE AND CLE
ANING:
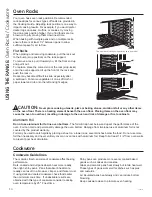
Cleaning the Glass Cooktop
Cleaning the Glass Cooktop
Use a CERAMA BRYTE
®
Cleaning
Pad for Ceramic Cooktops.
Normal Daily Use Cleaning
ONLY use CERAMA BRYTE
®
Ceramic Cooktop Cleaner
on the glass cooktop. Other creams may not be as
effective.
To maintain and protect the surface of your glass
cooktop, follow these steps:
1. Before using the cooktop for the first time, clean it
with CERAMA BRYTE
®
Ceramic Cooktop Cleaner.
This helps protect the top and makes cleanup easier.
2. Daily use of CERAMA BRYTE
®
Ceramic Cooktop
Cleaner will help keep the cooktop looking new.
3. Shake the cleaning cream well. Apply a few drops of
CERAMA BRYTE
®
Ceramic Cooktop Cleaner directly
to the cooktop.
4. Use a paper towel or
CERAMA BRYTE
®
Cleaning
Pad for Ceramic Cooktops
to clean the entire cooktop
surface.
5. Use a dry cloth or paper towel
to remove all cleaning residue.
No need to rinse.
NOTE:
It is very important that
you DO NOT heat the cooktop
until it has been cleaned
thoroughly.
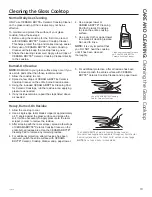
Burned-On Residue
NOTE:
DAMAGE to your glass surface may occur if you
use scrub pads other than those recommended.
1. Allow the cooktop to cool.
2. Spread a few drops of CERAMA BRYTE
®
Ceramic
Cooktop Cleaner on the entire burned residue area.
3. Using the included CERAMA BRYTE
®
Cleaning Pad
for Ceramic Cooktops, rub the residue area, applying
pressure as needed.
4. If any residue remains, repeat the steps listed above
as needed.
5. For additional protection, after all residue has been
removed, polish the entire surface with CERAMA
BRYTE
®
Ceramic Cooktop Cleaner and a paper towel.
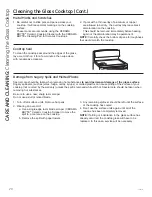
Heavy, Burned-On Residue
1. Allow the cooktop to cool.
2. Use a single-edge razor blade scraper at approximately
a 45° angle against the glass surface and scrape the
soil. It will be necessary to apply pressure to the razor
scraper in order to remove the residue.
3. After scraping with the razor scraper, spread a few drops
of CERAMA BRYTE
®
Ceramic Cooktop Cleaner on the
entire burned residue area. Use the CERAMA BRYTE
®
Cleaning Pad to remove any remaining residue.
4. For additional protection, after all residue has been
removed, polish the entire surface with CERAMA
BRYTE
®
Ceramic Cooktop Cleaner and a paper towel.
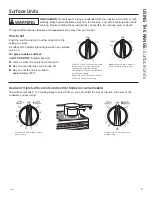
Clean your cooktop after each
spill. Use CERAMA BRYTE
®
Ceramic Cooktop Cleaner.
The CERAMA BRYTE
®
Ceramic Cooktop Scraper and all
recommended supplies are available through our Parts Center.
See instructions under “To Order Parts” section on next page.
NOTE:
Do not use a dull or nicked blade.
Summary of Contents for JS630
Page 23: ...49 80693 23 Notes...
Page 24: ...24 49 80693 Notes...