GE JS630 Owner'S Manual Download Page 14

14

49-80693

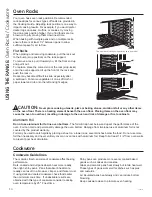
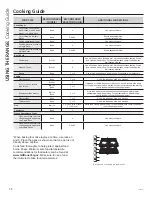
Your oven has seven rack positions. Recommended 
rack positions for various types of foods are provided in 
the Cooking Guide. Adjusting rack position is one way to 
impact cooking results. For example, if you would prefer 
darker tops on cakes, muffins, or cookies, try moving 
food one rack position higher. If you find foods are too 
brown on top try moving them down next time.
When baking with multiple pans and on multiple racks, 
ensure there is at least 1½" between pans to allow 
sufficient space for air to flow.
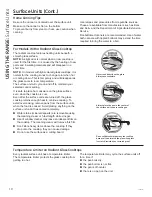
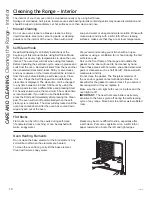
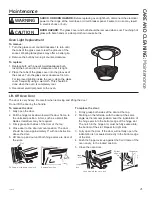
Flat Racks

When placing and removing cookware, pull the rack out 
to the bump (stop position) on the rack support.
To remove a rack, pull it toward you, tilt the front end up 
and pull it out.
To replace, place the curved end of the rack (stop-locks) 
onto the oven supports, tilt up the front of the rack and 
push the rack in.
Racks may become difficult to slide, especially after 
a self-clean. Put some vegetable oil on a soft cloth or 
paper towel and rub onto the left and right edges.

CAUTION:


Never place cooking utensils, pizza or baking stones, aluminum foil or any other items 

on the oven floor. There is a heating element beneath the oven floor. Placing items on the oven floor may 
cause the oven to overheat, resulting in damage to the oven and risk of damage or fire to cabinets.

Aluminum Foil

 Do not use aluminum foil to line oven bottoms. 

The foil will trap heat below and upset the performance of the 

oven. Foil can melt and permanently damage the oven bottom. Damage from improper use of aluminum foil is not 
covered by the product warranty.
Foil may be used to catch spills by placing a sheet on a lower rack, several inches below the food. Do not use more 
foil than necessary and never entirely cover an oven rack with aluminum foil. Keep foil at least 1-1/2” from oven walls 
to prevent poor heat circulation.

Cookware

Cookware Guidelines

The material, finish, and size of cookware affect baking 
performance.  
Dark, coated and dull pans absorb heat more readily 
than light, shiny pans.  Pans that absorb heat more 
readily can result in a browner, crisper, and thicker crust.  
If using dark and coated cookware check food earlier 
than minimum cook time.  If undesirable results are 
obtained with this type of cookware consider reducing 
oven temperature by 25º F next time.  

Shiny pans can produce more evenly cooked baked 
goods such as cakes and cookies.  
Glass and ceramic pans heat slowly but retain heat well.  
These types of pans work well for dishes such as pies 
and custards.
Air insulated pans heat slowly and can reduce bottom 
browning.  
Keep cookware clean to promote even heating.  

Oven Racks

USING THE RANGE:

 O

ven Racks / Cook

w

ar

e

The number of rack positions may vary by model.

Summary of Contents for JS630

Page 1: ...r Website at GEAppliances com Para consultar una version en espa ol de este manual de instrucciones visite nuestro sitio de internet GEAppliances com Owner s Manual Ranges Electric Slide In and Drop I...

Page 2: ...odels the storage drawer or kick panel can be removed for easy inspection If visual inspection is not possible slide the range forward confirm the anti tip bracket is securely attached to the floor or...

Page 3: ...ce units areas nearby the surface units or any interior area of the oven allow sufficient time for cooling first Other surfaces of the appliance may become hot enough to cause burns Potentially hot su...

Page 4: ...fire that may spread to surrounding cabinets Use a deep fat thermometer whenever possible to monitor oil temperature To avoid oil spillover and fire use a minimum amount of oil when shallow pan fryin...

Page 5: ...rd OVEN SAFETY INSTRUCTIONS WARNING SAVE THESE INSTRUCTIONS SAFETY INFORMATION Use care when touching the cooktop The glass surface of the cooktop will retain heat after the controls have been turned...

Page 6: ...ly gray porcelain coated oven racks may be left in the oven Do not use self clean to clean other parts such as drip pans or bowls Before operating the self clean cycle wipe grease and food soils from...

Page 7: ...to provide required service EXCLUSION OF IMPLIED WARRANTIES Your sole and exclusive remedy is product repair as provided in this Limited Warranty Any implied warranties including the implied warrantie...

Page 8: ...uals order parts or even schedule service on line Accessories Looking For Something More GE offers a variety of accessories to improve your cooking and maintenance experiences To place an order visit...

Page 9: ...rfaces A HOT COOKTOP indicator light will come on when the unit is hot to the touch stay on even after the unit is turned off stay on until the unit is cooled to approximately 150 F Dual and Triple Su...

Page 10: ...ing of new parts and insulating materials and will disappear in a short time NOTE On models with light colored glass cooktops it is normal for the cooking zones to change color when hot or cooling dow...

Page 11: ...permanent damage to cooktop glass The enamel can melt and bond to the ceramic cooktop Glass ceramic not recommended Poor performance Will scratch the surface Stoneware not recommended Poor performance...

Page 12: ...imer countdown is complete To turn the timer off press the Timer pad 8 Delay Time Delays when the oven will turn on Use this to set a time when you want the oven to start Press the Delay Time pad and...

Page 13: ...oor is opened all sounds the control will not beep when a button is pressed Broil Cook Time Timer Clock and Delay Time functions Sabbath mode can only be used with Bake This feature conforms to the St...

Page 14: ...to the oven and risk of damage or fire to cabinets Aluminum Foil Do not use aluminum foil to line oven bottoms The foil will trap heat below and upset the performance of the oven Foil can melt and pe...

Page 15: ...nd the possibility of fats igniting For best performance center food below the broil heating element Broiling on rack position 7 is not recommended Try broiling foods that you would normally grill Adj...

Page 16: ...ated in sauce avoid Broil Hi modes Broil skin side down first Watch food closely when broiling For best performance when broiling center food below the broil heating element Broil Lo Bake 2 or 3 Bonel...

Page 17: ...rior or exterior of the oven Clean with a mild soap and water or vinegar and water solution Rinse with clean water and dry with a soft cloth When cleaning surfaces make sure that they are at room temp...

Page 18: ...ovens the maximum 5 hour clean time is recommended If you wish to use the default time press the Start pad immediately after pressing the Clean pad The oven will turn off automatically when the self...

Page 19: ...ool 2 Spread a few drops of CERAMA BRYTE Ceramic Cooktop Cleaner on the entire burned residue area 3 Using the included CERAMA BRYTE Cleaning Pad for Ceramic Cooktops rub the residue area applying pre...

Page 20: ...r melted plastics can cause pitting of the surface of your cooktop not covered by the warranty unless the spill is removed while still hot Special care should be taken when removing hot substances Be...

Page 21: ...ff Oven Door The door is very heavy Be careful when removing and lifting the door Do not lift the door by the handle To remove the door 1 Fully open the door 2 Pull the hinge locks down toward the doo...

Page 22: ...sh the drawer back until it stops 3 Lift the front of the drawer and push back until the stops clear the guides 4 Lower the front of the drawer and push back until it closes Maintenance Cont CARE AND...

Page 23: ...49 80693 23 Notes...

Page 24: ...24 49 80693 Notes...

Page 25: ...ood spillovers not cleaned before next use See the Cleaning the glass cooktop section Hot surface on a model with a light colored cooktop This is normal The surface may appear discolored when it is ho...

Page 26: ...f the metal heating and cooling during both the cooking and cleaning functions This is normal Why is my range making a clicking noise when using my oven Your range cycles the heating elements by turni...

Page 27: ...o cool for one hour Put the oven back into operation If the function code repeats Disconnect all power to the oven for at least 30 seconds and then reconnect power If the function error code repeats c...

Page 28: ...time or start time You forgot to enter a bake temperature or cleaning time Touch the BAKE pad and desired temperature or the SELF CLEAN pad and desired clean time Oven racks are difficult to slide Th...

Reviews: