background image

GEAppliances.com

IMPORTANT SAFETY NOTICE

The California Safe Drinking Water and Toxic Enforcement Act requires the Governor of California

to publish a list of substances known to the state to cause birth defects or other reproductive

harm, and requires businesses to warn customers of potential exposure to such substances.
Gas appliances can cause minor exposure to four of these substances, namely benzene, carbon

monoxide, formaldehyde and soot, caused primarily by the incomplete combustion of natural

gas or LP fuels. Properly adjusted burners, indicated by a bluish rather than a yellow flame, will

minimize incomplete combustion. Exposure to these substances can be minimized by venting

with an open window or using a ventilation fan or hood.
The fiberglass insulation in self-clean ovens gives off a very small amount of carbon monoxide

during the cleaning cycle. Exposure can be minimized by venting with an open window or using

a ventilation fan or hood.

3

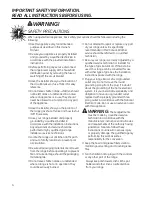
WARNING!

For your safety, the information in this manual must be followed to minimize the risk of fire or

explosion, electric shock, or to prevent property damage, personal injury, or loss of life.

To reduce the risk of tipping the range, the range must be

secured by a properly installed anti-tip bracket. See

installation instructions shipped with the bracket for

complete details before attempting to install.
To check if the bracket is installed and engaged properly,

remove the storage drawer or kick panel and look

underneath the range to see that the leveling leg is engaged

in the bracket. If the range is pulled from the wall for any

reason, always repeat this procedure to verify the range is

properly secured by the anti-tip bracket. 
If you did not receive an anti-tip bracket with your purchase,

call 1.800.626.8774 to receive one at no 

cost (in Canada, call 1.800.561.3344). For installation

instructions of the bracket, visit GEAppliances.com 

(in Canada, www.GEAppliances.ca).

ANTI-TIP DEVICE

Summary of Contents for JGSP28SENSS

Page 1: ...ight Bulbs 23 24 Oven Vent and Cooktop Air Inlet 26 Packaging Tape 22 Painted Surfaces 26 Racks 24 Stainless Steel Surfaces 26 Storage Drawer 24 Vent 26 Troubleshooting Tips 27 30 Accessories 33 Consu...

Page 2: ...gas supplier from a neighbor s phone Follow the gas supplier s instructions nIf you cannot reach your gas supplier call the fire department Installation and service must be performed by a qualified in...

Page 3: ...can be minimized by venting with an open window or using a ventilation fan or hood 3 WARNING For your safety the information in this manual must be followed to minimize the risk of fire or explosion...

Page 4: ...d the packaging material ignite n Do not leave children alone or unattended where a range is hot or in operation They could be seriously burned n Do not attempt to repair or replace any part of your r...

Page 5: ...range storage drawer or near a cooktop n Do not store or use combustible materials gasoline or other flammable vapors and liquids in the vicinity of this or any other appliance n Do not let cooking gr...

Page 6: ...rying stir together before heating or as fats melt slowly n Use a deep fat thermometer whenever possible to prevent overheating fat beyond the smoking point n Do not operate the burner without all bur...

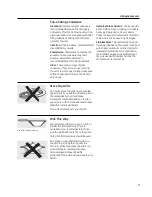
Page 7: ...ements n When using cooking or roasting bags in the oven follow the manufacturer s directions n Pulling out the rack to the stop lock is a convenience in lifting heavy foods It is also a precaution ag...

Page 8: ...rves to heat the handle In Case of Power Failure In case of a power failure you can light the gas surface burners on your range with a match Hold a lit match to the burner then push in and turn the co...

Page 9: ...is recommended because it heats quickly and evenly Most foods brown evenly in an aluminum skillet Use saucepans with tight fitting lids when cooking with minimum amounts of water Cast Iron If heated...

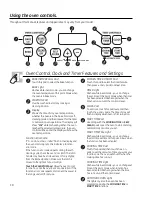
Page 10: ...e function error code repeats disconnect the power to the range and call for service KITCHEN TIMER ON OFF Pad Touch this pad to select the timer feature Then press and pads to adjust time TIMER Light...

Page 11: ...off and the BAKE TEMP RECALL pad light will light up Power Outage CAUTION Do not make any attempt to operate the electric ignition oven during an electrical power failure The oven or broiler cannot b...

Page 12: ...rack in the lowest position A The oven has 7 rack positions How to Set the Oven for Baking or Roasting Touch the BAKE pad Touch the or pads until the desired temperature is displayed Touch the START O...

Page 13: ...m the oven and fresh air to the oven burner be uninterrupted Avoid touching the vent openings or nearby surfaces during oven or broiler operation they may become hot n Handles of pots and pans on the...

Page 14: ...ces 1 2 thick D 8 5 precooked 1 thick D 8 8 Pork Chops 2 1 2 thick D 10 10 Slash fat Well Done 2 1 thick about 1 lb D 15 5 Using the oven Broiling Guide The size weight thickness starting temperature...

Page 15: ...one minute after you touch the CLOCK pad the display reverts to the original setting If this happens touch the CLOCK pad twice and reenter the time of day Touch the START ON pad until the time of day...

Page 16: ...h during timed cooking The latch is used for self cleaning only NOTE Foods that spoil easily such as milk eggs fish stuffings poultry and pork should not be allowed to sit for more than 1 hour before...

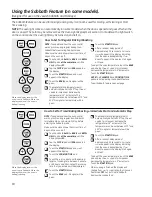
Page 17: ...but they are addressed separately in the following sections Special features of your oven control GEAppliances com 12 Hour Shut Off With this feature should you forget and leave the oven on the contro...

Page 18: ...t Step 7 To adjust the oven temperature touch the BAKE pad and tap the or pads to increase or decrease the temperature in 5 increments Touch the START ON pad When cooking is finished the display will...

Page 19: ...ld favorite recipes use margarine butter or stick spreads containing at least 70 vegetable oil GEAppliances com How to Exit the Sabbath Feature Touch the CLEAR OFF pad If the oven is cooking wait for...

Page 20: ...ve to the fumes given off during the self cleaning cycle of any range Move birds to another well ventilated room Wipe up heavy soil on the oven bottom How to Set the Oven for Cleaning Follow the direc...

Page 21: ...e oven Wipe it up with a damp cloth after the oven cools If white spots remain remove them with a soap filled scouring pad and rinse thoroughly with a vinegar and water mixture These deposits are usua...

Page 22: ...y The burner assemblies should be washed regularly and of course after spillovers Turn all controls off before removing burner parts The burner grates burner heads and burner caps can be removed for e...

Page 23: ...eceptacle Receptacle GEAppliances com Burner Grates Vent Grille and Vent Grille Cap Porcelain enamel burner grates vent grille and vent grille cap should be washed regularly and of course after spillo...

Page 24: ...replacing your oven light bulb disconnect the electrical power to the range at the main fuse or circuit breaker panel Be sure to let the light cover and bulb cool completely To remove the cover Twist...

Page 25: ...o not use oven cleaners cleaning powders or harsh abrasives on the outside of the door Lift Off Oven Door Cleaning the Oven Door The door is very heavy Be careful when removing and lifting the door Do...

Page 26: ...the touch pads after cleaning Removable Oven Floor To remove the oven floor for easier cleaning Remove the oven door using the instructions in the Lift Off Oven Door section Grasp oven floor at the re...

Page 27: ...e Replace the fuse or reset the circuit breaker blown or the circuit breaker tripped Burner parts not replaced See the Care and cleaning of the range section correctly Control Lockout feature If LOC O...

Page 28: ...element for 10 minutes voltage may be low Broil for the longest period of time recommended in the Broiling Guide Oven temperature Oven thermostat See the Adjust the oven thermostat Do it yourself too...

Page 29: ...ght on the SELF CLEAN pad goes off Wipe up the excess soil and reset the clean cycle Oven door will not Oven too hot Allow the oven to cool below locking temperature open after a clean cycle Oven not...

Page 30: ...e BROIL HI LO and BAKE pads must be touched at display to show SF not touched properly the same time and held for 3 seconds Power outage Power outage or surge Reset the clock If the oven was in use yo...

Page 31: ...31 OWNERSHIP REGISTRATION P O BOX 1780 MISSISSAUGA ONTARIO L4Y 4G1 FOR CANADIAN CONSUMERS ONLY Please place in envelope and mail to Veuillez mettre dans une enveloppe et envoyez...

Page 32: ...32...

Page 33: ...cton N B E1C 9M3 Broiler Pan Order Form Quantity ____________________ Part Number __________________________________________________ ____________________ ______________________________________________...

Page 34: ...ges This warranty gives you specific legal rights and you may also have other rights which vary from state to state To know what your legal rights are consult your local or state consumer affairs offi...

Page 35: ...Mabe will also provide free of charge all labor and in home original purchase service to replace the defective part GE Gas Range Warranty For customers in Canada Staple your receipt here Proof of the...

Page 36: ...anytime or call 800 626 2224 during normal business hours GE Consumer Home Services will still be there after your warranty expires In Canada call 1 888 261 2133 Parts and Accessories In the U S GEApp...

Reviews: