GE JGAS24 Use And Care & Installation Manual Download Page 21

Car

e and Cleaning

Removable Oven Bottom
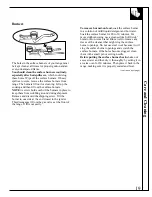
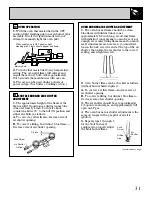
Broiler Drawer

The broiler pan is held in place by a wire broiler rack.
To open the broiler, gently lift up and pull forward on
the drop down broiler door. Pull the broiler pan
forward. It will reach a temporary stop position.
Continue to pull forward and the broiler pan will pull
out to expose the entire broiler grill surface. Remove
the broiler pan from the broiler rack by lifting up on
the front of the broiler pan so it will clear the wire
rack. Then pull forward slightly and use both hands to
lift the pan free of the rack. To return the pan to the
broiler rack, pull the wire rack out to the stop
position. Insert the pan into the recessed section of the
broiler rack. Slide the pan in place under the pan
retainers. Push the pan to the rear of the broiler
compartment. Close the broiler door.

(continued next page)

First remove the shelves from the oven. The oven
bottom lifts from the rear. Grasp each side of the oven
bottom and lift upward from the rear until the bottom
is clear—lift it to remove from the front.

NOTE: If the oven bottom is replaced incorrectly, 
it may warp and cause undesirable baking results.

21

The oven bottom has a porcelain enamel finish.
To make cleaning easier, protect the oven bottom
from excessive spillovers. This is particularly
important when baking a fruit pie or other foods with
high acid content. Hot fruit fillings or foods that are
acidic in content, such as milk, tomato or sauerkraut,
and sauces with vinegar or lemon juice, may cause
pitting and damage to the porcelain enamel surface.

To protect the oven bottom surface, place a piece of
aluminum foil slightly larger than the baking dish on
the shelf below to catch any boilovers. It should not
completely cover the shelf as this would cause uneven
heat in the oven. Aluminum foil should not be placed
on the oven bottom.

If a spillover does occur on the oven bottom, 
allow the oven to cool first. You can clean the bottom
with soap and water, a mild abrasive cleanser, soap-
filled abrasive pads or an oven cleaner following
package directions.

Summary of Contents for JGAS24

Page 1: ...ooking 8 9 Control Settings 8 Electric Ignition 8 9 Care and Cleaning 18 23 Broiler Drawer 21 Broiler Pan 22 Burner Assembly 18 20 Cooktop 18 Oven Bottom 21 23 Oven Door 22 Problem Solver 33 More ques...

Page 2: ...nge Before sending in this card please write these numbers here Model Number Serial Number Use these numbers in any correspondence or service calls concerning your range If you received a damaged rang...

Page 3: ...kitchen traffic path and out of drafty locations to prevent pilot outage on standing pilot models and poor air circulation Be sure all packing materials are removed from the range before operating it...

Page 4: ...g pork follow the directions exactly and always cook the meat to an internal temperature of at least 170 F This assures that in the remote possibility that trichina may be present in the meat it will...

Page 5: ...lt if left too close to the vent Do not leave any items on the cooktop The hot air from the vent may ignite flammable items and will increase pressure in closed containers which may cause them to burs...

Page 6: ...uminum foil anywhere in the oven except as described in this book Misuse could result in a fire hazard or damage to the range When using cooking or roasting bags in the oven follow the manufacturer s...

Page 7: ...p 18 8 OVEN TEMP Knob 11 9 Oven Shelf Supports 11 13 Shelf positions for cooking are 15 17 suggested in the Baking Roasting and Broiling pages 10 Oven Shelves with Stop Locks 11 15 20 11 Broiler Pan 1...

Page 8: ...s need adjusting turn the adjusting screw located on the pilot filter 5 Lower the cooktop Your surface burners are now ready for use 6 Observe lighted burners Compare the flames to pictures in the Pro...

Page 9: ...the handle Top of Range Cookware Aluminum Medium weight cookware is recommended because it heats quickly and evenly Most foods brown evenly in an aluminum skillet Use saucepans with tight fitting lid...

Page 10: ...rner in use when an electrical power failure occurs will continue to operate normally Your oven may be used during an electrical power outage by carefully following the steps below To light the oven p...

Page 11: ...rolled by an OVEN TEMP knob It will normally take 30 90 seconds before the flame comes on After the oven reaches the selected temperature the oven burner cycles off completely then on with a full flam...

Page 12: ...become hot during baking and broiling Do not touch them Do not leave plastic items on the cooktop they may melt if left too close to the vent Handles of pots and pans on the cooktop may become hot if...

Page 13: ...set the oven at the correct temperature selecting a higher temperature does not shorten the preheat time Preheating is necessary for good results when baking cakes cookies pastry and breads For most c...

Page 14: ...en baking results and poorly shaped products A cake baked in a pan larger than the recipe recommends will usually be crisper thinner and drier than it should be If baked in a pan smaller than recommen...

Page 15: ...heating is necessary 2 Check the weight of the meat Place it fat side up or for poultry breast side up on a roasting rack in a shallow pan The melting fat will baste the meat Select a pan as close to...

Page 16: ...he broiler pan in the broiler compartment A bottom of broiler compartment or second position Most broiling should be done in position A 2 Preheat the broiler for best results 3 If the meat has fat or...

Page 17: ...tes per side for cut up split lengthwise chicken Brush each side with melted butter Broil skin side down first Fish 1 lb fillets B 5 5 Handle and turn very carefully 1 4 to 1 2 inch thick Brush with l...

Page 18: ...he range 4 Slide the range forward to free the range foot from the Anti Tip bracket See the Installation Instructions for the location of the bracket 5 Reverse these steps to re install the range If t...

Page 19: ...isengages it from the gas valves at the front of the range It lifts out easily To remove burned on food soak the surface burner in a solution of mild liquid detergent and hot water Soak the surface bu...

Page 20: ...ed period of time without cookware on the grate The finish on the grate may chip without cookware to absorb the heat Control Panel and Knobs It s a good idea to wipe the control panel after each use o...

Page 21: ...rasp each side of the oven bottom and lift upward from the rear until the bottom is clear lift it to remove from the front NOTE If the oven bottom is replaced incorrectly it may warp and cause undesir...

Page 22: ...o not allow food spills with a high sugar or acid content such as milk tomatoes sauerkraut fruit juices or pie filling to remain on the surface They may cause a dull spot even after cleaning If necess...

Page 23: ...d ammonia may make the cleaning job easier Place 1 2 cup in a shallow glass or pottery container in a cold oven overnight The ammonia fumes will help loosen the burned on grease and food If necessary...

Page 24: ...is completed CONSUMER Keep this Use and Care Guide and the Installation Instructions for future use This appliance must be properly grounded WARNING Improper installation adjustment alteration service...

Page 25: ...ciation according to CAN CGA 1 1 latest edition See Electrical Connection Information Before installing the range in an area covered with linoleum or any other synthetic floor covering make sure the f...

Page 26: ...ace the backguard on top of the end panels at the rear of the range 3 Connect the disconnect plug for power to the backguard from the range 4 Insert the machine screws through the lower inside flange...

Page 27: ...d holes 4 Using the wrench back out the four range legs at least two turns Level the range See the Flooring Leveling section of this book for leveling information 5 Slide the range into place ANTI TIP...

Page 28: ...st not be removed To convert the regulator from one gas to another refer to the following illustration that applies For a Harper Wyman regulator remove converter cap by inserting a coin into slot in t...

Page 29: ...NOT be connected directly to pipe threads 2 The appliance connector must be installed by using the proper flare union adapters with the connector Cutoff valve appliance connector and adapters are not...

Page 30: ...match adjacent to the top burner to be used and turn valve knob to LITE USE EXTREME CAUTION 8 OVEN PILOT ADJUSTMENT On pilot models remove thermostat knob Check position of pilot gas selector to make...

Page 31: ...burner if equipped to properly adjust the broil burner flame SURFACE BURNER AIR SHUTTER ADJUSTMENT 1 The approximate height of the flame at the high or full ON position is a distinct inner blue cone o...

Page 32: ...1984 Manufactured Home Sites Communities and Set Ups ANSI A225 1 latest edition or with local codes In Canada mobile home installation must be in accordance with the current CAN CSA Z240 MH Mobile Ho...

Page 33: ...LP gas check all steps in the Installation Instructions LARGE OR YELLOW OVEN DOES NOT Make sure thermostat capillary bulb located in upper portion of oven is in COOK PROPERLY correct position not touc...

Page 34: ...34 NOTES...

Page 35: ...ur call and your question will be answered promptly and courteously And you can call any time GE Answer Center service is open 24 hours a day 7 days a week Service Contracts 800 626 2224 You can have...

Page 36: ...r limitation of incidental or consequential damages so the above limitation or exclusion may not apply to you This warranty gives you specific legal rights and you may also have other rights which var...

Reviews: