background image

Consumer Support

Tr

oubleshooting T

ips

Operating Instructions

Safety Instructions

Read and follow the specific
precautions in the 

Precautions

to Avoid Possible Exposure to
Excessive Microwave Energy

section above.

This appliance must be
grounded. Connect only 
to a properly grounded
outlet. See the 

Grounding

Instructions

section on page 8.

Install or locate this
appliance only in accordance
with the provided Installation
Instructions.

Be certain to place the front
surface of the door three
inches or more back from 
the countertop edge to avoid
accidental tipping of the
appliance in normal usage.

Do Not Attempt

to operate 

this oven with the door open
since open-door operation
can result in harmful
exposure to microwave
energy. It is important not 
to defeat or tamper with the
safety interlocks.

Do Not Place 

any object

between the oven front face
and the door or allow soil
or cleaner residue to
accumulate on sealing
surfaces.

Do Not Operate 

the oven if it

is damaged. It is particularly
important that the oven
door close properly and that
there is no damage to the:

door (bent),

hinges and latches 
(broken or loosened),

door seals and sealing
surfaces.

The Oven Should Not 

be

adjusted or repaired by
anyone except properly
qualified service personnel.

PRECAUTIONS TO AVOID
POSSIBLE EXPOSURE TO
EXCESSIVE MICROWAVE ENERGY

IMPORTANT SAFETY INFORMATION.
READ ALL INSTRUCTIONS BEFORE USING.

2

For your safety, the information in this manual must be
followed to minimize the risk of fire or explosion, electric
shock, or to prevent property damage, personal injury, or 
loss of life.

WARNING! 

When using electrical appliances, basic safety
precautions should be followed, including the following:

SAFETY PRECAUTIONS

Summary of Contents for JEB1860DM

Page 1: ...10 11 Microwave Terms 27 Optional Accessories 27 Other Features 24 26 Sensor Features 20 23 Time Features 13 18 Troubleshooting Tips 30 31 Things That Are Normal With Your Microwave Oven 32 Consumer S...

Page 2: ...t to defeat or tamper with the safety interlocks Do Not Place any object between the oven front face and the door or allow soil or cleaner residue to accumulate on sealing surfaces Do Not Operate the...

Page 3: ...Keep power cord away from heated surfaces Do not immerse power cord or plug in water Do not let power cord hang over edge of table or counter To reduce the risk of fire in the oven cavity Do not over...

Page 4: ...ve oven Such use of the microwave oven could result in injury Do not boil eggs in a microwave oven Pressure will build up inside egg yolk and will cause it to burst possibly resulting in injury Operat...

Page 5: ...e all infant food is thoroughly cooked Stir food to distribute the heat evenly Be careful to prevent scalding when warming formula The container may feel cooler than the formula really is Always test...

Page 6: ...per products Recycled paper towels napkins and waxed paper can contain metal flecks which may cause arcing or ignite Paper products containing nylon or nylon filaments should be avoided as they may al...

Page 7: ...o the box When using foil in the microwave oven keep the foil at least 1 inch away from the sides of the oven Plastic cookware Plastic cookware designed for microwave cooking is very useful but should...

Page 8: ...to have it replaced with a properly grounded 3 prong wall outlet Do not under any circumstances cut or remove the third ground prong from the power cord We do not recommend using an extension cord wit...

Page 9: ...at as the electrical rating of the appliance The extension cord must be a grounding type 3 wire cord and it must be plugged into a 3 slot outlet The extension cord should be arranged so that it will n...

Page 10: ...Latches Window with Metal Shield Screen allows cooking to be viewed while keeping microwaves confined in the oven Convenience Guide Touch Control Panel and Display Door Latch Release Press latch relea...

Page 11: ...dd 30 Sec Starts immediately Power Level Power level 1 10 Sensor Features and Auto Feature Press Enter Option Popcorn Starts immediately more less time Beverage Starts immediately Reheat Starts immedi...

Page 12: ...turning over A lower setting will cook more evenly and need less stirring or rotating of the food Some foods may have better flavor texture or appearance if one of the lower settings is used Use a lo...

Page 13: ...the food Close the door and press START to resume cooking Time Cook II Lets you change power levels automatically during cooking Here s how to do it Press Time Cook Enter the first cook time Change th...

Page 14: ...2 lbs 1 2 cup water fresh spears 1 bunch 7 to 11 min In 2 qt oblong glass baking dish 11 4 to 11 2 lbs place 1 4 cup water frozen 10 oz package 4 to 7 min In 1 qt casserole chopped frozen spears 10 o...

Page 15: ...In 1 qt casserole place 2 tablespoons water Potatoes fresh cubed 4 potatoes 9 to 12 min Peel and cut into 1 inch cubes white 6 to 8 oz each Place in 2 qt casserole with 1 2 cup water Stir after half o...

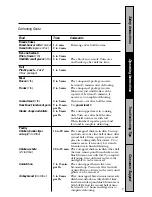
Page 16: ...pieces of foil A dull thumping noise may be heard during defrosting This is normal when oven is not operating at High power Defrosting Tips Foods frozen in paper or plastic can be defrosted in the pac...

Page 17: ...stand to complete defrosting Poultry Chicken broiler fryer 14 to 20 min Place wrapped chicken in dish Unwrap cut up 21 2 to 3 lbs and turn over after first half of time After second half of time separ...

Page 18: ...the 2 pad for 2 minutes of cooking time The power level can be changed as time is counting down Press Power Level and enter 1 10 18 Add 30 Seconds You can use this feature two ways It will add 30 sec...

Page 19: ...e Defrost is explained in the About the time features section There is a handy guide located on the inside front of the oven Remove meat from package and place on microwave safe dish Twice during defr...

Page 20: ...ainers and covers are essential for best sensor cooking Always use microwave safe containers and cover them with lids or vented plastic wrap Never use tight sealing plastic containers they can prevent...

Page 21: ...r an extra 20 seconds Press 9 again to add another 10 seconds total 30 seconds additional time To subtract time After pressing Popcorn press 1 immediately after the oven starts for 20 seconds less coo...

Page 22: ...areas may be extremely hot If food is not hot enough after the countdown use Time Cook for additional reheating time Some Foods Not Recommended for Use With Reheat It is best to use Time Cook for the...

Page 23: ...cooking time for all foods to suit your personal taste To reduce time by 10 Press 1 within 30 seconds after pressing the food pad To add 10 to cooking time Press 9 within 30 seconds after pressing the...

Page 24: ...CLEAR OFF Cooking Complete Reminder Scroll Speed The scroll speed of the display can be changed Press and hold the AM PM pad about 3 seconds to bring up the display Select 1 5 for slow to fast scroll...

Page 25: ...feature can be used like an alarm clock and can be used at any time even when the oven is operating The Reminder time can be set up to 24 hours later Press Reminder Enter the time you want the oven to...

Page 26: ...ress and hold CLEAR OFF for about three seconds When the control panel is locked LOCKED will appear in the display Sound Level The beeper sound level can be adjusted Press Beeper Volume Choose 0 3 for...

Page 27: ...k before larger parts Standing Time When you cook with regular ovens foods such as roasts or cakes are allowed to stand to finish cooking or to set Standing time is especially important in microwave c...

Page 28: ...rp utensils on oven walls To clean the surface of the door and the surface of the oven that come together upon closing use only mild nonabrasive soaps or detergents using a sponge or soft cloth Rinse...

Page 29: ...also scratch the control panel Door Surface It s important to keep the area clean where the door seals against the microwave Use only mild non abrasive detergents applied with a clean sponge or soft c...

Page 30: ...rted Make sure the 3 prong into wall outlet plug on the oven is fully inserted into wall outlet Control panel lighted yet Door not securely closed Open the door and close oven will not start securely...

Page 31: ...will unlock the control be displayed SENSOR ERROR During Popcorn Reheat Close the door press appears in display Beverage Chicken Fish CLEAR OFF and begin again Potato or Vegetable program the door wa...

Page 32: ...nce might be noticed while using the microwave Similar to the interference caused by other small appliances it does not indicate a problem with the microwave Plug the microwave into a different electr...

Page 33: ...s asked It s that simple Protect your refrigerator dishwasher washer and dryer range TV VCR and much more any brand Plus there s no extra charge for emergency service and low monthly financing is avai...

Page 34: ...erial Number Important If you did not get a registration card with your product detach and return the form below to ensure that your product is registered or register online at ge com First Name Apt C...

Page 35: ...you specific legal rights and you may also have other rights which vary from state to state To know what your legal rights are consult your local or state consumer affairs office or your state s Attor...

Page 36: ...hat are available while your warranty is still in effect You can purchase it on line anytime or call 800 626 2224 during normal business hours GE Consumer Home Services will still be there after your...

Reviews: