GEK-49849
be wi thi n the l im i t s 1 . 88 t o 2 . 1 2 amp s . I f the di sk moves at the l ower l im i t, c heck
that movement i s not over one-hal f i nch, meas ured a l ong the per i phery of the d i sk .
Thi s i s c a l l e d a c ompens at i on check . I f the current fal l s out s i de the 1 . 88 to 2 . 1 2 amp
l imi ts, the fol l owi ng steps shou l d be tak e n :
reset the control spr i n g unt i l
c ompens at i on at No . 1 0 t i me d i al i s wi thi n l im i ts . Then restore p i ck u p by adjust i ng
the res i stor . Recheck compensat i on after the res i stor adju s tment .
D I R ECT IONAL UNIT
The l ower jewel bear i ng s hou l d be screwed al l the way i n unt i l i ts head engages
the end of the threaded core support . The upper bear i ng shou l d be adju sted to al l ow
about 1 /64 i nch end p l ay i n the shaft .
To check the c l ear ance between the i ron core and the i n s i de of the r otor cup,
press down on the contact arm near the s haft, thus depres s i ng the spri ng-mounted jewe l
u nt i l the cup str i kes the i ron . The shaft shou l d move about 1/16 i nch.
and Stator
S hou l d i t be necessary to remove the cup-type rotor from the d i r ect i on a l u n i t, the
fol l owi ng procedure shou l d be fol l owed :
A l l l eads t o the u n i t shou l d f i rst be di sconnected and tagged f o r i dent i fi cati on
i n reconnect i ng . The u n i t can then be removed from the crad l e wi th i ts mou nt i ng p l ate
st i l l attached.
The upper of the three f l at-head screws hol d i ng the u n i t to the p l ate shou l d now
be remove d . O n s ome model s, i t may be neces sary to remove a res i stor o r capac i tor t o
expose thi s screw . The four corner screws c l amp i ng the u n i t together, shou l d next be
removed, and the ent i re top structure l i fted off .
Thi s g i ves acces s to the cup
assembl y and exposes the stator assembl y, whi ch shou l d be protected to keep i t free
from dust and metal l i c part i c l es u nt i l the u n i t i s reas sembl e d .
To remove the shaft and r otor from the contact head assembly, the spri ng c l i p at
the top of the shaft must be p u l l ed out and the c l utch adju st i ng screw t aken out of the
s i de of the mol ded contact arm . The sh aft and cup can n ow be pu l l e d out of the mol di ng .
The rotor must be han d l ed very c arefu l l y whi l e i t i s out of the u n i t .
Contact
To f ac i l i tate adjustment of contacts, remove the two red jumper l eads from
termi nal s 18, 1 9 an d 20 and use a neon i nd i cati ng l amp i n ser i es w i th an AC vol tage
supp l y across term i n al s 18 and 1 9 and 1 9 and 20 to s i g n i fy al l contact c l osures . Refer
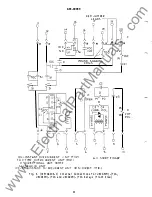
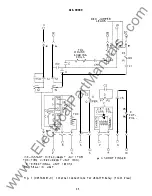
to F i g . 19 and F i g . 18 for i dent i f i c at i on of barrel and l ow gradi ent contact parts
respect i ve l y, and proceed as fol l ows:
Loosen s l i ghtl y the screw whi ch secures the barrel back stop {l ocated at the r i ght
front corner of the un i t ) to i ts support. Thi s screw shou l d be only l oose enough to
a l l ow the barrel to rotate i n i ts s l eeve but not s o l oose as to al l ow the s l eeve to move
w i thi n the support .
Unwi n d the barrel back stop so that the movi ng contact arm i s
perm i tted to swi ng freel y . Adju st the ten s i on of each l ow grad i en t contact brush s o
2 5
www
. ElectricalPartManuals
. com


