background image

Installation Instructions

SPECIFICATIONS SUBJECT TO CHANGE WITHOUT 

NOTICE

STEP 1  REMOVE POWER FROM 

DISHWASHER

• Unplug the dishwasher.
• Feed power cord back into its storage location.

STEP 2 REMOVE UNICOUPLE FROM 
FAUCET

‡7XUQRႇKRWZDWHU

• Relieve water pressure from the unicouple assembly 

before disconnecting it from the faucet by depressing the 
red pressure relief button on the unicouple.

• Depress the locking collar and remove the unicouple from 

the faucet.

• Drain excess water from the unicouple by holding it below 

sink level and allowing excess water to run from the 
hoses into a pan or similar container to catch the water.

• Feed the unicouple and hoses back into their storage 

pocket.

STEP 3  STORE DISHWASHER

• Close the dishwasher door.
• Roll the dishwasher into its storage location.
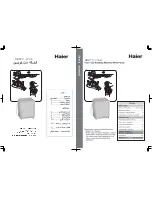
Depress collar to
release unicouple 
from faucet

Depress red button to
release water pressure

 
•  If the sink is 34" or higher from the floor, the excess 

water in unicouple hoses cannot be drained directly into 
the sink. It will be necessary to drain excess water from 
hoses into a bowl or suitable container that is held outside 
and lower than the sink.

HOW TO DISCONNECT DISHWASHER

Appliance Park

Louisville, KY 40225

STEP 3  CONNECT THE UNICOUPLE  

TO THE FAUCET

• Run garbage disposer, if you have one, to clean out the 

disposer and thus allow water to drain from the sink 
through the disposer and down the drain.

• Run hot water faucet to purge cold water from the hot 

water line. The hot water must be between 120°F and 
150°F for best wash performance.

• Roll the dishwasher to a position just in front of the sink.
• Pull the unicouple and its hoses completely out from 

storage compartment at rear of the dishwasher.

• Attach the unicouple to the 

faucet adapter following 
the three steps below: 
– Depress the locking 
collar at the top of the 
unicouple.

  – Place the unicouple 

completely over the faucet 
adapter.

  – Release the locking collar. The unicouple should now be  

   locked onto the faucet adapter.

• Turn on the hot water faucet and check for leaks. If a leak 

is detected, disconnect the unicouple, and refer to Step 4.

NOTE:

 The unicouple’s small hose carries water from the 

faucet to the dishwasher. The large hose carries water from  
the dishwasher to the sink. Orient the faucet with the 
unicouple attached so water from the unicouple will run into 
the sink drain.

STEP 5 PRETEST CHECK LIST

Review this list after connecting your dishwasher to avoid 
charges for a service call that is not covered by your 
warranty.

„

  Open the door and remove all foam and paper 

packaging.

„

  Locate the Owner’s Manual.

„

  Read the Owner’s Manual to familiarize yourself with the 

operation of the dishwasher.

„

  Remove the protective film, if present, from the control 

panel, door and cabinet. 

„

  Add 2 quarts of water to the bottom of the dishwasher to 

lubricate the pump seal.

„

  Plug power cord into outlet.

„

  Close and latch dishwasher door.

„

  Start dishwasher.

STEP 4 FAUCET ADAPTER LEAK

Skip this step if no unicouple leak was observed.

If a unicouple leak was observed in Step 3, take whatever 
actions are necessary to repair the leak. This may be as 
simple as tightening the faucet adapter. Or, it may require 
the services of a plumber if water is leaking from the 
interface between the moveable faucet arm and the fixed 
part of the faucet fastened to the sink.

Collar

Summary of Contents for GPT145 Series

Page 1: ...ARNINGS and CAUTIONS shown throughout these instructions While performing installations described in this booklet gloves safety glasses or goggles should be worn IMPORTANT Observe all governing codes and ordinances Note to Installer Be sure to leave these instructions for the consumer s and local inspector s use Note to Consumer Keep these instructions with your Owner s Manual for future reference...

Page 2: ...LDQ RU VHUYLFH UHSUHVHQWDWLYH LI RX DUH in doubt that the appliance is properly grounded Do not modify the plug provided with the appliance if it will not W WKH RXWOHW KDYH D SURSHU RXWOHW LQVWDOOHG E D TXDOL HG technician WARNING ELECTRICAL REQUIREMENTS Be sure that the electrical connection and wire size are adequate and in conformance with the National Electric Code ANSI NFPA 70 latest edition ...

Page 3: ... faucet adapter A sink spray attachment hose can burst if it is installed on the same faucet as your dishwasher We suggest that you disconnect the sink spray attachment if your sink has one and place a cap over the opening CAUTION Move the dishwasher close to its intended use and storage location Place two shipping corner posts or other protective material behind it Carefully lay the dishwasher ov...

Page 4: ...asher to a position just in front of the sink Pull the unicouple and its hoses completely out from storage compartment at rear of the dishwasher Attach the unicouple to the faucet adapter following the three steps below Depress the locking collar at the top of the unicouple Place the unicouple completely over the faucet adapter Release the locking collar The unicouple should now be locked onto the...

Page 5: ...tes de sécurité IMPORTANT Observez tous les codes et ordonnances en vigueur Note à l installateur Veuillez laisser les présentes directives au consommateur pour l inspecteur local Note au consommateur Veuillez conserver les présentes directives avec votre Manuel d utilisation pour consultation ultérieure Compétences requises L installation de ce lave vaisselle exige des compétences de base en méca...

Page 6: ...PRGL H SDV OD FKH fournie avec l appareil si celle ci n est pas adaptée à la prise murale existante faites installer une prise DSSURSULpH SDU XQ WHFKQLFLHQ TXDOL p AVERTISSEMENT ALIMENTATION ÉLECTRIQUE Assurez vous que le branchement électrique et le calibre du fil sont adéquats et conformes avec la version récente de la norme ANSI NFPA 70 le Code national de l électricité tous les règlements et t...

Page 7: ...lée sur le même robinet que votre lave vaisselle Nous recommandons de débrancher la douchette et de mettre un capuchon sur l ouverture ATTENTION Risque lié poids excessif Deux personnes ou plus sont requises pour déplacer et installer le lave vaisselle L omission de prendre cette précaution peut causer une blessure au dos ou à une autre partie du corps AVERTISSEMENT Déplacez le lave vaisselle à pr...

Page 8: ...isselle Si elle présente retirez la pellicule protectrice sur le panneau de commande la porte et la carrosserie Ajoutez deux litres d eau au fond du lave vaisselle pour lubrifier le joint de la pompe Branchez le cordon électrique dans une prise ermez la porte du lave vaisselle Démarrez le lave vaisselle ÉTAPE 4 FUITE DE L ADAPTATEUR DU ROBINET Ignorez cette étape si le raccord unicouple ne fuit pa...

Page 9: ... códigos y ordenanzas gubernamentales Nota para el Instalador Asegúrese de entregar estas instrucciones al consumidor y al inspector local Nota para el Consumidor Guarde estas instrucciones con su Manual del Propietario para referencia futura Nivel de habilidad La instalación de este lavavajillas requiere un nivel básico de habilidades mecánicas eléctricas y de plomería La correcta instalación del...

Page 10: ...HOHFWULFLVWD FDOL FDGR o representante de servicio técnico si tiene dudas sobre OD FRUUHFWD FRQH LyQ D WLHUUD GHO DSDUDWR 1R PRGL TXH el enchufe provisto con este aparato si no entra en el WRPDFRUULHQWH VROLFLWH D XQ HOHFWULFLVWD FDOL FDGR TXH instale un tomacorriente adecuado ADVERTENCIA REQUISITOS ELÉCTRICOS Asegúrese de que la conexión eléctrica y el tamaño del cable sean los adecuados y que cu...

Page 11: ...s installed on the same faucet as your dishwasher We suggest that you disconnect the sink spray attachment if your sink has one and place a cap over the opening PRECAUCIÓN ADVERTENCIA Riesgo de Peso Excesivo Cuente con la ayuda de dos o más personas para mover e instalar el lavavajillas Si esto no se cumple se podrán producir lesiones en la espalda u otras heridas Coloque el lavavajillas en una po...

Page 12: ...Gire el lavavajillas hasta la posición que se encuentra justo frente al lavabo Empuje la manguera de acople rápido y las demás mangueras completamente hacia afuera del compartimiento de almacenamiento en la parte trasera del lavavajillas Adhiera la manguera de acople rápido al adaptador del grifo VLJXLHQGR ORV WUHV SDVRV TXH JXUDQ D continuación Presione el tensor excéntrico en la parte superior d...

Reviews: