background image

4

Safety Instructions

Operating 

Instructions


Care and Cleaning

Installation Instructions

Troubleshooting Tips

Consumer Support

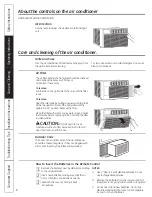
About the controls on the air conditioner

Controls


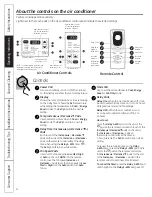
Power Pad

Turns air conditioner on and off . When turned 

on, the display will show the room temperature .


Display

Shows the room temperature or time remaining 

on the Delay timer . Shows the

 Set 

temperature 

while setting the temperature in 

Cool 

or 

Energy 

Saver 

modes . The

 Set

 light will turn on while 

setting .


Temp Increase 


/Decrease 


Pads

Use to set temperature when in

 Cool 

or 

Energy 

Saver

 mode . The 

Set

 light will turn on while 

setting .


Delay Timer Increase

 (+) /Decrease 

(–) 

Pads

Each touch of the 

Increase


 / 

Decrease 


pads on the unit or the

 Increase 

+


Decrease 


pads on the remote control will set the delay 

time when using the 

Delay 1–24hr


timer (

) . 

The 

Set

 light will turn on while setting .


Fan Speed Pads

Use to set the fan speed to

 Low, Med, High 

or 

Auto

 on the unit . 

NOTE:

 On the remote 

control, use the fan speed

 Increase 

Decrease 


pads to set the fan speeds to 

Low, 

Med 

or 

High

 . Use the 

Auto

 pad to turn 

Auto


fan on .


Mode Pad

Use to set the air conditioner to 

Cool, Energy 

Saver

 or 

Fan Only

 mode .


Delay Pads

Delay ON—

When the air conditioner is off, it can 

be set to automatically come on in 1 to 24 hours 

at its previous mode and fan settings . 

Delay OFF—

When the air conditioner is on, 

it can be set to automatically turn off in 1 to  

24 hours . 

How to set:

Press the 

Delay 1–24hr

 pad on the unit or the

pad on the remote control . Each touch of the 

Increase


Decrease

pads on the unit or 

the 

Increase 

Decrease 


pads on 

the remote control will set the timer in  

1-hour intervals . The 

Set

 light will turn on while 

setting .
To review the remaining time on the 

Delay 

1–24hr

 timer, press the 

Delay 1–24hr

 pad on the 

unit or the

pad on the remote control . Use 

the 

Increase


 / 

Decrease


 pads on the unit 

or the 

Increase 

+


Decrease 


pads on the 

remote control to set a new time if desired .

To cancel the timer,

 press the 

Delay 1–24hr 

pad 

until the light on the

 Delay 1–24hr

 pad goes off .

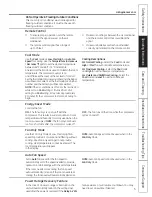
Features and appearance will vary.
Lights next to the touch pads on the air conditioner control panel indicate the selected settings.

Fan

Fan

     Delay 1–24hr

  Delay timer 

Decrease
Mode select

Fan speed  

Decrease
Temperature  

set Increase 

and Decrease

Remote Control

  Delay timer  

Increase 
  Auto Fan on

Fan speed  

Increase
 Unit power  

on/off

NOTE: The display always shows the room 

temperature except when setting the Set 

temperature or the Delay timer.

Air Conditioner Controls

Light indicates the 

delay timer is set.

Light indicates the unit 

is in the temperature or 

delay time Set mode.

Light indicates the unit 

is in the temperature or 

delay time Set mode.

Light indicates the 

delay timer is set.

(on some models)

(on some models)

Summary of Contents for ENERGY STAR AED06LN

Page 1: ...Instructions Write the model and serial numbers here Model __________________________ Serial __________________________ Find these numbers on a label on the side of the air conditioner Air Conditioner...

Page 2: ...contractors and technicians to use tools equipment and safety standards approved for use with this refrigerant DO NOT use equipment certified for R22 refrigerant only SAFETY PRECAUTIONS Do not under...

Page 3: ...n cord However if you must use an extension cord it is absolutely necessary that it be a UL listed 14 gauge 3 wire grounding type appliance extension cord having a grounding type plug and outlet and t...

Page 4: ...s previous mode and fan settings Delay OFF When the air conditioner is on it can be set to automatically turn off in 1 to 24 hours How to set Press the Delay 1 24hr pad on the unit or the pad on the r...

Page 5: ...wer set temperature For Quieter and Nighttime Cooling Select the Cool mode and Low fan with a middle set temperature Fan Only Mode Use the Fan Only Mode at Low Med or High fan speed to provide air cir...

Page 6: ...ttach the cover by sliding it back into position NOTES n Use 2 AAA 1 5 volt alkaline batteries Do not use rechargeable batteries n Remove the batteries from the remote control if the system is not goi...

Page 7: ...it replaced with a properly grounded 3 prong wall outlet Some models require 230 208 volt AC protected with a time delay fuse or circuit breaker These models should be installed on their own single b...

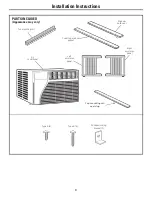
Page 8: ...s Right accordion panel Type A 4 Type B 6 Foam top window gasket Left accordion panel Window sash seal Top mounting rail Air conditioner Window locking bracket 1 PARTS INCLUDED Appearance may vary Top...

Page 9: ...ill 1 2 higher than vinyl frame on some windows Vinyl frame 3 Top mounting rail Remove backing from seal strip Top mounting rail Seal strip FRONT VIEW 9 ATTACH THE TOP MOUNTING RAIL SEAL STRIP Some mo...

Page 10: ...d the window to prevent air and insects from getting into the room NOTE If the gasket supplied does not fit your window obtain appropriate material locally to provide a proper installation seal A CAUT...

Page 11: ...ill not stay engaged discontinue use of the air conditioner and contact a qualified service technician Air conditioner does Airflow is restricted Make sure there are no curtains blinds or furniture no...

Page 12: ...12 Safety Instructions Operating Instructions Care and Cleaning Installation Instructions Troubleshooting Tips Consumer Support Notes...

Page 13: ...13 OWNERSHIP REGISTRATION P O BOX 1780 MISSISSAUGA ONTARIO L4Y 4G1 FOR CANADIAN CONSUMERS ONLY Please place in envelope and mail to Veuillez mettre dans une enveloppe et envoyez...

Page 14: ...14...

Page 15: ...ons labor necessary to move the unit to a location where it is accessible for service by an individual technician n Replacement of house fuses or resetting of circuit breakers n Failure due to corrosi...

Page 16: ...easonable and necessary maintenance n In commercial locations labor necessary to move the unit to a location where it is accessible for service by an individual technician n Replacement of house fuses...

Page 17: ...e mod le et de s rie Num ro de mod le ____________________ Num ro de S rie _____________________ Vous trouverez ces num ros sur l tiquette appos e sur le c t du climatiseur 17 Au Canada visitez nous a...

Page 18: ...s entrepreneurs et techniciens adoptent des outils du mat riel et des normes de s curit approuv s pour utilisation avec ce r frig rant N utilisez pas de mat riel certifi pour le r frig rant R22 unique...

Page 19: ...il lectrom nager et doit tre quip e d une fiche et d une prise femelle avec terre Les caract ristiques lectriques de la rallonge doivent tre de 15 amp res minimum et de 125 volts MISE EN GARDE N UTILI...

Page 20: ...gramm pour d marrer automatiquement dans un d lai de 1 24 heures ses r glages pr c dents mode vitesse du ventilateur Delay OFF d lai d arr t Lorsque le climatiseur est en fonctionnement il peut tre pr...

Page 21: ...Only ventilateur uniquement Utilisez le mode Fan Only avec une vitesse de ventilateur r gl e sur Low Med ou High pour faire circuler l air et le filtrer sans le refroidir Etant donn que le mode Fan On...

Page 22: ...re et de la charpie et de r duire son efficacit Serpentins Ext rieurs Les serpentins situ s du c t ext rieur du climatiseur doivent tre r guli rement v rifi s S ils sont obstru s par des poussi res ou...

Page 23: ...remplacer par une prise triphas e correctement mise la terre Certains mod les n cessitent une prise mise la terre de 230 208 Volts AC prot g e par un fusible action diff r e ou par un disjoncteur Ces...

Page 24: ...t d tanch it sup rieur en mousse de la fen tre Panneau en accord on gauche Joint d tanch it de la fen tre guillotine Rail de montage sup rieur Climatiseur Ferrure de verrouillage de la fen tre 1 PI CE...

Page 25: ...montage sup rieur Le cas ch ant ignorez cette tape Retirez la pellicule de la bande d tanch it du rail de montage sup rieur et apposez cette bande d tanch it sur le bas du rail de montage sup rieur l...

Page 26: ...argeur de la fen tre Ins rez la mousse entre la vitre et la fen tre pour emp cher l air et les insectes de p n trer dans la pi ce NOTE Si le joint d tanch it fourni ne s adapte pas votre fen tre procu...

Page 27: ...devrait qui bloque le devant du climatiseur Le contr le de temp rature En mode Cool frais appuyez sur la touche Decrease pad n est pas bien r gl Sur les mod les dot s de boutons de commandes tournez...

Page 28: ...28 Consignes de s curit Consignes d Utilisation Entretien et nettoyage Instructions de montage Conseils de d pannage Assistance la client le Notes...

Page 29: ...29 OWNERSHIP REGISTRATION P O BOX 1780 MISSISSAUGA ONTARIO L4Y 4G1 FOR CANADIAN CONSUMERS ONLY Please place in envelope and mail to Veuillez mettre dans une enveloppe et envoyez...

Page 30: ...30...

Page 31: ...e province l autre Pour conna tre les droits dont vous b n ficiez dans votre province communiquez avec le bureau des relations avec les consommateurs de votre r gion Garant Mabe Canada Inc Burlington...

Page 32: ...rs peuvent recevoir pi ces et accessoires directement la maison cartes VISA MasterCard et Discover accept es Les proc dures expliqu es dans le pr sent manuel peuvent tre ex cut es par n importe quel u...

Page 33: ...onsumidor 47 AED05 AED06 AED08 AEQ08 Apoyo al consumidor Solucionar problemas Instalaci n Cuidado y limpieza Operaci n Seguridad Escriba los n meros de modelo y serie aqu de Modelo_________________ de...

Page 34: ...s de acondicionadores de aire R410A requieren que los contratistas y t cnicos usen herramientas equipos y est ndares de seguridad aprobados para su uso con este refrigerante NO use equipamiento certif...

Page 35: ...necesidad de usar un cable el ctrico de extensi n es absolutamente necesario que el mismo est listado bajo UL sea calibre 14 del tipo de 3 tomas con conexi n a tierra para electrodom sticos y el ndic...

Page 36: ...en el modo y configuraci n de ventilador anterior Delay OFF APAGADO Retardo Cuando el acondicionador de aire est encendido puede ajustarse para que se apague autom ticamente dentro de 1 a 24 horas C m...

Page 37: ...Solo ventilador a velocidad Low Baja Med Media o High Alta para proporcionar circulaci n de aire y filtraci n sin enfriamiento Debido a que los niveles de ventilador nicamente no proporcionan enfriami...

Page 38: ...loque la cubierta otra vez desliz ndola en su lugar NOTAS n Use 2 pilas alcalinas AAA de 1 5 voltios No use pilas recargables n Retire las pilas del control remoto si no va a usar el sistema por un pe...

Page 39: ...acondicionador de aire Los cables caseros de aluminio podr an presentar problemas especiales Consulte a un t cnico electricista calificado ANTES DE INICIAR Lea estas instrucciones completa y cuidados...

Page 40: ...a Panel de acorde n derecho Tipo A 4 Tipo B 6 Junta de espuma superior de la ventana Panel de acorde n izquierdo Sello de la banda de la ventana Riel de montaje superior Acondicionador de aire Soporte...

Page 41: ...MONTAJE SUPERIOR Es posible que en algunos modelos la banda de sellado ya se encuentre sobre el riel de montaje Si corresponde saltee este paso Retire la parte posterior de la banda de sellado del ri...

Page 42: ...erecha D Riel de montaje superior Riel de montaje inferior PREPARE EL ACONDICIONADOR DE AIRE cont Deslice el extremo libre del panel de acorde n sobre los rieles del panel lateral Deslice el panel hac...

Page 43: ...i la habitaci n El aire fr o se est escapando Cerci rese de que los registros de la calefacci n no est n abiertos y se encuentran retornando el aire fr o Las bobinas de enfriamiento Ver Acondicionador...

Page 44: ...ire n Da os despu s de la entrega Lo que no est cubierto Esta garant a se extiende al comprador original y cualquier comprador posterior de productos comprados para uso residencial dentro de Estados U...

Page 45: ...Apoyo al consumidor Solucionar problemas Instalaci n Cuidado y limpieza Operaci n Seguridad 45 Notas...

Page 46: ...46 Notas Seguridad Operaci n Cuidado y limpieza Instalaci n Solucionar problemas Apoyo al consumidor...

Page 47: ...nas con dificultades auditivas favor de llamar al 800 TDD GEAC 800 833 4322 Piezas y accesorios GEAppliances com Aquellos individuos con la calificaci n necesaria para reparar sus propios electrodom s...

Page 48: ...Suite 310 1 Factory Lane Moncton N B E1C 9M3 Parts and Accessories In the U S A GEAppliances com Individuals qualified to service their own appliances can have parts or accessories sent directly to th...

Reviews: