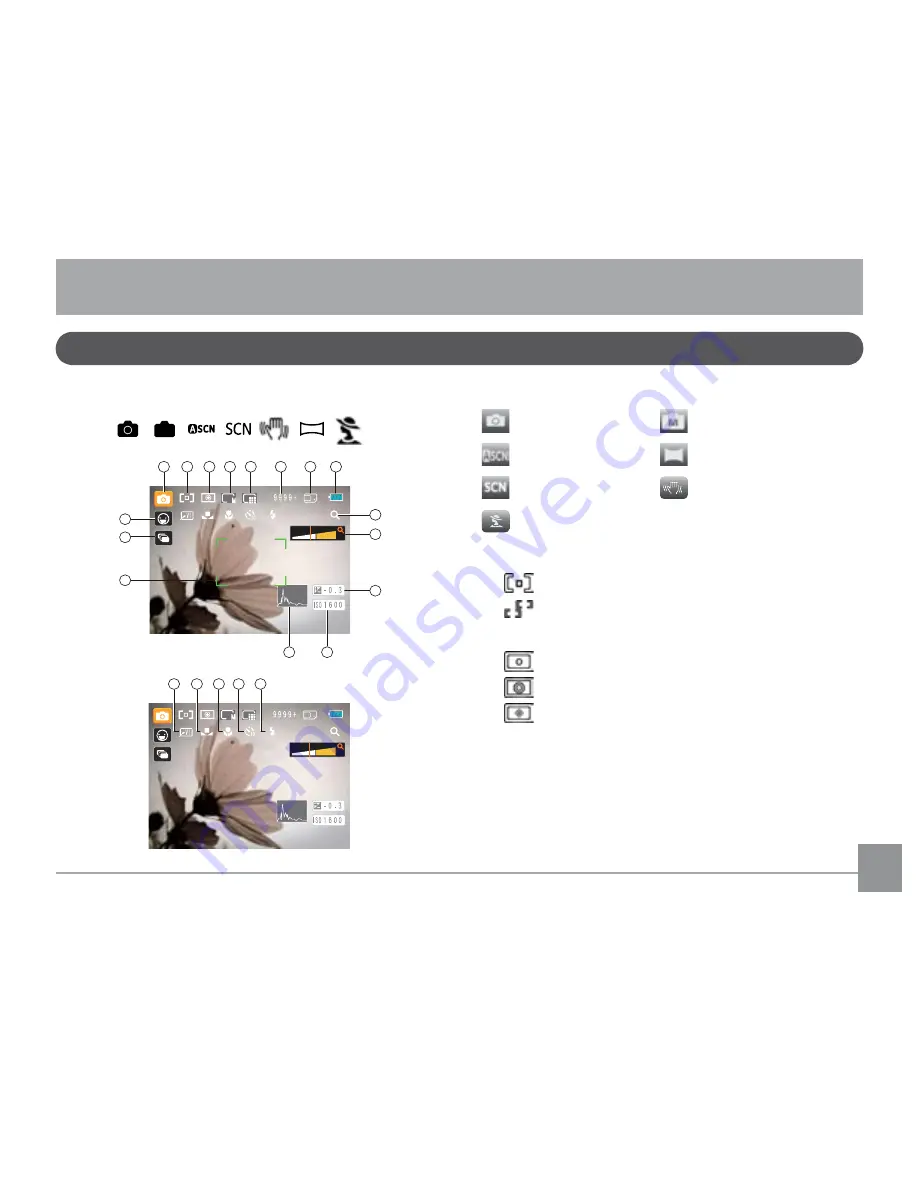
GE E Series User Manual Download Page 28

24

25

LCD Screen Display

USING THE MODES

Still Picture Mode Display

Mode:


M


1

2

3

4

5

6

7

8

9

10

11

12

13

14

15

16

8

17

18

19 20

21

8

1  Shooting Mode Icons

  Auto mode

  Manual mode

  ASCN mode

  Panorama mode

  Scene mode

  Stabilization mode

  Portrait mode

2  AF Mode

  Single-AF
  Multi-AF

3  Expo Metering

  Spot
  Center
  AiAE

Image Size

5  Image Quality

Summary of Contents for E Series

Page 1: ...EN Appendix Camera connectivity Using the Menus Playback Camera function controls Basic operation Getting Started GE Digital Camera E Series E1450W User Manual imagination at work ...

Page 2: ...001 EN 61000 3 3 1995 A1 2001 following the provision of the EMC Directive 89 336 EEC 2004 108 EEC WARNING Do not expose the camera battery pack or other accessories to rain or humidity to prevent a fire hazard or electric shock For customers in the U S A Tested To Comply With FCC Standards FOR HOME OR OFFICE USE FCC Statement This device complies with part 15 of the FCC Rules Operation is subject...

Page 3: ...ia makes the playback of recordings not possible Battery notes Incorrect use of the battery may cause it to leak become hot ignite or burst Always observe the following precautions Do not expose the battery to water and take particular care to keep the terminals dry Do not heat the Battery or throw it into a fire Do not attempt to deform disassemble or modify the battery Keep the battery out of re...

Page 4: ... only and are properties of their respective owners Safety Information Please read the following important information carefully before using this product Do not take apart or attempt to service the camera your self Do not drop or knock the camera Improper handling may damage the product Turn off the camera before inserting or removing the bat tery and memory card Use only the type of battery that...

Page 5: ...htly damp soft cloth About This Manual This manual provides you with instructions on how to use your GE digital camera Every effort has been made to ensure that the contents of this manual are accurate however General Imaging Company reserves the right to make changes without notice Symbols used in this manual Throughout this manual the following symbols are used to help you locate information qui...

Page 6: ... Inserting the Battery and SD SDHC Card Not included 11 Turning On and Off 13 Using the Mode Button 14 Setting language and date time 15 Setting the Language 15 Setting the Date and Time 16 About the LCD Screen 17 BASIC OPERATION 18 Shooting in Auto Mode 18 Using the Zoom Function 18 Flash 19 Self timer 19 Macro Mode 20 Using quick recording 20 Advanced Functions Menu 21 Size 22 Quality 22 WB Whit...

Page 7: ...e ASCN 29 Landscape 29 Portrait 29 Night Portrait 30 Backlit Portrait 30 Night Landscape 30 Macro 30 Auto 30 Panorama 30 Manual Scene Mode SCN 31 Landscape 32 Sport 32 Beach 32 Sunset 32 Fireworks 32 Night Landscape 32 Night Portrait 32 Party 33 Children 33 Indoor 33 Snow 33 ID 33 Museum 33 Photo frame 33 Panning Shot 33 Text 33 Leaf 33 Glass 33 Fish eye 33 Sketch 33 ...

Page 8: ...Metering Exposure Metering 43 Continuous Shot 43 Continuous AF 44 Smile Detection 44 Digital Zoom 45 Slow Shutter 45 Quick Review 46 Date Imprint 46 Movie Menu 47 Expo Metering Exposure Metering 48 Continuous AF 48 DIS Digital Image Stabilization 49 Playback Menu 50 Protect 50 Delete 51 DPOF Digital Print Order Format 52 Resize 53 Rotate 53 Red eye Reduction 54 Trim 54 HDR High Dynamic Range 54 Di...

Page 9: ...irmware version 64 Transmission 65 Video System 65 Connecting to a PC 66 Setting the USB Mode 66 Transferring Files to your PC 66 Connecting to a PictBridge Compatible Printer 68 Setting the USB Mode 68 Connecting the Camera and Printer 69 Using the PictBridge Menu 70 Print with Date 70 Print without Date 71 Print Index 72 Print DPOF 73 Exit 73 APPENDICES 74 Specifications 74 Error Messages 78 Tro...

Page 10: ...n the camera model you purchased along with the following items If anything is missing or appears to be damaged please contact General Imaging Unpacking USB Cable Wrist Strap Power Adapter Rechargeable lithium ion battery CD ROM Warranty Card ...

Page 11: ... Camera Views Front View Back View Right View 1 2 3 4 5 6 10 9 8 7 12 13 11 14 15 ...

Page 12: ...K Button 4 Microphone 16 USB AV Out Port 5 LCD Screen 17 Wrist Strap Mount 6 Zoom Button 18 Power Button 7 Power Indicator 19 Recording Shortcut Button 8 Mode Selection Button 20 Shutter Button 9 Playback Button 21 Speaker 10 Menu Button 22 Tripod Mount Point 11 Disp Up Button 23 Memory Card Battery Compartment 12 Flash Mode Right Button 17 16 22 23 21 18 19 20 ...

Page 13: ...t the camera to the power adapter 3 Insert the power adapter into the power socket Charging the Battery Leave the battery charging until the charger light turns green To maximize battery life the first charge should be at least 4 hours The charger is for indoor use only ...

Page 14: ...11 11 Insert the Battery and SD SDHC Card Not included 2 Insert the battery into the battery slot in the correct position as shown in the following diagram 1 Open the battery compartment ...

Page 15: ...12 12 4 Close the battery compartment 3 Insert an SD SDHC card not included into the memory card slot as shown Write protection buckle ...

Page 16: ... battery compartment and gently push the card to release it Pull the card out carefully Turning On and Off Press the Power button to turn the camera on To turn off the camera press the Power button again Power Button When the camera is turned on it will default to the the shooting mode last used You can use the Mode button on the back to change modes When using the camera for the first time the la...

Page 17: ...n this mode ASCN mode Select to have the camera automatically select the best scene type for still pictures Panorama mode In this mode up to 3 frames can be stitched together to create a panoramic photo Scene mode Choose from 20 different scene types and effects for your photos Stabilization mode Select to take still pictures by reducing motion blur caused by hand shake low luminance or slow shutt...

Page 18: ... Setup menu do the following 1 Press the Power button to turn the camera on 2 Press the button then switch among camera settings menus with the Left Right button and select the General Setup menu Then press the Up Down button to access General Setup menu options Setting the Language 1 Select language with the Down button then press the or right button to enter language options 2 Use the Up Down Le...

Page 19: ...ime with Up Down button then press the or right button to enter the date time settings options 2 Use the Left Right button to select the date or time field then press the Up Down buttons to adjust the values 3 Press the button to confirm the setting ...

Page 20: ...d induce vomiting Then seek medical assistance immediately About the LCD Screen When you turn the camera on various icons are shown on the LCD screen to indicate the current camera settings and status To learn more about the displayed icons see LCD Screen display on page 25 LCD Screen notes Extremely high precision technology has been used to manufacture the LCD screen so that most of the pixels a...

Page 21: ...current zoom status is indicated by the following symbol Shooting in Auto Mode Auto mode is the easiest mode to take photos While operating in this mode the camera automatically optimizes the camera s settings for best results under average shooting conditions To start shooting do the following 1 Press the Power button to turn the camera on 2 In the Mode menu select the Auto mode 3 Compose your pi...

Page 22: ...of people which include night scenery Flash Red eye reduction The camera emits a brief flash before the picture is taken to reduce red eye effects Flash Auto Camera flash fires automatically based on existing light conditions To enable the self timer press the Down Self timer button to enter the self timer selection interface then press the Left Right button to switch between three self timer mode...

Page 23: ...s Macro On Select this to focus on subjects 5cm from the lens Macro Off Select this option to disable Macro Macro Mode Using quick recording In shooting mode press the Recording shortcut button to begin recording video After finishing press the Recording shortcut button or the Shutter button to stop and store the video The camera will return to shooting mode ...

Page 24: ... Set the advanced functions as follows 1 Pull up the Advanced Function Menu by pressing the button 2 Press the Down button to enter the advanced function selection screen then press the Left Right button to select the function that you want to set 3 Now press the Up button to enter the advanced function setting interface 4 Use the Left Right buttons to change the settings then press the button to ...

Page 25: ...igger the file sizes are and the less pictures you can store on a memory card Quality The quality setting determines how much the camera compresses the photo files The higher the compression the smaller the file size will be but the quality will decrease The lower the compression the larger the file size but the better the quality The three levels of compression are Quality Best Quality Fine Quali...

Page 26: ...e WB Auto WB Daylight WB Cloudy WB Fluorescent WB Fluorescent CFW Cool White Fluorescent WB Incandescent WB Manual Press the shutter button to set WB Color The color setting option allows you to add artistic effects when taking pictures You can try different color tones to alter the mood of your pictures The Color option is only available when the camera is in the M Manual mode The color options i...

Page 27: ...only available when the camera is in the M Manual mode Pictures taken with higher ISO will generally have more noise than those taken with lower ISO The options of ISO include automatic 64 100 200 400 800 and 1600 Exposure Compensation The exposure compensation feature allows you to adjust the light exposure value to control the brightness of the image The adjustable range of exposure value is fro...

Page 28: ...Mode M 1 2 3 4 5 6 7 8 9 10 11 12 13 14 15 16 8 17 18 19 20 21 8 1 Shooting Mode Icons Auto mode Manual mode ASCN mode Panorama mode Scene mode Stabilization mode Portrait mode 2 AF Mode Single AF Multi AF 3 Expo Metering Spot Center AiAE 4 Image Size 5 Image Quality ...

Page 29: ...e only in M Manual Mode 13 Histogram 14 Focus Frame 15 Continuous Shot Slow Shutter Warning 16 Face Detection 17 Picture Color Adjustable only in M Manual Mode 18 White Balance Adjustable only in M Manual Mode 19 Macro Mode 20 Self timer Self timer 2 sec Self timer 10 sec 21 Flash Mode Flash Forced off Flash Forced flash Flash Red Eye Slow Synchro Flash Slow Synchro Flash Red eye reduction Flash A...

Page 30: ... 9 Battery Status 10 Zoom icon 11 Zoom WT Ratio Displayed only when zoom is activated 12 Exposure compensation value 13 Recording Status Icon Recording standby Recording For optimal video shooting it is recommended that an SD card be used Recording videos with the internal memory may result in image jitter and image noise HD recording time is limited to less than 29 minutes During video recording ...

Page 31: ... 5 Memory Card Built in Memory 6 Battery Status 7 Image Zoom 8 The current display area 9 Zoom magnification area shown 10 Memory Space this picture Total number of pictures 11 Recording Date and Time 12 OK PLAY 13 HDR Playback Mode Display Mode 1 2 3 4 5 6 7 8 9 10 11 13 12 ...

Page 32: ...t the subject The optimum scene mode will be identified automatically 3 Press the Shutter button halfway down to focus 4 Press the Shutter button all the way down to take the picture Icon Mode name Icon Mode name Landscape Mode Night Landscape Mode Portrait Mode Macro Mode Night Portrait Auto Mode Backlit Portrait Landscape Mode For landscapes ASCN will automatically adjust the exposure to match t...

Page 33: ...panoramic picture by stitching together several pictures Follow these steps to create a panoramic picture 1 Press the Mode button use the Left Right button to select Panorama mode then press the button to confirm the setting 2 Use the Left Right button to select the direction of image stitching e g left to right or right to left Then press the button to confirm the setting if no selection is made ...

Page 34: ...t or press the Delete button to cancel and exit Panorama Mode can stitch a maximum of 3 pictures In Manual Scene mode you can select from a total of 20 scene types to match your needs You just need to select the right scene for the occasion and the camera will automatically adjust to the optimal settings for you Press the Mode button then use the Left Right button to enter the Scene Selection mode...

Page 35: ...e For landscapes Vivid reproduction of green and blue Sport For fast moving subjects Capture sharp action shots without blur Beach For capturing images in scenes with strong sunlight Sunset For sunsets Capture subjects in strong sunlight Fireworks For fireworks at night Shutter speed is adjusted to capture spectacular images The use of a tripod is recommended Night landscape For night scenes The u...

Page 36: ...useum or flash free areas Retain color and reduce blur Photo frame For adding interesting frame effects to the photo Travel shooting Produces background image blur that emphasizes the motion of the main subject Text For capturing documents printed material and presentation boards Leaf For plants Capture brilliant shots of greenery and blossoms Glass For objects behind transparent glass Fish eye Cr...

Page 37: ...you to adjust the image quality and image size Please refer to the Advanced Functions Menu section on page 21 for detailed instructions This mode can help reduce image blur caused by hand shake low light or when using slow shutter speeds Use stabilization mode in dark environments or when using slow shutter speeds Shooting in a windy or unstable environment such as a moving vehicle may cause blurr...

Page 38: ... Detection is enabled by default unless disabled by the user When shooting if a face is detected with its eyes closed the Blink Detection will appear on the screen to show that a blink was detected Blink Detection ...

Page 39: ...the photos or video clips stored in the internal memory or memory card 3 To play a selected video clip press the button to enter the movie playback mode During video playback the operating instructions will appear on the screen Press the Left Right button and press the button for confirmation 1 2 3 4 5 6 The operating instruction icons are as follows 1 Return to the first frame and play 4 Return t...

Page 40: ...37 37 When playing a movie press the Up Down button to increase or decrease the volume To mute the audio press and hold the Down button until appears ...

Page 41: ...d of the Zoom button and thumbnails of your photos and videos will display on the screen 1 Use the Zoom button to switch between the 3x3 and 4x4 Date Folder thumbnail display 2 When 3x3 and 4x4 thumbnails are displayed use the Up Down Left Right button to select a picture or video clip for viewing press the button to return to the original size 3 When date folder thumbnails are displayed use the U...

Page 42: ...he Left Right navigation buttons to select a photo to magnify 3 Press the end of the Zoom button to zoom in on the selected photo 4 Use the Zoom buttons to zoom in and out The zoom indication and the frame of the whole photo will display on the screen 5 Use the navigation buttons to pan across the image 6 Press the button to return the image to its original scale Movie images cannot be magnified ...

Page 43: ...o enter the Playback Mode 2 Select a picture or video clip you want to delete with the Left Right button 3 Press the Down Delete button and the delete screen will appear 4 Select Yes or Back with the Up Down button and press the button for confirmation Erased photos video clips cannot be recovered Please refer to page 51 for instructions on the Delete Menu options ...

Page 44: ...ess the Up Down buttons to select the function 3 Then press the or Right button to enter the submenu 4 Press the Up Down button to select an option or press the Left or button to return to the menu 5 Press the button to confirm the setting and return to the previous page After selecting a function you can press the Up button to return to the Still Picture menu for other Photo Setup or Camera Setup...

Page 45: ...ot recommended that this be turned off or the camera may not focus correctly AF Mode Auto Focus mode Use this setting to control the auto focus mechanism while taking pictures Two options are available Single AF The focus frame appears on the center of the LCD screen to focus on the subject Multi AF The camera will focus correctly for multiple parts of the object ...

Page 46: ...lding down the shutter button There are five available options OFF Turn off the Continuous Shot function Continuous shooting Press and hold the shutter button to shoot continuously until you release the shutter or until the memory card has run out of space 3 shot Capture up to 3 consecutive pictures 3 shots Last Capture pictures continuously until the Shutter button is released Only the last 3 sho...

Page 47: ...es on a moving subject such as a sports player Smile Detection With the Smile Detection feature the camera automatically detects and captures a person smiling A face must be detected by the camera in order for smile detection to function correctly ...

Page 48: ... Slow shutter mode the shutter will remain open as long as the Shutter button is held down for up to 30 seconds This gives you control over the duration of the exposure The slow shutter mode is available only in M manual mode Manual To set a long exposure time between 2 30 seconds The use of tripod is recommended for prolonged exposure times ...

Page 49: ...here are three options available Off Date Date and Time Quick Review This setting refers to the brief photo review immediately after taking a picture The picture stays on the LCD screen for an adjustable period of time Four options are available Off 1 sec 2 sec 3 sec ...

Page 50: ... select the page with the function you want to adjust and press the Down button 2 Press the Up Down arrow button to select the function to be set and Press the or Right button to enter the submenu 3 Press the Up Down button to select an option or the Left or button to return to the menu 4 Press the button to confirm the setting and return to the previous menu Refer to the following pages for more ...

Page 51: ... what part of the picture the camera uses to determine the correct exposure for the whole picture Three options are available Spot Center AiAE Artificial Intelligence AE Continuous AF The camera continuously focuses on a moving subject such as a sports player ...

Page 52: ...49 DIS Digital Image Stabilization Use this function to ensure maximum stability of the screen when recording video ...

Page 53: ...ions for detailed instructions on the various menu options Protect To prevent pictures or videos from being accidentally erased use this setting to lock one or all of the files To protect unprotect a picture or video 1 Use the Up Down arrow button and select Protect then press the or Right button to enter the submenu ...

Page 54: ...ct Unprotect to unlock them then press the Up Down button and select Back to return to the playback menu Selecting reset will un protect all previously protected photos and videos Delete There are three ways to delete files Delete One 1 In the Delete setting select Delete One and then press the or Right button 2 Press the Left Right button to locate the photo or video to be deleted Press the Up Do...

Page 55: ...p Down button to select item Yes to delete the file or Cancel to return to the menu and then press to confirm The indicator means a file is protected File protection must be removed first before a file can be deleted Deleting files will cause DPOF settings to be reset DPOF Digital Print Order Format DPOF allows you to record a selection of pictures that you would like to print and will save your s...

Page 56: ...rm the setting Resizing an image creates a new file that contains the image in the size you select The file with the original image also remains in the memory Rotate You can use this setting to change the orientation of the picture 1 Select the Rotate setting from the Playback menu as described previously 2 Use the Left Right navigation buttons to select a picture to rotate 3 Use the Up Down navig...

Page 57: ...yes should be as large as possible red eye is not detected will display on the screen if the camera does not detect red eye effect Trim The Trim setting allows you to trim an area of a selected photo and save it as a new photo To trim a picture 1 Select the Trim setting from the menu 2 Using the Left Right buttons locate the photo that you want to trim and have it displayed on the LCD 3 Select Yes...

Page 58: ...zing the highlights and lowlights captured to more accurately represent the actual scene 1 Select the HDR setting in the menu as described previously 2 Press the Left and Right button to find pictures you want to optimize and then select Confirm to perform HDR optimization or select Return to go back to Playback menu 3 After HDR optimizing the image will be saved as another file with the icon as a...

Page 59: ...view all the stored pictures as a slideshow 1 Select Slide Show menu then press the or Right button to enter the slide show setup interface 2 Press the Up Down button to select effect interval repeat or music and press the or Right button to enter and adjust the settings press the button to confirm the settings 3 Use the Up Down navigation buttons and select Start to run the slideshow or Cancel to...

Page 60: ...irm the setting or press the Left button to return to last page and press to exit the menu User Nature Sparkling Welcome wallpaper Use the Up Down button to select Welcome wallpaper then press to confirm the setting or press the Left button to return to the last page and press to exit the menu User GE logo ...

Page 61: ...58 58 Set back to defaults Use the Up Down button and select Set back to defaults then press to confirm or press the Left button to return to last page and press to exit the menu Yes No ...

Page 62: ...es Or you can press the Down button to switch to the next menu page Refer to the following pages for more details about each setting Setup Menu Mode M The Setup menu for the camera is available in all modes Each menu page can be selected by pressing the button and switching between menus with the Left Right button To adjust the settings 1 Select the menu page with the function you want to adjust a...

Page 63: ...ing Beep Use this setting to adjust beep volume shutter button self timer power on and power off tones To change these settings 1 Select the Beep setting from the Setup menu as described previously 2 Use the Up Down navigation buttons to switch between volume shutter tone key tone self timer tone and power tone options 3 Press the or Right button to enter and Press the Up Down button to adjust vol...

Page 64: ...between the hometown and travel destination fields 3 Use the Left Right navigation buttons to select a city close to the desired time zone Then press the button to confirm Power Saver This setting allows you to save power and get the maximum possible running time for your battery Follow the steps below to turn off the LCD screen and camera automatically after a period of inactivity 1 Select the Po...

Page 65: ...u 2 Use the Up Down navigation buttons to select Yes or No Then press the button to confirm 3 Select Yes and the camera will format the selected media 4 Please note that when you perform the Format Memory function it only formats the active memory If a memory card is inserted the memory card is active and will be formatted If there is no memory card the internal memory is active and the internal m...

Page 66: ...s or No Then press the button to confirm File Numbering After you take a picture or video clip the camera will save it and assign it a sequential number You can use this feature to reset the file numbering to 1 When more than 999 images are in the memory card the use of this features will have no effect 1 Select file Numbering in the File Software menu page then press the or right button 2 Use the...

Page 67: ...ade accordingly as necessary To update to the latest firmware version you can go to the following website www ge com digitalcameras and look under Support Reset Settings Use this setting to restore the camera to its default settings 1 Select Reset Settings in the File Software menu page and press the or Right button 2 Use the Up Down navigation buttons to select Yes or No Then press the button to ...

Page 68: ...ons NTSC USA Canada Taiwan Japan etc PAL Europe Asia excluding Taiwan Oceania etc Note The TV output will not perform properly if an incorrect video system is selected Use this setting to configure your video system to your current area 1 Select Video System in the Transmission menu 2 Use the Up Down navigation buttons to select NTSC or PAL Then press the button to confirm ...

Page 69: ... and select PC 3 Press the button to confirm the setting Transferring Files to Your PC The computer will automatically detect the camera as a removable drive Double click the My Computer icon on the desktop to locate the removable drive and to copy the folders and files in the drive to a directory on your PC as you would copy any other folder or file By using the USB cable you can transfer the cap...

Page 70: ...to the displayed menu Macintosh Drag the untitled icon to the Trash Untitled 4 Disconnect the camera once the transfer is completed If the USB option is set to PC Turn the camera off and disconnect the USB cable If the USB option is set to PC PTP Remove the camera from the system as described below before turning the camera off and disconnecting the USB cable ...

Page 71: ...irectly with a PictBridge compatible printer using the supplied USB cable without the need for a PC Setting the USB Mode Since the camera s USB port can be set to connect with either a PC or a Printer the following steps will ensure that the camera is correctly configured to connect with a Printer 1 Enter the camera setup menu to select USB Mode with the Up Down button then press the or Right butt...

Page 72: ... of the cable to the USB port on the printer If the camera is not connected to a PictBridge compatible printer the following error message will appear on the LCD screen The above error message would also appear if the USB mode were set incorrectly in which case you should disconnect the USB cable check the USB mode settings ensure that the Printer is turned on and then try connecting the USB cable...

Page 73: ...the following sections for more detailed information on each setting Print with Date If you have set the date and time of your camera the date and time will be recorded and saved with each photo you take 1 Select Print with date from the PictBridge menu The following screen will appear 2 Use the Left Right navigation buttons to scroll through the photos Using the PictBridge Menu ...

Page 74: ...Then press the button Print without Date Use this setting to print the photos without dates on them 1 Select Print without date from the PictBridge menu The following screen will appear 2 Use the Left Right navigation buttons to scroll through the images 3 Use the Up Down navigation buttons to select the number of prints for the image currently displayed 4 Press the button and the following screen...

Page 75: ... the button 5 Select Yes to confirm the print setting or Cancel Then press the button Print Index You can use this setting to print all indexes to show all photos currently in your camera 1 Select Print index from the PictBridge menu The following screen will appear ...

Page 76: ...hand see the DPOF section on page 52 1 Select Print DPOF from the PictBridge menu The fol lowing screen will appear 2 Select Yes to confirm the print setting or Cancel Then press the button Exit To exit the PictBridge menu select Exit The Remove USB cable message will be displayed Disconnect the USB cable from the camera and printer ...

Page 77: ...ensor 14 4 Megapixels 1 2 3 CCD Lens Focal Length F 5 05mm Wide 25 25mm Tele 35mm film equivalent 28mm Wide 140mm Tele F number F3 8 Wide F5 6 Tele Construction 9 elements in 8 groups Optical Zoom 5X Focusing Range Normal Wide 60cm Tele 100cm Macro Wide 5cm Anti Handshake DIS Digital Zoom 6X digital zoom Combined Zoom 30 X APPENDICES ...

Page 78: ...OF Ver1 1 Support Yes File Format Still Image Exif 2 2 JPEG Movie MPEG 4 MOV Audio G 711 Monaural Shooting Modes Auto Manual Auto Scene Scene Sport Indoor Snow Fireworks Museum Night Landscape Children Leaf Sunset Glass Landscape Night Portrait Beach Text Gathering ID Fish eye Travel shooting Photo frame Sketch Portrait Panorama Video Smile Detection Yes Blink Detection Yes Face Detection Yes Red ...

Page 79: ...od Artificial Intelligence AE AiAE Center weighted Average Spot Fixed to center of frame Exposure Control Method ProgramAE AE lock available Exposure Compensation 2 EV in 1 3 Step increments Shutter Speed 4 1 2000 second Manual 30 s Playback Modes Single Photo Index 9 16 thumbnails Slide Show Movie Slow Motion possible Zoom Approx 2X 8X Audio Histogram Display White Balance Control Auto AWB Daylig...

Page 80: ...MB SD Card SDHC Card Up to 32 GB support Other Features PictBridge ExifPrint Support Multi language Sup port Jacks USB2 0 5 pin Macro USB AV OUT Power Rechargeable Lithium ion Battery GB 10 3 7V 700mAh Shooting Capability Battery Performance Approx 220 shots based on CIPA Standards Operation Environment Temperature 0 40 o C Humidity 0 90 Dimensions W x H x D 91 5mm x 56 5mm x 18 3 19 4 mm Mass App...

Page 81: ... There are no images in the memory card or in the internal memory Lens error The lens is probably stuck and the camera will power off automatically System error Unexpected error encountered Write protect The write protection switch in the memory card is set to the LOCK position Out of the range When pictures were taken in Panorama mode the direction of movement was incorrect or the angle was outsi...

Page 82: ...it No other actions allowed to perform during video audio recording Warning Battery exhausted The battery is out of charge This file cannot be played back The picture format cannot be recognized by the camera No connection The camera is not connected to the printer correctly Print error There is a problem with camera or printer Cannot print Check that the printer is out of paper or out of ink Chec...

Page 83: ... memory card with a new one Delete unwanted images Unlock the memory card No picture is taken when pressing the Shutter button The memory card is full No available space to store the files The mode dial is in Playback mode Replace the memory card with a new one or format the current memory card Delete unwanted images Unlock the memory card Images cannot print from the con nected printer The camera...

Page 84: ...protection interruption phenomenon in the memory card such as caused by too slow storage etc means that you can not continue to shoot or record Please replace a memory card Please shoot again Too many movies to process The number of pictures or binders in the memory card exceeded the specifications so the playback of data folder can not be displayed Deleteneedlessfiles Transfer the files in the me...

Page 85: ...http www ge com digitalcameras 2011 General Imaging Company Printed in China ...

Reviews: