7.4.2 Internal battery replacement (for 8/10 kVA models)
In case of battery failure, please proceed with the following steps to replace that:
NOTE
During battery replacement the UPS will not be able to support the load if a mains
failure occurs! It is recommended to switch off the load
(see section 4.3.2) before
battery manipulation
.
1. Remove the 2 lower UPS
front cover from the cabinet
by gently pulling them out.
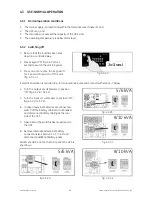
2. Remove the battery grille by
loosening the three
mounting screws (fig. 7.4.2.a).
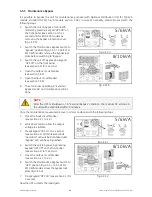
3. Disconnect DC cabling from
battery pack connectors
(fig. 7.4.2.b).
4. Grab hold of the battery
packs and slide them out
(fig. 7.4.2.b). Be careful during
this operation and consider
the weight of the battery.
5. Unpack the 2 new battery
packs from their carton
boxes.
6. Place the battery packs side
by side in the battery
compartment.
7. Fix the 2 battery brackets
with the screw set to hold
battery packs into the
cabinet (see section 3.3.4).
8. Connect the DC connectors
of each battery pack.
9. Fix the battery grille in front
of the battery compartment
with 3 screws.
10. Mount the two front covers
fig. 7.4.2.a
fig. 7.4.2.b
8/10 kVA
8/10 kVA
NOTE
To avoid battery malfunction, in case of additional batteries connected, all battery packs
have to be replaced! It’s not possible to replace only 1 pack. Avoid connection between
new and old battery packs.
modifications reserved
38
User manual GT Series 5/6/8/10 kVA UPS 1.0 (US)


