background image

The satisfactory operation of this air condition-
er is dependent upon it being installed in a wall
case, and used with an exterior grille, both
specifically designed for use with this unit.

Use

with an incorrect wall case or with an incorrect
grille may result in poor performance and
could cause damage to the unit. If you are not
sure if you have the correct wall case and the
rear grille please contact the company where
you purchased the unit.

For personal safety, this air conditioner must be
properly grounded.

It is important to have the wall outlet and circuit
checked by a qualified electrician if there is any
doubt as to whether a proper ground exists.

Follow National Electrical Code (NEC) or local
codes and ordinances.

CAUTION:

Do not, under any circumstances, cut or remove
the third (ground) prong from the power cord.

Do not change the plug on the power cord of this
air conditioner.

Aluminum house wiring may present special
problems—consult a qualified electrician.

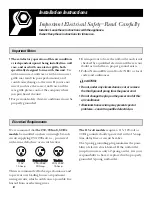
We recommend that

the 230/208-volt, 60 Hz

models

be installed on their own single branch

circuit supplying 230/208-volt a.c., protected
with a time delay fuse or circuit breaker.

P

Pa

arra

alllle

ell

P

Pe

errp

pe

en

nd

diic

cu

ulla

arr

T

Ta

an

nd

de

em

m

115V.

230/208V.

230/208V.

15 Amp.

20 Amp.

15Amp.

This is recommended for best performance and
to prevent overloading house or apartment
wiring circuits, which could cause a possible fire
hazard from overheating wires.

The 115-volt models 

require a 115/120-volt a.c.,

60 Hz grounded outlet protected with a 15-amp
time delay fuse or circuit breaker.
The 3-prong grounding plug minimizes the possi-
bility of electric shock hazard. If the wall outlet
you plan to use is only a 2-prong outlet, it is your
responsibility to have it replaced with a properly
grounded 3-prong wall outlet.

Important Notes

Installation Instructions

Important Electrical Safety –Read Carefully

Installer: Leave these instructions with the appliance.
Owner: Keep these instructions for future use.

Electrical Requirements

8

Summary of Contents for AJCH12DC

Page 1: ...Care of Product 11 Helpful Information Things That Are Normal 12 If Something Goes Wrong Before You Call for Service GE Service Numbers Warranty GE Appliances GE Answer Center 800 626 2000 49 7361 1...

Page 2: ...chase Staple your receipt to the inside back cover of this manual You will need it to obtain service under warranty Start Here Before using your air conditioner Need Help Read this manual It contains...

Page 3: ...oes into the larger slot to provide the proper polarity for the power cord FOR PROPER GROUNDING 1 Screw the adapter to the outlet using the outlet cover screw 2 Ground the outlet through the house wir...

Page 4: ...speeds HIGH HEAT and LOW HEAT provide heating with different fan speeds LOW FAN or HIGH FAN provides air circulation and filtering without cooling or heating NOTE If you move the switch from a cool o...

Page 5: ...us up the fan runs all the time The unit is shipped in the CONT setting The vent control is located behind the front grille When set at CLOSE only the air inside the room will be circulated and condit...

Page 6: ...h is not visible from the out side If they are clogged with dirt or soot it will reduce the cooling or heating performance and the unit will not work properly They may be professionally steam cleaned...

Page 7: ...and out On other models pull it down Replace the clean filter by pushing it back into place CAUTION DO NOT operate the air conditioner without the filter in place If a filter becomes torn or damaged i...

Page 8: ...ing may present special problems consult a qualified electrician We recommend that the 230 208 volt 60 Hz models be installed on their own single branch circuit supplying 230 208 volt a c protected wi...

Page 9: ...J Model in an Existing Wall Case 9 J model air conditioners may fit in existing wall cases However they often need a kit to properly adapt the case to the GE air conditioner Answer these questions an...

Page 10: ...that the case installation is secure 4 Reinstall the locking plate with the tab behind the wall case flange Tighten the screw 5 Attach the power cord to the base pan with the clamp 6 When the wall ou...

Page 11: ...ick when the compressor cycles on and off Water will collect in the base pan during high humidity or on rainy days The water may overflow and drip from the outdoor side of the unit On the heat pump un...

Page 12: ...flow Set the mode control at HIGH FAN or and stops the air conditioner HIGH COOL with the thermostat from cooling the room at a warmer setting Airflow is restricted Make sure there are no curtains bli...

Page 13: ...Notes 13...

Page 14: ...14 Notes...

Page 15: ...sories sent directly to their home VISA MasterCard and Discover cards are accepted Care and cleaning instructions con tained in this manual cover proce dures to be performed by any user Other servicin...

Page 16: ...To know what your legal rights are in your state consult your local or state consumer affairs office or your state s Attorney General Staple sales slip or cancelled check here Proof of original purcha...

Reviews: