


5
GEAppliances .com
Consumer Support
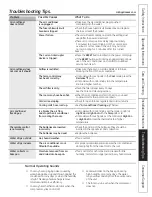
Troubleshooting Tips
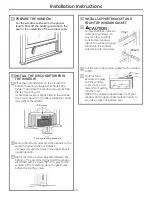
Installation Instructions
Care and Cleaning
Operating Instructions
Safety Instructions
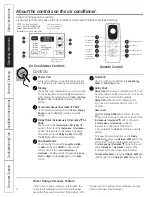
Cool Mode
Use the
Cool
mode at
Low, Med, High
or
Auto Fan
Speed
for cooling . Use the
Temperature Increase
▲
/
Decrease
▼
pads to set the desired temperature
between 64°F and 86°F in 1°F increments .
An electronic thermostat is used to maintain the room
temperature . The compressor will cycle on
and off to keep the room at the set level of comfort .
Set the thermostat at a lower number and the indoor
air will become cooler . Set the thermostat at a higher
number and the indoor air will become warmer .
NOTE:
If the air conditioner is off and is then turned on
while set to a
Cool
setting or if turned from a fan
setting to a
Cool
setting, it may take approximately
3 minutes for the compressor to start and cooling to
begin.
Cooling Descriptions
For Normal Cooling
—Select the Cool
mode and
High
or
Med
fan with a middle set temperature .
For Maximum Cooling
—Select the Cool
mode
and
High
fan with a lower set temperature .
For Quieter and Nighttime Cooling
—Select the
Cool
mode and
Low
fan with a middle set
temperature .
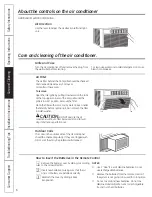
Energy Saver Mode
Controls the fan .
ON
—The fan will cycle on and off with the
compressor . This results in wider variations of room
temperature and humidity . Normally used when the
room is unoccupied .
NOTE:
The fan may continue to
run for a short time after the compressor cycles off.
OFF
—The fan runs all the time, while the compressor
cycles on and off .
Fan Only Mode
Use the Fan Only Mode at Low, Med or High fan
speed to provide air circulation and filtering without
cooling . Since fan-only settings do not provide
cooling, a Set temperature cannot be entered . The
room temperature will appear
in the display .
NOTE:
Auto Fan Speed cannot be used when in the
Fan Only
Mode.
Set to
Auto
fan speed for the fan speed to
automatically set to the speed needed to provide
optimum comfort settings with the set temperature .
If the room needs more cooling, the fan speed
will automatically increase . If the room needs less
cooling, the fan speed will automatically decrease .
NOTE:
Auto Fan Speed cannot be used when in the
Fan Only
Mode.
Auto Fan Speed
n
To ensure proper operation, aim the remote
control at the signal receiver on the air
conditioner .
n
The remote control signal has a range of
up to 20 feet .
n
Make sure nothing is between the air conditioner
and the remote control that could block the
signal .
n
Make sure batteries are fresh and installed
correctly as indicated on the remote control .
Remote Control


