


49-7811
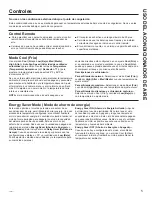
Controles
Las luces al lado de las teclas de toque en el panel de control del acondicionador de aire indicarán los ajustes seleccionados.
Las funciones y el aspecto pueden variar.
Controles (en algunos modelos)
1
.
Tecla de Power (Encendido)
Apaga y prende el acondicionador de aire. Al encenderse,
la pantalla mostrará la temperatura ambiente.
2.
Pantalla
Muestra la temperatura ambiente o el tiempo restante
en el Sincronizador de retardo. Muestra la temperatura
Definida
al configurar la temperatura en los modos
Cool
(Frío)
o de
Energy Saver (Ahorro de energía)
. La luz
de
Ajuste
se encenderá durante la configuración.
NOTA:
la pantalla cambiará para mostrar la temperatura
ambiente una vez que se haya realizado la configuración.
3.
Teclas de Temp Aumento
Ÿ
/Reducción
ź
8VDGRSDUDDMXVWDUODWHPSHUDWXUDFXDQGR
se encuentre en el modo
Cool (Frío)
o
Energy Saver
(Ahorro de energía)
. La luz de
Ajuste
se encenderá
durante la configuración.
4.
Teclas de Sincronizador de retardo Aumento
Ÿ
(+) / Reducción
ź
(–)
Cada vez que toque las teclas
Aumento
Ÿ
/ Reducción
źGHODXQLGDGRODVWHFODV
A / Reducción
–
en el control remoto definirá el tiempo de retardo al
utilizar el
Delay 1–24hr
timer
6LQFURQL]DGRU
de retardo
1–24 h)
.
La luz de
Ajuste
se encenderá durante la
configuración.
5.
Teclas de Fan Speed (Velocidad del ventilador)
8VDGRSDUDDMXVWDUODYHORFLGDGGHOYHQWLODGRUD
Low
(Bajo), Med (Medio),
High (Alto)
o
Auto (Automática)
en la unidad.
NOTA:
en el control remoto, utilice las
teclas
A / Reducción
–
velocidad de ventilador
para ajustar la velocidad del ventilador en
Low (Bajo),
Med (Medio)
o
High (Alto)
.
8WLOLFHODWHFOD
Auto
para
activar el ventilador automático.
6.
Tecla de MODO
8VDGRSDUDDMXVWDUHODFRQGLFLRQDGRUGHDLUHDOPRGR
Cool (Frío), Energy Saver (Ahorro de energía)
o
Fan
Only (Solo ventilador
)
.
7.
Teclas de Delay (Retardo)/ Delay 1–24hr
(Retardo
1–24h)
Delay ON (ENCENDIDO Retardo)
—
Cuando el
acondicionador de aire está apagado, puede ajustarse
SDUDTXHVHHQFLHQGDDXWRPiWLFDPHQWHGHQWURGHD
horas en el modo y configuración de ventilador anterior.
Delay OFF (APAGADO Retardo)—
Cuando el
acondicionador de aire está encendido, puede ajustarse
SDUDTXHVHDSDJXHDXWRPiWLFDPHQWHGHQWURGHD
horas.
Cómo realizar el ajuste:
Pulse la tecla
Delay 1–24hr (Retardo
1–24h)
en
la unidad o
Delay pad
(Retardo)
del control remoto.
Cada toque de las teclas
Aumento
Ÿ
/ Reducción
ź
en la unidad o las teclas
A / Reducción
–
en
el control remoto definirá el temporizador en intervalos
GHKRUD/DOX]GH
Ajuste
se encenderá durante la
configuración.
Para revisar el tiempo restante en el Sincronizador
i
retardo 1–24 h
,
pulse la tecla de
Delay 1–24hr (Retardo
1–24h)
en la unidad o
Delay pad
(Retardo)
en
GHOFRQWUROUHPRWR8WLOLFHODVWHFODV
Aumento
Ÿ
/
Reducción
ź
en la unidad o las teclas
A /
Reducción –
en el control remoto para definir un nuevo
tiempo, si lo desea.
Para cancelar el sincronizador,
pulse la tecla
Delay
1–24hr (Retardo
1–24h)
hasta que la luz e dicho control
se apague.
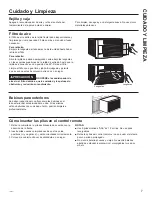
8.
Reinicio del Filtro
La luz LED se encenderá cuando el ventilador haya
DFXPXODGRKRUDVGHIXQFLRQDPLHQWRFRPR
recordatorio para la limpieza del filtro. Presione Reset
)LOWHU5HLQLFLDUHO)LOWURSDUDDSDJDUODOX]/('\
reiniciar el tiempo de funcionamiento acumulado
.
Fan
Fan
±KGHUHWDUGR
Reducción de
sincronizador de
retardo
Selección de
modo
Reducción de
velocidad del
ventilador
Aumento y
reducción
de ajuste de
temperatura
Aumento de
sincronizador de
retardo
Encendido
automático del
ventilador
Aumento de
velocidad
del ventilador
Encendido/apagado
de la unidad
Controles del acondicionador de aire
NOTA:
/DWHPSHUDWXUDSRUGHIHFWRTXHILJXUDHQODSDQWDOODHVWiHQJUDGRV)DKUHQKHLW)3DUDPRGLILFDUODSDQWDOODDJUDGRV&HOVLXV
&PDQWHQJDSUHVLRQDGRVORVERWRQHV7HPS,QFUHDVH,QFUHPHQWRGH7HPSHUDWXUDŸ7HPS'HFUHDVH'LVPLQXFLyQGH7HPSHUD
-
WXUDźDOPLVPRWLHPSR\GXUDQWHVHJXQGRV5HSLWDHOSURFHVRSDUDYROYHUDPRGLILFDUODSDQWDOODDJUDGRV)DKUHQKHLW)
127$/DSDQWDOODPXHVWUDVLHPSUHODWHPSHUDWXUDDPELHQWH
excepto al
configurar la temperatura Definida o el Sincronizador de retardo.
Power
On/Off
Fan
Mode
Auto
Reset
Filter
High
Med
Low
Cool
Fan Only
Energy Saver
Delay
1-24 Hrs
Set
+
-
8
La luz indica que la unidad está en
el modo de Ajuste de temperatura
o de Tiempo de retardo.
La luz indica que el
temporizador de retardo
está configurado.
Control Remoto
USO DEL
ACONDICIONADOR DE
A
IRE
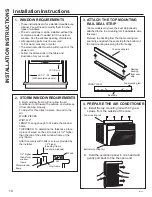
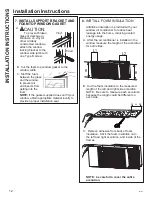
Summary of Contents for AEM06 Series
Page 14: ...14 49 7811 Notes NOTES...
Page 30: ...49 7811 Notas NOTAS...


