background image

Installation Instructions

6

A

B

2 Frame locking brackets

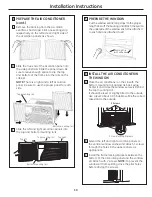
  PREPARE THE WINDOW


 Cut the window seal (2 long strips) to the proper 

length. Peel off the backing and attach the seal to 

the underside of the window sash. One attached 

to sash and one attached to sill.

5

3 Screws

C

10

INSTALL THE AIR CONDITIONER IN 

THE WINDOW

Place the air conditioner on the sill with the   

bottom mounting rail against its back edge.   

Center it and close the window securely behind   

the top mounting rail.  

It should be level or slightly tilted to the outside.   

Use a level; about a 1/3 bubble will be the correct   

case slant to the outside.

Extend the left and right accordion panels to 

the vertical window sashes and attach 3 screws 

through the holes in the upper panels, as 

appropriate.
Install the frame locking brackets between the 

bottom of the accordion panel and the window 

sill. Attach with 2 screws. 

NOTE: 

To prevent the 

window sill from splitting, drive the pilot holes 

before driving the screws.

Sealing Strip  

(with adhesive)

  PREPARE THE AIR CONDITIONER 

FRQW

Remove the backing from the accordion 

seal (two short strips). Stick one sealing strip 

respectively on the left side and right side of 

the accordion panels, as shown.

Slide the free end of the accordion panel into 

the side panel rails. Slide the panel down. Be 

sure to leave enough space to slip the top 

and bottom of the frame into the rails on the 

cabinet.  

NOTE:

 There is a right and a left accordion 

panel. Be sure to use the proper panel for each 

side.

Slide the left and right accordion panels into 

the top and bottom mounting rails.

4

C

Top left

Top right

Top mounting rail

Bottom mounting rail

D

Top mounting rail

Bottom mounting rail

E

Summary of Contents for AEH12 Series

Page 1: ...r Warranty 13 49 7752 2 01 16 GE Owner s Manual and Installation Instructions Write the model and serial numbers here Model _________________________ Serial __________________________ Find these numbe...

Page 2: ...safety do not store or use combustible materials gasoline or other flammable vapors or liquids in the vicinity of this or any other appliance All air conditioners contain refrigerants which under fede...

Page 3: ...ectrician to make sure the outlet is properly grounded Where a 2 prong wall outlet is encountered it is your personal responsibility and obligation to have it replaced with a properly grounded 3 prong...

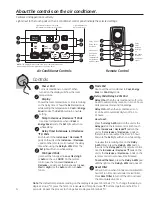
Page 4: ...onditioner is off it can be set to automatically come on in 1 to 24 hours at its previous mode and fan settings HOD 2 When the air conditioner is on it can be set to automatically turn off in 1 to 24...

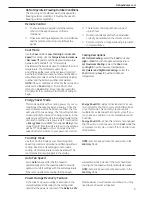
Page 5: ...y set to the speed needed to provide optimum comfort settings with the set temperature If the room needs more cooling the fan speed will automatically increase If the room needs less cooling the fan s...

Page 6: ...iding it back into position NOTES Use 2 AAA 1 5 volt alkaline batteries Do not use rechargeable batteries Remove the batteries from the remote control if the system is not going to be used for a long...

Page 7: ...prong outlet it is your responsibility to have it replaced with a properly grounded 3 prong wall outlet Some models require 230 208 volt AC protected with a time delay fuse or circuit breaker These mo...

Page 8: ...cking bracket 1 PARTS INCLUDED SSHDUDQFH PD YDU Frame locking bracket 2 Right accordion panel Left accordion panel Foam top window gasket Accordion panel seal 2 Window sill and sash seal 2 Foam Insula...

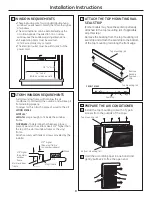
Page 9: ...dow See the window opening dimensions All supporting parts must be secured to firm wood masonry or metal The electrical outlet must be within reach of the power cord 1 2 1 2 higher than storm window f...

Page 10: ...anels as appropriate Install the frame locking brackets between the bottom of the accordion panel and the window sill Attach with 2 screws NOTE To prevent the window sill from splitting drive the pilo...

Page 11: ...e jamb with one screw B C Wood Vinyl Installation Instructions 11 INSTALL FOAM INSULATION Additional insulation is provided with your window air conditioner to reduce heat leakage into the home reduci...

Page 12: ...here are no curtains blinds or furniture not cool as it should blocking the front of the air conditioner The temp control may On models with touch pads In the Cool mode press the QRW EH VHW FRUUHFWO D...

Page 13: ...cceeding owner for products purchased for home use within the USA Some states do not allow the exclusion or limitation of incidental or consequential damages This warranty gives you specific legal rig...

Page 14: ...es de instalaci n 20 24 Solucionar problemas 25 Sonidos de operaci n normales 25 Servicio al consumidor Garant a 26 Servicio al consumidor 27 Escriba los n meros de modelo y serie aqu de Modelo_______...

Page 15: ...s inflamables en la proximidad de ste o alg n otro electrodom stico Todos los acondicionadores de aire contiene refrigerantes los que por Ley Federal deben ser removidos antes de desecharlos Si usted...

Page 16: ...macorriente y el circuito para cerciorarse de que el tomacorriente est conectado a tierra de la manera apropiada Donde exista un tomacorriente de dos tomas es su responsabilidad y obligaci n personal...

Page 17: ...Retardo del control remoto Cada toque de las teclas Aumento Reducci n en la unidad o las teclas Aumento Reducci n en el control remoto definir el temporizador en intervalos de 1 hora La luz de Ajuste...

Page 18: ...e la opci n en Velocidad de ventilador autom tica para definir autom ticamente la velocidad necesaria para proporcionar una configuraci n de comodidad ptima con la temperatura elegida Si la habitaci n...

Page 19: ...de colocarlo otra vez en su lugar No lave el filtro en un lavavajillas PRECAUCI N NO OPERE el acondicionador de aire sin el filtro debido a que la suciedad y las pelusas lo obstruir n y reducir n su...

Page 20: ...acondicionador de aire Los cables caseros de aluminio podr an presentar problemas especiales Consulte a un t cnico electricista calificado ANTES DE INICIAR Lea estas instrucciones completa y cuidados...

Page 21: ...porte para bloqueo de ventana 1 PARTES INCLUIDAS Apariencia puede variar Soporte de cierre de la estructura 2 Riel de montaje superior Acondicionador de aire Banda de sellado del riel de montaje super...

Page 22: ...grueso coloque un pedazo de madera en el umbral para hacerla 1 2 m s alta que la parte superior del marco de la ventana de tormentas o del marco vinilo P guelo firmemente con clavos o con tornillos p...

Page 23: ...iloto antes de colocar los tornillos Retire el apoyo del sello de acorde n dos bandas cortas Adhiera una banda de sellado respectivamente del lado izquierdo y del lado derecho de los paneles de acorde...

Page 24: ...la ventana y vidro quebrado B C Madera Vinilo Instrucciones de instalaci n 24 INSTALE EL AISLANTE DE GOMAESPUMA Aislante adicional es provisto con su acondicionador de aire de ventana a fin de reduci...

Page 25: ...ando Cerci rese de que los registros de la calefacci n no est n abiertos y se encuentran retornando el aire fr o Las bobinas de enfriamiento Ver Acondicionador de aire congel ndose m s adelante se con...

Page 26: ...arant a se extiende al comprador original y cualquier comprador posterior de productos comprados para uso residencial dentro de Estados Unidos Algunos estados no permiten la exclusi n o las limitacion...

Page 27: ...con dificultades auditivas favor de llamar al 800 TDD GEAC 800 833 4322 Piezas y accesorios GEAppliances com Aquellos individuos con la calificaci n necesaria para reparar sus propios electrodom stico...

Page 28: ...es check out our Website today For the hearing impaired please call 800 TDD GEAC 800 833 4322 Parts and Accessories GEApplianceParts com Individuals qualified to service their own appliances can have...

Reviews: