background image

11

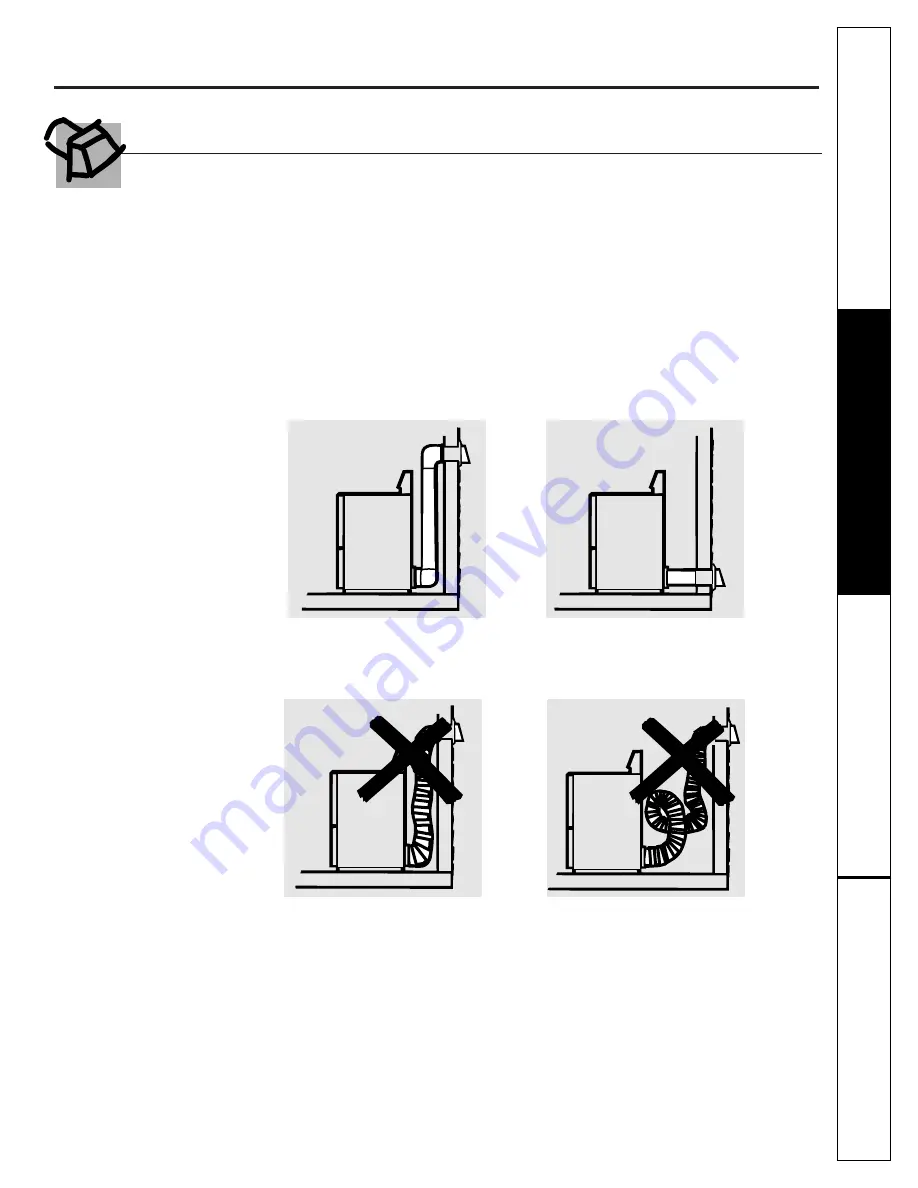
For the best drying performance the dryer needs to be properly vented. 

The dryer will use more energy

and run longer if it is not vented to the below specifications. Carefully follow the details on Exhausting in
the Installation Instructions.

Use only rigid metal or flexible metal 4

diameter 

ductwork inside the dryer cabinet or for exhausting 
to the outside.

Do not use plastic or other combustible ductwork.

Use the shortest length possible.

Do not crush or collapse.

Avoid resting the duct on sharp objects.

Venting must conform to local building codes.

Venting the Dryer

Customer Service

Troubleshooting T

ips

Operating Instructions

Safety Instructions

Correct
Venting

Incorrect
Venting

Summary of Contents for 3300

Page 1: ...4 00 JR www geappliances com Safety Information 3 5 Operating Instructions Controls 6 7 Features 8 Loading and Using the Dryer 10 Reversing the Door 9 Venting the Dryer 11 Troubleshooting Tips Before You Call For Service 12 13 Customer Service Product Registration 17 18 Service Telephone Numbers Back Cover Warranty 19 ...

Page 2: ...allation Instructions IF YOU NEED SERVICE You ll find many answers to common problems in the Before You Call For Service section If you review our chart of Troubleshooting Tips first you may not need to call for service at all If you do need service you can relax knowing help is only a phone call away A list of toll free customer service numbers is included in the back section Or in the U S you ca...

Page 3: ...cal switch do not use any phone in your building Clear the room building or area of all occupants Immediately call your gas supplier from a neighbor s phone Follow the gas supplier s instructions carefully If you cannot reach your gas supplier call the fire department 5 4 3 2 1 California Safe Drinking Water and Toxic Enforcement Act This act requires the governor of California to publish a list o...

Page 4: ...ed a cleaning solvent or that contains flammable materials such as cleaning cloths mops towels used in beauty salons restaurants or barber shops etc must not be placed in or near the dryer until solvents or flammable materials have been removed There are many highly flammable items used in homes such as acetone denatured alcohol gasoline kerosene some household cleaners some spot removers turpenti...

Page 5: ... qualified technician See the Loading and Using the Dryer section If yours is a gas dryer it is equipped with an automatic electric ignition and does not have a pilot light DO NOT ATTEMPT TO LIGHT WITH A MATCH Burns may result from having your hand in the vicinity of the burner when the automatic ignition turns on You may wish to soften your laundered fabrics or reduce the static electricity in th...

Page 6: ... locate your model number on the label on the front of the dryer behind the door Throughout this manual features and appearance may vary from your model Operating Instructions Safety Instructions Customer Service Troubleshooting Tips Models Type 483 485 2000 and 3300 Optional Features on some models 2 3 1 Models Type 453 and 463 2 3 1 Optional Feature on some models Model Type 4500 Model Type 333 ...

Page 7: ...s select OPTIMUM DRY on some models or select the Preferred Regular Setting marked with an EASY CARE For wrinkle free permanent press and delicate items and knits PERMANENT PRESS TIMED DRY Set the Cycle Selector at the desired drying time DAMP DRY For leaving items partially dry DEWRINKLE For removing wrinkles from items that are clean and dry or that are very lightly damp QUICK FLUFF For fresheni...

Page 8: ...ally when drying fabrics like polyester knits and permanent press These fabrics should be removed so wrinkles won t set in Drum Lamp On some models Before replacing the light bulb be sure to unplug the dryer power cord or disconnect the dryer at the household distribution panel by removing the fuse or switching off the circuit breaker Reach above dryer opening from inside the drum Remove the bulb ...

Page 9: ...ch hinge on the dryer face half way With one hand holding the top of the door and the other hand holding the bottom remove the door from the dryer by lifting it UP and OUT Rotate the door 180 Insert it on the opposite side of the opening by moving the door IN and DOWN until the top hinge and the bottom hinge are resting on the top screws inserted in step 1 Remove the remaining screws from the side...

Page 10: ...ross the filter Have a qualified technician vacuum the lint from the dryer once a year The Exhaust Duct Inspect and clean the exhaust ducting at least once a year to prevent clogging A partially clogged exhaust can lengthen the drying time Follow these steps Turn off electrical supply by disconnecting the plug from the wall socket Disconnect the duct from the dryer Vacuum the duct with the hose at...

Page 11: ...s Use only rigid metal or flexible metal 4 diameter ductwork inside the dryer cabinet or for exhausting to the outside Do not use plastic or other combustible ductwork Use the shortest length possible Do not crush or collapse Avoid resting the duct on sharp objects Venting must conform to local building codes Venting the Dryer Customer Service Troubleshooting Tips Operating Instructions Safety Ins...

Page 12: ...s and the dryer Clothes were not completely clean Sometimes stains which cannot be seen when the clothes are wet appear after drying Use proper washing procedures before drying Lint on clothes Lint filter is full Clean lint screen before each load Improper sorting Sort lint producers like chenille from lint collectors like corduroy Static electricity can attract lint See suggestions in this sectio...

Page 13: ...perates easily Check the Installation Instructions to make sure the dryer venting is correct Blown fuses or tripped circuit Replace fuses or reset circuit breakers Since most breaker dryers use 2 fuses breakers make sure both are operating Overloading combining loads Do not put more than one washer load in the dryer at a time Underloading If you are drying only one or two items add a few items to ...

Page 14: ...Operating Instructions Safety Instructions Customer Service Troubleshooting Tips Notes 14 ...

Page 15: ...15 Notes Operating Instructions Safety Instructions Customer Service Troubleshooting Tips ...

Page 16: ...16 Notes Operating Instructions Safety Instructions Customer Service Troubleshooting Tips ...

Page 17: ...otection or you may request your money back on the remaining value of your contract No questions asked It s that simple Protect your refrigerator dishwasher washer and dryer range TV VCR and much more any brand Plus there s no extra charge for emergency service and low monthly financing is available Even icemaker coverage and food spoilage protection is offered You can rest easy knowing that all y...

Page 18: ...or register online at www geappliances com 1 2 3 Model Number Serial Number Cut here Complete and mail your Consumer Product Ownership Registration today Have the peace of mind of knowing we can contact you in the unlikely event of a safety modification After mailing the registration below store this document in a safe place It contains information you will need should you require service Our serv...

Page 19: ...of the product if it is abused misused or used for other than the intended purpose or used commercially Replacement of house fuses or resetting of circuit breakers Damage to the product caused by accident fire floods or acts of God Incidental or consequential damage to personal property caused by possible defects with this appliance What GE Will Not Cover This warranty is extended to the original ...

Page 20: ...still be there after your warranty expires In Canada call 1 800 461 3636 Parts and Accessories In the U S 800 626 2002 Individuals qualified to service their own appliances can have parts or accessories sent directly to their homes VISA MasterCard and Discover cards are accepted Instructions contained in this manual cover procedures to be performed by any user Other servicing generally should be r...

Reviews: