background image

5

T

ABLE


OF

 C

ONTENTS

E

QUIPMENT

 A

PPROVAL

 I

NFORMATION

........ 2

I

NTERFERENCE

 I

NFORMATION

................... 3

F

EATURES

............................................ 4

B

EFORE

 Y

OU

 B

EGIN

............................... 6

P

ARTS

 C

HECKLIST

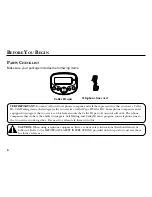
............................................. 6

I

NTRODUCTION


TO

 CID S

ERVICE

.............. 7

Y

OUR

 C

ALLER

 ID C

ALL

 W

AITING

 U

NIT

 A

LLOWS

Y

OU

 T

O


........................................................... 7

I

NSTALLATION

....................................... 7

I

MPORTANT

 I

NSTALLATION

I

NFORMATION

.................................................... 7

M

ODULAR

 J

ACK

 R

EQUIREMENTS

.......................... 7

I

NSTALLING


THE

 B

ATTERIES

.................................. 8

C

ONNECTING


A

 T

ELEPHONE

.................................. 9

O

PTIONS

 M

ENU

................................. 10

S

ETTING


THE

 CID L

ANGUAGE

............................. 11

S

ETTING


THE

 LCD C

ONTRAST

............................ 11

S

ETTING


THE

 L

OCAL

 A

REA

 C

ODE

........................ 12

S

ETTING


THE

 10-

DIGIT

 R

EGIONAL

 A

REA

 C

ODES

.... 12

E

XITING


THE

 O

PTIONS

 M

ENU

............................ 13

O

PERATION

........................................ 13

R

ECEIVING

 C

ALLS

............................................ 13

F

LASH

........................................................... 14

C

ALL

 W

AITING

 D

ISPLAY

.................................... 14

R

EVIEWING

 C

ALL

 R

ECORDS

............................... 15

D

ELETING

 C

ALL

 R

ECORDS

................................. 15

T

O

 D

ELETE


AN

 I

NDIVIDUAL

 C

ALL

................... 15

T

O

 D

ELETE

 A

LL

 C

ALLS

................................ 15

D

IAL

............................................................. 15

C

HANGING


THE

 N

UMBER

 F

ORMAT

...................... 16

C

ALLER

 ID M

ESSAGES

........................ 16

T

ROUBLESHOOTING

 T

IPS

....................... 17

G

ENERAL

 P

RODUCT

 C

ARE

..................... 17

I

NDEX

............................................... 18

L

IMITED

 W

ARRANTY

............................. 19

Summary of Contents for 29096

Page 1: ...We bring good things to life 29096 Caller ID with Call Waiting User s Guide ...

Page 2: ...ine Check with your local telephone company Notice must be given to the telephone company upon permanent disconnection of your telephone from your line 2 Rights of theTelephone Company Should your equipment cause trouble on your line which may harm the telephone network the telephone company shall where practicable notify you that temporary discontinuance of service may be required Where prior not...

Page 3: ...that is receiving the interference Reorient or relocate and increase the separation between the telecommunications equipment and receiving antenna Connect the telecommunications equipment into an outlet on a circuit different from that to which the receiving antenna is connected Consult the dealer or an experienced radio TV technician for help If these measures do not eliminate the interference pl...

Page 4: ...by mode Stores the CID information for up to 70 name and number CID records Dials displayed telephone number with area code arrangement Dual review buttons allow forward or backward review of call records FEATURES Electronic contrast control Delete button allows individual or collective deletion of call records Programmable area code New call indicator Unknown Call Private Call Error and No Data S...

Page 5: ...S 8 CONNECTING ATELEPHONE 9 OPTIONS MENU 10 SETTING THE CID LANGUAGE 11 SETTING THE LCD CONTRAST 11 SETTING THE LOCAL AREA CODE 12 SETTING THE 10 DIGIT REGIONAL AREA CODES 12 EXITING THE OPTIONS MENU 13 OPERATION 13 RECEIVING CALLS 13 FLASH 14 CALL WAITING DISPLAY 14 REVIEWING CALL RECORDS 15 DELETING CALL RECORDS 15 TO DELETE AN INDIVIDUAL CALL 15 TO DELETE ALL CALLS 15 DIAL 15 CHANGING THE NUMBE...

Page 6: ...aller ID Some phone companies aren t equipped to integrate the two services which means only the Caller ID part of your unit will work The phone companies that do have the ability to integrate Call Waiting and Caller ID must program your telephone line so the two services work together You need to call and ask them to do this CAUTION When using telephone equipment there are basic safety instructio...

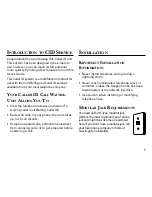
Page 7: ...eview all calls to your phone the unit stores up to 70 call records Screen unwanted calls eliminate harassment from annoying calls or to get prepared before answering a call INSTALLATION IMPORTANT INSTALLATION INFORMATION Never install telephone wiring during a lightning storm Never touch uninsulated telephone wires or terminals unless the telephone line has been disconnected at the network interf...

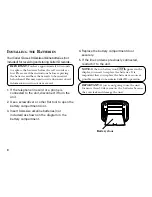
Page 8: ...o the unit disconnect it from the unit 2 Use a screwdriver or other flat tool to open the battery compartment door 3 Insert 3 AA size alkaline batteries not included as shown on the diagram in the battery compartment 4 Replace the battery compartment door securely 5 If the line cord was previously connected reattach it to the unit NOTE If the low battery icon appears in the display you need to rep...

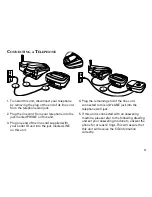
Page 9: ...end of the line cord supplied with your Caller ID unit into the jack marked LINE on this unit 4 Plug the remaining end of the line cord connected to this unit s LINE jack into the telephone wall jack 5 If this unit is connected with an answering machine please refer to the following drawing and set your answering machine to answer the phone for at least 2 rings This will assure that this unit will...

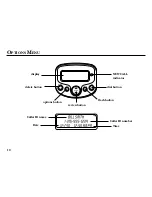
Page 10: ...10 OPTIONS MENU delete options new flash review dial NEW CALL indicator dial button flash button review button options button delete button display Caller ID name Caller ID number Time Date ...

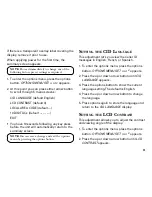
Page 11: ...u press the options button OPTIONS MENU SET or v appears 2 Press the up or down arrow button until LCD CONTRAST appears If there is a transparent overlay label covering the display remove it prior to use When applying power for the first time the summary screen appears NOTE Proceed immediately to change any of the following factory preset settings as required 1 To enter the options menu press the ...

Page 12: ...w the current local area code The default is The first digit flashes indicating it is ready to accept the area code entry 4 Press the down arrow button to choose 9 0 for the first digit 5 When the desired number is flashing press the up arrow button to advance to the next digit 6 Repeat steps 4 and 5 until all the digits for your area code are correct 7 Press options again to store the local area ...

Page 13: ...delete the selected set of the area code by pressing the delete button EXITING THE OPTIONS MENU 1 Press the up or down arrow button until EXIT SETUP appears 2 Press the options button to exit the options menu OPERATION RECEIVING CALLS This unit has a built in real time clock that accurately keeps the current time and date The clock is automatically set and updated each time Caller ID information i...

Page 14: ...iting features unless you are subscribed to receive the services from your local telephone company Check with your local telephone company to confirm both of these services are available If you only have Caller ID service this unit will not receive and display Call Waiting with Caller ID information If you have Call Waiting Caller ID service a tone alerts you there is a new call coming while you a...

Page 15: ...cords are reviewed the indicator turns off When you reach the end of the call records the display shows START END confirming you have reviewed all the records DELETING CALL RECORDS TO DELETE AN INDIVIDUAL CALL When reviewing calls you may delete an individual call by pressing the delete button once The contents of the display will be erased and the remaining Caller ID records are renumbered TO DEL...

Page 16: ... During this time you may press the options button and adjust the number format When you are fininshed the number automatically dials IMPORTANT All phones on the line must be on the hook for this feature to work 4 If the phone is on the hook the counter counts down from ten to zero seconds During this time you may press the options button to adjust the number format Pick up the handset before the ...

Page 17: ...e and not damaged Did you order Caller ID service from your local telephone company This unit requires that you subscribe to Caller ID service in order to work GENERAL PRODUCT CARE To keep your Caller ID unit working and looking good follow these guidelines Avoid putting it near heating appliances and devices that generate electrical noise for example motors or fluorescent lamps DO NOT expose to d...

Page 18: ...n 7 Installation 7 Installing the Batteries 8 Interference Information 3 Introduction to CID Service 7 L Limited Warranty 19 M Modular Jack Requirements 7 O Operation 13 Options Menu 10 P Parts Checklist 6 R Receiving Calls 13 Reviewing Call Records 15 S Setting the 10 digit Regional Area Codes 12 Setting the CID Language 11 Setting the LCD Contrast 11 Setting the Local Area Code 12 T To Delete Al...

Page 19: ...nd setup service adjustments Batteries Damage from misuse or neglect Products which have been modified or incorporated into other products Products purchased or serviced outside the USA Acts of nature such as but not limited to lightning damage Limitation of Warranty THE WARRANTY STATED ABOVE ISTHE ONLY WARRANTY APPLICABLE TO THIS PRODUCT ALL OTHER WARRANTIES EXPRESS OR IMPLIED INCLUDING ALL IMPLI...

Page 20: ...Model 29096 15861690 Rev 1 E S 02 20 Printed in China ATLINKS USA Inc 101 West 103rd Street Indianapolis IN 46290 2002 ATLINKS USA Inc Trademark s Registered Marca s Registrada s ...

Page 21: ...29096 Creamos cosas buenas para la vida Identificador de Llamadas con Llamada en Espera Caller ID with CallWaiting Guía del Usuario ...

Page 22: ... por eso es posible que Ud no pueda usar su propio equipo telefónico si Ud estuviera compartiendo la misma línea telefónica con otros abonados Se debe notificar la compañía telefónica cuando se desconecte permanentemente su teléfono de la línea 2 Derechos de la Compañía Telefónica Si su equipo causase algún problema en su línea que pudiera dañar la red telefónica la compañía telefónica siempre que...

Page 23: ...la posición o cambie la ubicación y aumente la distancia entre el equipo de telecomunicaciones y la antena receptora de la radio o de la televisión que está recibiendo la interferencia Conecte el equipo de telecomunicaciones a una toma en un circuito diferente del circuito al cual la antena receptora esté conectada Si estas medidas no eliminan la interferencia favor de consultar a su distribuidor ...

Page 24: ...ión del Identificador de Llamadas CID hasta para 70 archivos de nombre y número del CID Marca el número telefónico con el código de área de larga distancia ya incluído Doble botón que le permite recorrer hacia adelante o atrás para revisar datos de llamadas Control de contraste electrónico Botón para borrar que le permite borrar datos de llamadas individuales o colectivas Clave de área programable...

Page 25: ... IDIOMA PARA EL IDENTIFICADOR DE LLAMADAS 11 PROGRAMACIÓN DEL CONTRASTE DEL VISOR 11 PROGRAMACIÓN DEL CÓDIGO DE AREA LOCAL 12 PROGRAMACIÓN DEL CÓDIGO DE AREA REGIONAL DE 10 DÍGITOS 12 PARA SALIR DEL MENU DE OPCIONES 13 OPERACIÓN 13 PARA RECIBIR LLAMADAS 13 FLASH SERVICIOS ESPECIALES 14 VISOR DE LLAMADA EN ESPERA 14 PARA REVISAR ARCHIVOS 14 PARA BORRAR ARCHIVOS 15 PARA BORRAR UNA LLAMADA INDIVIDUAL...

Page 26: ...Llamadas Tipo II Algunas compañías telefónicas no están equipadas para integrar los dos servicios lo cual implica que unicamente funcionará la parte de su aparato para Identificador de Llamadas Las compañías telefónicas que tienen la capacidad de integrar Llamada en Espera e Identificador de Llamadas deben programar su línea telefónica para que ambos servicios funcionen juntos Usted tiene que llam...

Page 27: ...entificador de Llamada en Espera Revisar todas las llamadas recibidas el aparato almacena hasta 70 archivos de llamadas Filtrar llamadas no deseadas eliminar llamadas molestas o prepararse antes de contestar una llamada INSTALACIÓN INFORMACIÓN IMPORTANTE PARA LA INSTALACIÓN Nunca instale el cableado del teléfono durante una tormenta de relámpagos Nunca toque alambres telefónicos o terminales que n...

Page 28: ...rato 2 Utilice un destornillador o alguna otra herramienta plana para abrir el compartimento de las baterías 3 Coloque 3 baterías alcalinas tamaño AA no incluídas como se muestra en el diagrama dentro del compartimento de baterías 4 Vuelva a colocar la puerta del compartimento y asegúrese de que quede bien cerrada 5 Si el cable de la línea estaba previamente conectado vuelva a conectar al aparato ...

Page 29: ...cluído en su empaque con el aparato de Identificación de Llamadas en un contacto marcado LINE en el aparato 4 Conecte el otro extremo del cable telefónico que ha conectado ya en el contacto marcado LINE en un contacto de pared 5 Si este aparato está conectado con un contestador por favor refiérase al siguiente diagrama y programe su contestador para contestar el teléfono después de por lo menos 2 ...

Page 30: ...nico del Caller ID Hora Fecha Si hay una etiqueta transparente cubriendo el visor por favor quítela antes de usar el aparato Cuando pasa corriente por primera vez la pantalla sumario aparece NOTA Proceda inmediatamente a cambiar cualquiera de las siguientes programaciones pre establecidas de fábrica que vienen con el aparato como sea requerido 1 Para entrar al menú de opciones oprima el botón de o...

Page 31: ...otón para opciones OPTIONS para mostrar el nivel de contraste actualmente programado Hay 5 niveles de contraste y el nivel pre programado es 3 2 En este punto usted puede oprimir cualquiera de los botones de las flechas para recorrer las 5 pantallas de menús Idioma del Identificador de Llamadas CID LANGUAGE pre programado de fábrica en inglés Contraste del Visor CONTRAST pre programado en el nivel...

Page 32: ...ogramado es El primer dígito parpadea indicando que está listo para aceptar la inscripción de la clave de área 4 Oprima el botón de la flecha hacia abajo para escoger entre el 9 y 0 para el primer dígito 5 Cuando el número deseado está parpadeando oprima el botón de la flecha hacia arriba para avanzar al siguiente dígito 6 Repita los pasos 4 y 5 hasta que todos los dígitos para su código de área e...

Page 33: ...IONES 1 Oprima el botón de la flecha hacia arriba o hacia abajo hasta que aparezca la indicación de salida SALIDA PROGRAMAC 2 Oprima el botón options para salir del menú de opciones OPERACIÓN PARA RECIBIR LLAMADAS Este aparato tiene un reloj integrado que mantiene la hora y la fecha actual correctamente El reloj es programado automáticamente y se pone al día cada vez que se recibe información del ...

Page 34: ...va entrando mientras usted está en otra llamada Usted experimentará un pequeño rato de silencio mientras el aparato procesa la información del Identificador de Llamadas Cuando entra una señal de llamada en espera la indicación de llamada en espera MENSAJE parpadea en la pantalla Entonces el nombre y el número telefónico de la persona que llama aparece en la pantalla durante 20 segundos Oprima el b...

Page 35: ...rar delete durante más de 3 segundos La pantalla le preguntará si borra todos los archivos BORRARTODO 2 Oprima delete nuevamente para confirmar MARCAR Si su aparato con Identificador de Llamadas está conectado a una línea con marcado por tono usted puede utilizar el botón para marcar dial cualquier número telefónico que se muestra en la pantalla IMPORTANTE Todos los teléfonos en la línea deben est...

Page 36: ...modalidad de inactividad y el número telefónico se marca automáticamente 5 Oprima el botón de servicios flash para salir y volver a la modalidad de revisión MENSAJES DEL IDENTIFICADOR DE LLAMADAS Los siguientes mensajes especiales indican el estado actual de un mensaje o del aparato NINGUNA LLAMADA El registro de llamadas está vacío DESCONOCIDO La llamada entrante no tiene servicio de Identificado...

Page 37: ... suave Nunca use un agente de limpieza fuerte ni un polvo abrasivo ya que esto dañará el acabado Guarde el empaque original en caso de que usted necesite enviar el aparato empacado en un futuro CÓMO OBTENER SERVICIOS DE MANTENIMIENTO Este producto puede únicamente ser reparado por el fabricante o sus agentes de reparación autorizados Cualquier cambio o modificación no aprobados expresamente por AT...

Page 38: ...r de Llamadas 16 Menú de Opciones 10 O Operación 13 P Para Borrar Archivos 15 Para Borrar todas las Llamadas 15 Para Borrar una Llamada Individual 15 Para Cambiar el Formato de Números 15 Para Conectar elTeléfono 9 Para Instalar las Baterías 8 Para Recibir Llamadas 13 Para Revisar Archivos 14 Para Salir del Menu de Opciones 13 Programación del Código de Area Local 12 Programación del Código de Are...

Page 39: ...so o negligencia Productos que han sido modificados o incorporados a otros productos Productos comprados o que han recibido servicio fuera de los Estados Unidos Desastres naturales por ejemplo y sin limitarse a ellos daños por relámpagos Limitaciones sobre la Garantía LA GARANTÍA ESPECIFICADA ANTERIORMENTE ES LA ÚNICA GARANTÍA APLICABLE A ESTE PRODUCTO CUALQUIER OTRA GARANTÍA EXPRESA O IMPLÍCITA I...

Page 40: ...Modelo 29096 15861690 Rev 1 E S 02 20 Impreso en China ATLINKS USA Inc 101 West 103rd Street Indianapolis IN 46290 2002 ATLINKS USA Inc Trademark s Registered Marca s Registrada s ...

Reviews: