GE Security NetworkX NX-1300E User Manual Download Page 4

Page 2 

THIS MANUAL IS FURNISHED TO HELP YOU UNDERSTAND YOUR 

SECURITY SYSTEM AND BECOME PROFICIENT IN ITS OPERATION.  

ALL USERS OF YOUR SECURITY SYSTEM SHOULD READ AND FOLLOW 

THE INSTRUCTIONS AND PRECAUTIONS IN THIS BOOKLET AND, IF 

POSSIBLE, PRACTICE ON THE KEYPAD CONTROL WHILE YOUR 

PROFESSIONAL INSTALLER IS ON SITE.  FAILURE TO DO SO COULD 

RESULT IN THE SECURITY SYSTEM NOT WORKING PROPERLY. THIS 

BOOKLET SHOULD BE KEPT IN AN ACCESSIBLE LOCATION FOR THE 

LIFE OF THE SECURITY SYSTEM. IF YOU DO NOT UNDERSTAND ANY 

PART OF THIS MANUAL YOU SHOULD NOTIFY YOUR INSTALLING 

COMPANY SHOWN ON PAGE 1. 


The SECURITY CONTROL can be turned on (ARMED) and off (DISARMED) by 

entering a 4 or 6 digit code into the Keypad Control, which is similar to a 

telephone keypad. If your Security Control has been so programmed, you 

may be able to turn on (ARM) your System by simply pressing the [STAY] or 

[EXIT] key. The system must always be disarmed using a 4 or 6 digit code. 

The LED keypad includes up to 35 lights and a built-in electronic sounder. 

These provide specific information relating to the status of the security system 

which is described in the booklet. Understanding what the lights and sounds 

mean will help you to easily operate your system. 


Keep in mind, the level of security you will obtain with this system 

relates specifically with two major factors: 

1.  The quantity, quality and placement of security devices attached to 

this system. 

2.  The knowledge you have of the security system and how that 

knowledge is utilized in a weekly test of the complete system. 


You should be aware of the following facts when preparing a 

safety/security plan for your home/business. 


Your security system is an electronic device and is subject to failure or 

malfunction. Do not rely on it as your single source of security. 


Your system should be tested weekly. 


Your system will not work without power. 


Warning devices will need to be loud enough, wired correctly, and properly 

placed to provide notification of an alarm event. 


Smoke and heat detectors may not detect heat and smoke in all situations. 


Use qualified security professionals to install and maintain your security 

system. 


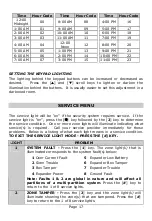
It may be possible to arm the security system without the backup battery 

connected. Your periodic test should be done with AC Power removed to 

verify the battery is connected and adequately charged. 


Care should be taken to plug in and restrain the AC Transformer after 

testing. 


Please read the following information and instructions carefully 

before operating your security control system.  


Summary of Contents for NetworkX NX-1300E

Page 1: ...NetworX Series NX 1300E LED Keypad User s manual ...

Page 2: ......

Page 3: ...Arm s Battery Test Communicator Test Re Exit Siren Test s These features should not be enabled on UL listed systems ENTRY EXIT DELAY TIMES Exit Delay Time __________ Secondary Exit Delay Time ________ Entry Delay Time _________ Secondary Entry Delay Time _______ ZONE DESCRIPTIONS 01 _______________ 09 _______________ 17 _______________ 02 _______________ 10 _______________ 18 _______________ 03 __...

Page 4: ...d sounds mean will help you to easily operate your system Keep in mind the level of security you will obtain with this system relates specifically with two major factors 1 The quantity quality and placement of security devices attached to this system 2 The knowledge you have of the security system and how that knowledge is utilized in a weekly test of the complete system You should be aware of the...

Page 5: ...IN THE STAY MODE 8 USING THE QUICK ARM 9 CHANGING MODES WHILE SYSTEM IS ARMED 9 DISARMING THE SYSTEM 9 CANCEL ABORT FEATURE 9 BYPASSING ZONES 12 GROUP BYPASS 12 UNBYPASSING 12 TURNING THE DOOR CHIME ON AND OFF 12 CHANGING USER CODES 13 ASSIGNING USER CODE AUTHORITY LEVELS 13 OTHER KEYPAD FUNCTIONS 15 SETTING THE KEYPAD TONE 15 VIEW ALARM MEMORY 15 TEST FUNCTION 15 RESET FUNCTION 16 SET SYSTEM DATE...

Page 6: ... being operated under duress Forced Arming An option that allows the system to be turned on ARMED with one or more zones open A system that is ready to be force armed will flash the ready light Note Those zones that are not ready will not create an alarm Function Code A Function Code is either a four 4 or six 6 digit code that has been programmed by the installer to operate a device Group Bypass A...

Page 7: ...ollowed by the CANCEL key while this light is flashing all abortable reports will stop the communication process Note The abort feature must be enabled Entering a code followed by the CANCEL key during or after an alarm report to the central station will cause the cancel light to come on It will stay on until the central station has received the cancel report Note The cancel feature must be enable...

Page 8: ... is on when the system is ready to arm and flashes if ready to force arm The ready light is off when the system is not ready to arm because of a zone s being faulted STAY LIGHT The stay light is on when the all interior motion detector zones are bypassed ZONE LIGHT The zone lights are off when everything is normal A zone light will be on if the zone has been bypassed If a zone light is flashing th...

Page 9: ... two seconds If your system is connected to a monitoring center an emergency report could be transmitted to that center NOTE Some Panic Hold Up alarms are programmed to be silent at the protected site while reporting an alarm to the monitoring center Check with your installing company to determine how your security system will respond to the Panic Hold Up activation KEYPAD FUNCTIONS ARMING YOUR SY...

Page 10: ...ing company listed on page 1 of this booklet for service Step 2 Enter your 4 or 6 digit user code If Auto Bypass is enabled all interior zones will be bypassed if you do not leave through a designated entry exit door If Auto Bypass is enabled omit Step 3 When Auto Instant is enabled if you do not leave through a designated entry exit door the instant light will illuminate indicating that the entry...

Page 11: ...y by pressing the STAY key again DISARMING THE SYSTEM When you enter the protected area through one of the designated Entry Exit doors the keypad control will sound a continuous tone for the duration of the entry delay time or until you enter a valid code The red armed light will go off and the tone will stop The security system is now DISARMED If a valid code is not entered before the end of the ...

Page 12: ...Page 10 CENTER SPREAD KEYPAD PHOTO GOES HERE ...

Page 13: ...Page 11 CENTER SPREAD KEYPAD PHOTO GOES HERE ...

Page 14: ...ass light will stop flashing upon exiting the Bypass Mode GROUP BYPASS By pressing the BYPASS key followed by the 0 key then the BYPASS key again all zones that are designated as group bypass zones will be bypassed Press the BYPASS key again to exit group bypassing UNBYPASSING To manually unbypass zones perform the bypassing procedure on a zone that is already bypassed The corresponding light for ...

Page 15: ...ter r r r r for a 4 digit code or r r r r r r for a 6 digit code Step 5 The ready light will flash indicating you are back at Step 2 above If the code is rejected the sounder will beep 3 times Step 6 If another user code needs to be programmed return to Step 3 Step 7 Press the key while the ready light is flashing to exit the User Code Programming Mode ASSIGNING USER CODE AUTHORITY LEVELS Assign a...

Page 16: ...re the user has access To change any of the partitions where the user has access press numbers corresponding to areas where you want to give the user access or deny access Example If zone light 2 is lit then the user is assigned access to partition 2 By pressing the 2 key the light will go off denying access to partition 2 Refer to chart shown below LIGHT PARTITIONS ASSIGNED 1 Partition 1 2 Partit...

Page 17: ...econds Step 4 If another key is pressed the system will remain in the new partition until no keys have been pressed for 60 seconds VIEW ALARM MEMORY Step 1 Press r 3 The zone s that created the last alarm will be displayed on the keypad Step 2 The ALARM MEMORY feature will flash those zones that created alarms and will light steady those zones that were bypassed during the last alarm TEST FUNCTION...

Page 18: ...nter the Day of Week 1 Sunday 3 Tuesday 5 Thursday 7 Saturday 2 Monday 4 Wednesday 6 Friday Step 3 Enter the Month Code Must always be two 2 digits 01 January 05 May 09 September 02 February 06 June 10 October 03 March 07 July 11 November 04 April 08 August 12 December Step 4 Enter the Day Code Must always be two 2 digits Example The 5th would be entered as 0 5 Step 5 Enter the last two digits of ...

Page 19: ... press the r key followed by the 2 key to determine the service condition One or more zone lights will illuminate indicating what service s is required Call your service provider immediately for these problems Below is a listing of what each light means in a service condition TO EXIT THE SERVICE LIGHT MODE PRESS THE KEY LIGHT PROBLEM SYSTEM FAULT Press the 1 key The zone light s that is illuminate...

Page 20: ...service light will remain lit until the trouble clears and a user code is entered SEE NOTE 7 FAILURE TO COMMUNICATE This light will illuminate when there is a failure to communicate between your system and the central station SEE NOTE 8 LOSS OF SYSTEM TIME This light will illuminate when there has been a loss of power and your system clock needs to be reset Instructions are on page 16 SEE NOTE NOT...

Page 21: ... home Show windows doors stairs and rooftops that can be used for escape Indicate each occupant s escape routes Always keep these routes free from obstruction Determine two means of escape from each room One will be the normal exit from the building The other may be a window that opens easily An escape ladder may have to be located near the window if there is a long drop to the ground below Set a ...

Page 22: ...Page 20 Quincy MA 02269 The following are examples of evacuation plans A plan unique to your home or business should be drawn and memorized by each occupant ...

Page 23: ...Page 21 SYSTEM NOTES ...

Page 24: ...NX 1300E SERIES USER S MANUAL NX1300EUC02 REV C 09 19 02 ...

Reviews: