GE Security Legend User Manual Download Page 51

47

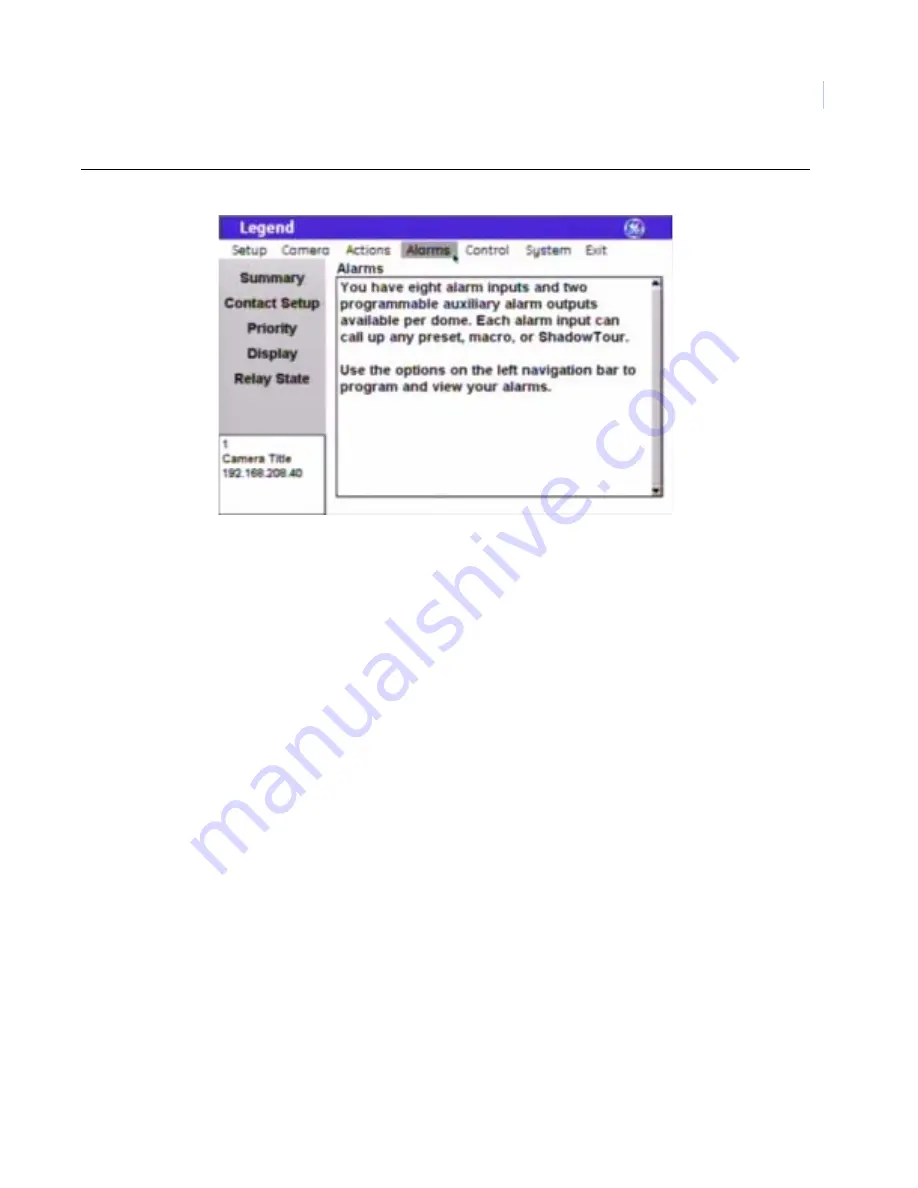
Figure 40. Alarms menu   


Summary screen  ( Alarms | Summary )

You can view the status of alarms from the summary page. Alarms are presented in numerical order with 
whatever titles have been assigned. Statuses are as follows:  

On

: Status shows as On if the contact for the alarm is in its active state. So, for a N/O (normally open) 

contact that is closed, the status reports as on, because it is in its activated, abnormal state.

Off

: Status shows as Off if the contact for the alarm is in its inactive state. So, for a N/C (normally 

closed) contact that is closed, the status reports as off, because it is in its normal state.

Upon initial installation, all alarm contacts are N/O. Changing an alarm to N/C will not refresh the summary 
page until after the contact has been tripped or the camera has been rebooted. All other changes will refresh 
immediately. 

Summary of Contents for Legend

Page 1: ...GE Security Legend User Manual ...

Page 2: ...nly in accordance with the license terms THE ENCLOSED PROGRAM IS FURNISHED SUBJECT TO THE TERMS AND CONDITIONS OF THIS AGREEMENT RETENTION OF THE PROGRAM FOR MORE THAN 30 DAYS OPENING OF THE SEALED WRAPPER IF ANY SURROUNDING THE PROGRAM OR USE OF THE PROGRAM IN ANY MANNER WILL BE CONSIDERED ACCEPTANCE OF THE AGREEMENT TERMS IF THESE TERMS ARE NOT ACCEPTABLE RETURN THE UNUSED PROGRAM AND ANY ACCOMP...

Page 3: ...6 Using the keyboard of the programming interface 6 Basic programming 7 Presets 7 Programming presets from the keypad 7 Programming presets with the programming interface 8 ShadowTours 9 Advanced programming 10 Setup menu 10 Memory screen Setup Memory 10 Passcode screen Setup Passcode 11 Title Date screen Setup Title Date 13 Network screen Setup Network 14 Preferences screen Setup Preferences 15 C...

Page 4: ...9 Diagnostics screen System Diagnostics 60 Status screen System Status 60 Logs screen System Log 61 Firmware Update screen System Firmware Update 61 System operation 63 Setting autopan limits 63 Rebooting the dome 63 Resetting the dome 63 Calling up presets from a keypad 64 Interrelationship between the Exposure and Day Night features 64 Troubleshooting maintenance support 65 Troubleshooting your ...

Page 5: ...plying with all applicable codes should perform all required hardware installation Conventions used in this document The following conventions are used in this document Safety terms and symbols These terms may appear in this manual References If you want to investigate related topics these other documents may prove helpful GE Security Legend Installation Manual 1052026 GE Security KTD 405 Controll...

Page 6: ...e however is not backward compatible Other enhancements that relate to performance and operation include passcode protection that prevents unauthorized personnel from changing programming settings while still allowing operator access The dome also now offers an Ethernet connection to flash software upgrades over a standard IP network using a standard web browser For additional details refer to the...

Page 7: ...mpatible keypads and protocols please contact your GE sales representative or Technical Support To access the programming interface from a KTD 405 keypad 1 At the normal display press and hold the set key on the keypad until you hear a beep and the programming code display appears on the keypad s LCD Figure 2 Normaldisplay visiblebeforeprogramminginterfaceaccessed 2 At the enter programming code d...

Page 8: ...the joystick Figure 8 See Monitor For Menus display 6 If passcodes are turned on select your passcode level and enter your passcode Figure 9 If passcodes are turned off you will be taken directly to the main programming screen Figure 10 You can now access any programming parameters that are allowed by your passcode Figure 9 Log on screen for the programming interface Figure 10 Main programming scr...

Page 9: ...ge Joystick as simulated mouse When the joystick is a simulated mouse use it as described here to enter menus and commands Joystick as video controller When the joystick is controlling video use the keypad s keys to enter the following programming commands Saving accepting live video programming To save or accept live video programming such as positioned titles privacy masks presets and ShadowTour...

Page 10: ...setting autopan limits Using the keyboard of the programming interface Open the keyboard by selecting the ab icon After you have entered the necessary characters select Done on the keyboard to return to the page and select OK to save the changes made to the page Figure 12 Using the keyboard of the programming interface Table 1 Keypad shortcuts for details see the KTD 405 Controller Keypad User Man...

Page 11: ...firmware version 1 2 09 or later then you can call up all 127 preset numbers 1 through 127 directly from the keypad If however you have a GE KTD 405 keypad with an earlier version of firmware then you can use the keypad to call up only the first 63 preset numbers 1 through 63 If you are using presets 62 and 63 for your left and right autopan limits then you have a total of 125 or 61 preset numbers...

Page 12: ... level and enter your passcode If passcodes are turned off you will be taken directly to the main programming screen The programming interface will appear on the monitor screen and you will start using the joystick to enter commands 7 Use the joystick to pan tilt and zoom the camera to the desired view 8 Press the iris or set key on the keypad to save accept the preset position or press the iris o...

Page 13: ... level and enter your passcode If passcodes are turned off you will be taken directly to the main programming screen The programming interface will appear on the monitor screen and you will start using the joystick to enter commands 8 Press the iris or set key on the keypad to save accept the ShadowTour or press the iris or esc key to cancel abort the ShadowTour Both canceling and saving the Shado...

Page 14: ...ad and save the changes made on the programming page by selecting OK in the programming interface when you return to programming mode from live video mode Setup menu This is the beginning of your system s setup Start here to number and title your dome turn on off or change passcodes establish network connectivity set the north point and manage your dome s memory Figure 15 Setup menu Memory screen ...

Page 15: ...r access and are not required to log on If only the Admin and Operator passcodes are programmed then anyone can still access the entire programming interface as an installer since the Installer passcode was not programmed CAUTION CAUTION Clearing memory replaces your custom programmed settings with the factory default settings Select memory clear options You can clear all or specific portions of y...

Page 16: ... the page Installer passcode The installer passcode feature allows the installer to operate and change all dome features including all three default passcodes installer admin and operator There is a 4 digit limit Admin passcode The admin passcode feature allows your system administrator to operate and change all dome features except passcodes There is a 4 digit limit Operator passcode The operator...

Page 17: ...r titles Display title The Display title feature enables or disables the display of individual camera titles on the monitor screen Choices are On default and Off Title POS position The camera title will appear on screen in a default position on the monitor screen upper left corner but you can reposition it with the Title POS button Be aware of where you already have other titles privacy masks pres...

Page 18: ...een in the color selected Choices are as shown Default is Black Block transparency You can set the block background to be a solid color or a transparency The block will appear on screen in the transparency selected Choices are as shown Default is No color Installation date Enter the actual date of installation for your camera Include the punctuation in the format shown CAUTION CAUTION When flashin...

Page 19: ...ided as the unique address of the dome the MAC address allows you to connect to the dome before you have set up its network addressing The MAC address is assigned at the factory The installer establishes the overriding IP address during installation See the above IP address item Note Remember to select OK to save any changes you make on the page Language The Language feature sets which language th...

Page 20: ...m 40 to 200 in 10 degree increments Default is 0 Duration high temp The high temperature duration feature allows you to set how long the warning appears on the monitor screen Choices are During action default and Indefinite Low temp warning The Low temp warning feature allows you to display a low temperature reading on the monitor screen when the temperature in the dome has reached a set low thres...

Page 21: ...the dome Choices are Off Degrees 180 default and Degrees 90 Figure 23 Tilt coordinates Zoom The Zoom feature displays the zoom coordinate of the dome Choices are Off and Power default W 270 90 E 90 90 N 0 0 Pan coordinates Bearings Degrees 360 Degrees 180 NE 45 45 NW 315 45 S 180 180 SE 135 135 SW 225 135 0 90 180 90 N 270 90 Tilt coordinates Degrees 180 Degrees 90 NE 225 135 NW 315 45 90 0 135 45...

Page 22: ...he north point or press the iris or esc key to cancel abort the north point Both canceling and saving the north point returns you to the Coordinates page of the Preferences screen Coordinate font color Coordinates will appear on screen in the color selected Choices are as shown Default is White Coordinate font size Coordinates will appear on screen in the font size selected Choices are as shown De...

Page 23: ...ks screen Camera Privacy Masks Privacy masks let you place a block over sensitive areas such as neighboring windows to protect them from view on the monitor screen and in the recorded video You can create 24 privacy masks numbered 1 to 24 per dome A maximum of eight privacy masks can be displayed at one time When creating your masks it is a common practice to make them 50 larger than the areas tha...

Page 24: ... can reposition it with the Title POS button Be aware of where you already have other titles camera presets tours macros areas and alarms positioned To set the position of the mask title 1 Select Title POS 2 Move the joystick to move the title to the desired position 3 Press the iris or the set key on the keypad to accept save the new position or press the iris or esc key to cancel abort the new p...

Page 25: ... to the desired view 3 Press the iris or the set key on the keypad to save accept the camera view or press the iris or esc key to cancel abort the camera view Canceling the camera view returns you to the Privacy Masks screen Accepting the camera view advances you to the second mask programming screen 4 At the second screen if you accepted the camera view use the joystick to adjust the height and w...

Page 26: ... 64 Choices are Automatic default Manual and Disabled Automatic Enables the camera to automatically switch between day color and night monochrome modes at a factory default light level The factory default is not changeable You can briefly override the day night setting from the keypad Within a few seconds the dome will return to the mode day or night determined by the Automatic setting Manual Allo...

Page 27: ...e Manual option select Set to access the red and blue scales Red This adjustment is available only if Manual white balance is selected Options range from 0 to 127 Default is 64 Move the joystick right to increase and left to decrease the red value Press the iris or the set key on the keypad to save accept the changed value or press the iris or esc key to cancel abort the changed value Blue This ad...

Page 28: ...d the shutter speed continue to decrease the blur of the video will gradually increase Choices are Off default and On See Table 2 on page 24 and Table 3 on page 25 for details about the exposure settings Exposure Lowest shutter speed This setting is available only if the Shutter or Manual control setting is selected It sets the lowest allowable shutter speed that can be used Choices are as shown a...

Page 29: ...st shutter speed Return to auto Available for which control setting Auto Shutter Manual Shutter Iris Manual How it works Automatically slows the shutter speed below the normal setting as needed to compensate for low light conditions Sets the lowest allowable shutter speed Returns the dome to Auto exposure mode with any manual pan or tilt movement Thereby returning the iris toggle key to function a...

Page 30: ...ertical phase shift of a camera s video signal to coordinate with other cameras Due to differences in cameras environments and cable lengths the phase shift will not be the same for all cameras being synchronized Use an oscilloscope or a GE Security vertical phase adjustment tool KTS 56 Contact your GE Security sales representative Phase adjustment This option is available only if On is selected f...

Page 31: ...t is 0 Zoom speed Zoom speed is a camera feature that sets the rate at which the zoom motors operate There are three fixed settings and one variable setting If your keypad provides variable speed control for zooming you can use the Variable setting and the joystick s range of motion for operation You quicken or slow the zoom by how far you twist the joystick Farther is faster Choices are Variable ...

Page 32: ...Programming them turns them on Note The dome prevents any hourglassing behavior by restricting the tilt limit to 90 when necessary to accommodate some pan limits set to less than 180 To avoid setting tilt limits too tightly we recommend that you set the pan limits first then set the tilt limits Pan right limit Pan right limit is a feature that sets a programmable stop for the camera at the rightmo...

Page 33: ... coming in from a keypad to activate any of the 127 presets 16 tours or 32 macro actions This enables you to manually initiate any of the expanded capabilities of the dome from keypad controllers with limited command capability See Command Map screen Control Command Map on page 54 Note Most keypads have a limited number of preset numbers they can call If you have a GE KTD 405 keypad with firmware ...

Page 34: ...e dome whether or not they are programmed or titled Figure 31 Summary page Actions Presets Summary No The No column of the summary page lists all 127 presets 1 through 127 in numerical order whether or not they are programmed Title The Title column of the summary page lists the titles of all 127 presets The default titles are listed if they have not been retitled ...

Page 35: ...re modes if needed Figure 32 Edit page Actions Presets Edit Note Remember to select OK to save any changes you make on the page No The No drop down box allows you to select the preset number that you want to program or reprogram Title The Title box shows you the existing title for the selected preset number You can customize the default title on the Display page Duration The Duration feature defin...

Page 36: ...o the desired position 3 Press the iris or the set key on the keypad to save accept the preset position or press the iris or esc key to cancel abort the preset position Both cancelling and saving the preset position returns you to the Edit page of the Presets screen Note Remember to select OK to save any changes you make on the page No The No drop down box allows you to select the preset number th...

Page 37: ...The Display title on screen feature sets the preset title to appear on the monitor screen if checked The duration that the title appears on the monitor screen is set by the Duration feature on the Edit page Title font color The preset title will appear on screen in the color selected Choices are as shown Default is White Title font size The preset title will appear on screen in the font size selec...

Page 38: ...continue programming Title The Title box shows you the existing title for the selected preset number You can customize the default title on the Display page Use custom camera state for preset The Use custom camera state for preset feature overrides the settings established for the camera s normal operation under Camera Settings if checked You must check this feature to make the other features on t...

Page 39: ...der Camera Settings then the Night mode feature will use the Day Night setting customized for the preset for 5 to 10 seconds After 5 to 10 seconds the camera will revert to the normal operating setting and adjust for the current light conditions Manual If the Day Night feature is set to Manual under Camera Settings then the Night mode feature will use the Day Night setting customized for the prese...

Page 40: ...d warmer color temperature setting ATW autotracking white balance This mode automatically adjusts the color while the images changes within the 2000 to 10000 Kelvin color temperature range Manual This mode allows you to manually adjust the current blue and red settings After selecting the Manual option select Set to access the red and blue scales Red This adjustment is available only if Manual whi...

Page 41: ...keypad to scroll through the choices then press the iris or the set key on the keypad to save accept the changed value or press the iris or esc key to cancel abort the changed value Iris The set iris F stop controls the size of the aperture that lets light into the camera through the lens You will not be able to set values for gain or shutter speed The choices for iris F stop are as shown Use the ...

Page 42: ...adowTour title will appear on screen in a default position on the monitor screen center above the macro title default position but you can reposition it with the Title POS button Be aware of where you already have other titles camera privacy masks presets macros areas and alarms positioned To set the position of the preset title 1 Select Title POS 2 Move the joystick to move the title to the desir...

Page 43: ...n to the menus Note Since the GE KTD 405 keypad times out after five minutes of inactivity and the programming interface times out along with it you will want to exit the programming interface to view ShadowTours that are longer than five minutes Program The Program button programs the ShadowTour To program a ShadowTour 1 Select Program The programming interface will be replaced by a full screen o...

Page 44: ...efault title on the Display page Macro list step type no speed zoom and duration The macro list shows the defined steps for the macro in sequential order You can use the drop down boxes and buttons located below the summary to add append delete remove move up or move down individual steps Step number The Step box selects the step number you want to program Type The Type box selects the action for ...

Page 45: ...e next macro step Choices are 1 to 60 seconds in 1 second increments Duration if Relay selected The Duration feature defines how long the action for the step continues For relays the duration is a timer for the relay action The next macro step is immediately performed after the relay timer runs out Choices are Infinite default and seconds 1 2 3 4 5 15 30 and 60 Energize with Relay The Energize opt...

Page 46: ... title default position but you can reposition it with the Title POS button Be aware of where you already have other titles camera privacy masks presets tours areas and alarms positioned To set the position of the macro title 1 Select Title POS 2 Move the joystick to move the title to the desired position 3 Press the iris or the set key on the keypad to accept save the new position or press the ir...

Page 47: ...perly triggered when the camera enters the trigger zone Summary page Actions Areas Summary The summary page provides the number and title of all areas that are programmed for the dome Figure 38 Summary page Actions Areas Summary Block color You can create a block background that offsets the ShadowTour title from the video behind it The block will appear on screen in the color selected Choices are ...

Page 48: ...efault and Off When on the video is replaced with a blue screen and title When off the video is not blanked but an area title appears in an area is programmed Title POS The area title will appear on screen in a default position on the monitor screen upper center but you can reposition it with the Title POS button Be aware of where you already have other titles camera privacy masks presets tours ma...

Page 49: ... live video overlaid with a grid that asks you to establish the upper left corner of the area 2 At the first screen live video use the joystick to pan tilt and zoom the center of the grid to the upper left corner of the desired view 3 Press the iris or the set key on the keypad to save accept the upper left corner position or press the iris or esc key on the keypad to cancel abort it Canceling the...

Page 50: ... alarm has finished being actioned then the first lower priority alarm will have its action restarted only if it is still active You do not need to acknowledge dome alarms in the same sense as required by typical alarm equipment To move the camera from the position of the alarmed action and reenable the Resume feature however you do need to issue a command from the keypad The only time you need to...

Page 51: ...en contact that is closed the status reports as on because it is in its activated abnormal state Off Status shows as Off if the contact for the alarm is in its inactive state So for a N C normally closed contact that is closed the status reports as off because it is in its normal state Upon initial installation all alarm contacts are N O Changing an alarm to N C will not refresh the summary page u...

Page 52: ...merical order whether programmed or not The eight alarms are numbered from 1 to 8 Summary Title The Title column of the summary page lists the titles for all available alarms whether programmed or not Summary Status The Status column of the summary page lists the status of each programmed alarm as either on active or off inactive ...

Page 53: ...ion The Action feature associates an action with an alarm An action is not required Choices are None default Preset Tour and Macro If you select preset tour or macro the Action number feature is activated to let you select a specific one Action number The Action number feature lets you select a specific preset tour or macro if you selected preset tour or macro in the Action feature Relay 1 Each Re...

Page 54: ...lay action with an alarm Relays can be used to trip such devices as speakers doors and DVMRs Each alarm can be programmed with up to three actions one dome action and two relay actions You can set both relays to activate with an alarm An action is not required Choices are No action default On and Off Duration The Duration feature defines how long the relay is active Choices are Infinite default an...

Page 55: ... There is a 60 character limit but be aware of how much video you want to cover with your alarm block Title POS The alarm block will appear on screen in a default position on the monitor screen upper right but you can reposition it with the Title POS button Be aware of where you already have other titles camera privacy masks presets tours macros and areas positioned To set the position of the macr...

Page 56: ...he blocks will appear on screen in the transparency selected Choices are as shown Default is Solid Alarm box content The Alarm box content feature sets how many alarms will display on the monitor screen in the alarm block Choices are Off displays no alarms whether active or inactive All status displays all alarms whether active or inactive Highest priority displays only the highest priority alarm ...

Page 57: ...ming the dome to activate this relay each time the dome is powered up Relay 1 off The Relay 1 off button lets you turn relay 1 off regardless of the current state of any associated alarm Relay 2 on The Relay 2 on button lets you turn relay 2 on regardless of the current state of any associated alarm Note If you select Relay 2 on and select OK then you are programming the dome to activate this rela...

Page 58: ...An example of remapping is using a preset command from the keypad to run Macro 1 In the command map programming you would select the preset number you wish to use and remap that command to activate Macro 1 Note Most keypads have a limited number of preset numbers they can call which will limit how many commands can be remapped If you have a GE KTD 405 keypad with firmware version 1 2 09 or later t...

Page 59: ...mapped Note To see the title of the selected command go to the corresponding summary or list under the Actions menu Assigned action The Assigned action feature remaps the selected command preset or tour to the same type of command or to another type of command for example from a preset to a tour or macro Auxiliaryinput assignedaction The Auxiliary input feature specifies the number of the command ...

Page 60: ...ume delay Resume delay is a feature that sets how long the keypad is inactive before the Resume operation is performed Choices are Off default 15 sec 30 sec 1 min 2 min 3 min 4 min and 5 min Resume operation Resume defines the operation for the dome to perform after the keypad has been inactive for a period of time This command will not activate if a tour or autopan is in progress Note If turned o...

Page 61: ... presets in macros and while autopanning Choices are 0 through 20 in increments of 2 Default is 16 A setting of 0 degrees second makes the camera move as slowly as possible This is not a stop motion command Macro autopan speed Medium deg s The Medium speed setting is a feature that sets how fast the camera moves in degrees per second at the medium speed while traveling between presets in macros an...

Page 62: ...oom is a feature that slows the pan and tilt speeds as you zoom in This makes it easier to follow far off moving targets when you are zoomed in to them Choices are checked default and unchecked Enable zoom variable tilt Zoom variable tilt is a feature that lowers the upper tilt limit when the camera is zoomed out to a wide angle of view so that the trim ring of the dome is not in view The feature ...

Page 63: ...tatus you can see a detailed listing of your dome s site camera information such as title and IP address customized settings alarm status and customized presets tours masks and macros Under Logs you can see a history of the command protocol and motor messages being managed by the dome Under Firmware Update you can update the dome s software firmware if you are logged on as the Installer Figure 50 ...

Page 64: ...of your dome Figure 51 Diagnostics screen System Diagnostics Status screen System Status The Status screen provides a detailed listing of your dome s site camera information such as title and IP address customized settings alarm status and customized presets tours masks and macros Figure 52 Status screen System Status ...

Page 65: ...iction and importance Figure 53 Log screen System Log Firmware Update screen System Firmware Update There are two ways to reload or update the software in your dome One way is using the Firmware Update feature The other way is using a web browser The Firmware Update feature is explained here To use the web browser method see Reloading or updating the software on page 65 The Firmware Update screen ...

Page 66: ... after the system is successfully rebooted Wait until after you see the splash and color bar screens on the monitor screen and live video is again playing normally You may see a blank or gray screen for up to five minutes Do nothing until you see live video again Only after 10 minutes have elapsed without a successful reload update should you try cycling power to restart the dome CAUTION CAUTION F...

Page 67: ...ots in about 60 seconds You will see the RESETTING CAMERA display on the keypad LCD and the splash screen and color bars on the monitor screen as the camera reinitializes itself Resetting the dome You can reset the dome whether or not you have valid communication between the keypad and the dome To reset the dome cycle the power to the dome by turning the power off then on When setting autopan limi...

Page 68: ...and Map on page 54 To use the KTD 405 keypad see KTD 405 Controller Keypad User Manual 1036547 Interrelationship between the Exposure and Day Night features The Day Night feature works only if the Exposure feature is set to Auto or Return to auto Two conditions can prevent the camera from switching between the color and monochrome modes according the Day Night setting One if you ve overridden the ...

Page 69: ...e power off then on Maintenance Reloading or updating the software There are two ways to reload or update the software in your dome One way is using the Firmware Update feature from the programming interface The other way is using a web browser The web browser method is explained here To use the Firmware Update feature see Firmware Update screen System Firmware Update on page 61 To reload or updat...

Page 70: ...nutes Do nothing until you see live video again Only after 10 minutes have elapsed without a successful reload update can you try cycling power to restart the dome 6 If this is the first time you are accessing the web browser for the dome after it has rebooted you will be asked to log on to the dome Only installers have passcode permission to update software You need to type in Installer with a ca...

Page 71: ...tation provided If you still have questions you may contact technical support during normal business hours Monday through Friday excluding holidays between 6 a m and 5 p m Pacific Time Note Be ready at the equipment before calling for technical support Online publication library Another great resource for assistance with your GE Security products is our online publication library available to all ...

Page 72: ... title positions Default programming settings Table 4 lists the system s programming defaults Table 4 Default programming settings Setting Default Alarm box content All status Alarm box duration During action Alarm contact type N O Autopan speed Slow Autoslow shutter Off Backlight compensation Off Block color Black Block transparency No color Branding Off Contact type alarms N O ...

Page 73: ...ase lock enabled Off Power on Off Preset title duration Infinite Privacy mask color Gray Relay 1 Relay 2 No action Relay duration Infinite Resume Off Resume delay Off Resume operation Preset Return to auto On Subnet mask 255 255 255 0 Temperature display Off Temperature display duration During action Temperature thresholds high and low 0 Tilt coordinates Degrees 180 Tilt limits Off Title font colo...

Page 74: ...le font weight Bold Title font size 26 pt Title length 60 characters White balance Auto Zoom coordinates Power Zoom proportional On Zoom speed Variable Zoom variable tilt On Table 4 Default programming settings Setting Default ...

Page 75: ...y night 22 64 defaults programming settings 68 system 68 title positions 68 diagnostics screen 60 digital zoom 27 due north 18 duration alarm box 52 high temperature 16 low temperature 16 macro 41 preset title 31 relay 49 50 E E flip 58 electronic image flip E flip 58 exposure 37 64 auto 24 37 64 autoslow shutter 24 control 24 iris 24 37 lowest shutter speed 24 manual 24 37 return to auto 24 setti...

Page 76: ...19 product overview 2 program areas 45 presets 7 8 32 privacy masks 21 ShadowTours 9 39 tours 9 39 programming advanced 10 basic 7 programming interface 3 accessing 3 navigating 5 proportional zoom 58 publication library 67 R reboot 63 references 1 relay 46 49 50 relay state screen 53 reloading the software 65 remapping presets 54 tours 54 reset 63 resume 56 return to auto 24 S safety cautions 2 1...

Page 77: ...al support 67 tilt 17 57 tilt limits 27 28 timeout 5 time date screen 13 tips for alarms 46 title positioning 33 38 tours program 9 39 remapping 54 troubleshooting 65 U updating the software 65 W white balance 23 36 Z zoom 17 27 58 variable tilt 58 ...

Reviews: