background image

BusSecure User Manual 

BusSecure Configuration 


0150-0263A / May 2003 

25 

4.1.2  C

ONFIGURE 

C

AMERAS


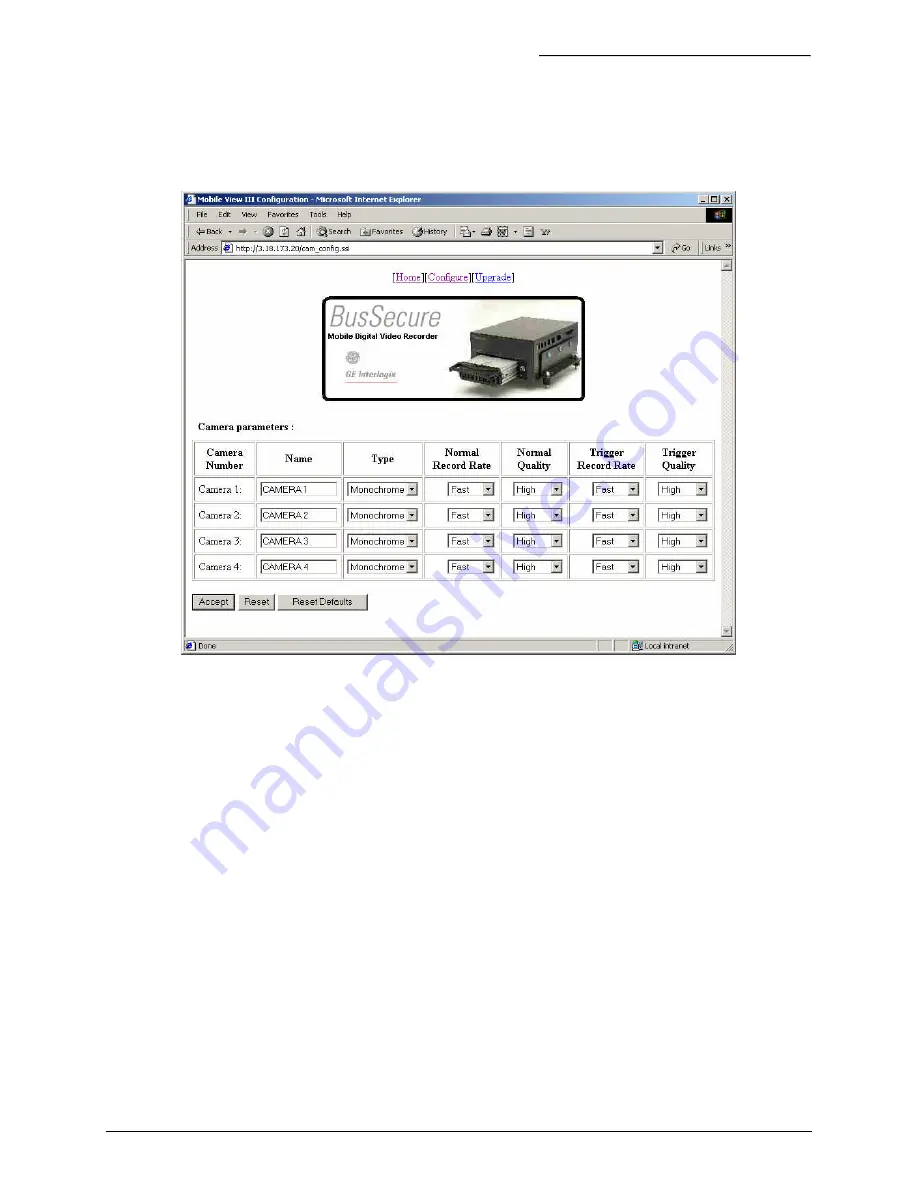
Click on the 

Configure Camera

 option to display the following screen: 


The configuration options on this page include: 

• 

Name

 – User supplied camera name or designation. 

• 

Type

 – Camera type, Color or Monochrome. 

• 

Normal Record Rate* 

– Fast, Normal, or Slow. 

• 

Normal Quality 

– High, Medium, or Low. 

• 

Trigger Record Rate* 

– Fast, Normal, or Slow. 

• 

Trigger Quality 

– High, Medium or Low. 

• 

AGC Level 

– Automatic Gain Control (Positive numbers makes the images brighter, Negative 

numbers make the images darker, and 0 is the default value). Select from +5 to –5. 

Reset Defaults

 button is also available. Click the 

Accept

 button to enter the changes or click the 

Reset

 button to undo any changes. 

*Note: The Normal and Trigger record rate programming feature of any camera in the system depends on the capture rate 
of the other cameras. Therefore, if you want camera 1 to capture images at a faster rate than other cameras in the system, 
you must set camera 1’s capture rate (Normal or Trigger) to fast and the other cameras capture rates to normal or slow. 

Summary of Contents for BusSecure

Page 1: ...BusSecure Mobile Digital Video Recorder ...

Page 2: ... of any of the contents of this document For the latest product specifications visit GE Interlogix Kalatel division online at www kalatel com or contact your GE Interlogix Kalatel division sales representative For technical support before and after installation call 800 469 1676 Technical support is available 24 hours a day 7 days a week Call Tech Support 800 469 1676 6 A M 5 P M PST Monday throug...

Page 3: ...ctional Field of View 12 2 5 INSTALLING THE IMPACT SENSOR OPTIONAL 14 2 6 INSTALLING THE PANIC BUTTON OPTIONAL 15 2 7 INSTALLING THE MICROPHONE OPTIONAL 15 3 DVR INSTALLATION AND WIRING 16 3 1 MOUNTING THE DVR 16 3 2 WIRING THE DVR 17 3 2 2 Alarm and Trigger Inputs 19 3 2 3 Status Output Connections 20 3 2 4 Audio Connections 21 3 2 5 Input Power Connections 21 4 BUSSECURE CONFIGURATION 22 4 1 CON...

Page 4: ...g and troubleshooting this product refer to this document and any other documentation provided If you still have questions please contact GE Interlogix Kalatel division Technical Support and Sales Kalatel a division of GE Interlogix Inc Call 800 469 1676 Fax 541 752 9096 Note you should be at the equipment and ready with details before calling Technical Support Conventions Used in this Manual Bold...

Page 5: ... capturing images as soon as the vehicle s engine is started and continues to record as long as the vehicle is running When the available storage capacity is full the DVR will automatically purge the oldest image data to make room for new image data Tagged images images recorded because of alarm activation can be protected from being overwritten for a user designated period of time the default set...

Page 6: ... SYSTEM A BusSecure system consists of the required equipment and the accessories shown in Figure 1 Aluminum housing Microphone Camera Panic Button Up to four cameras per system Impact Sensor RG179 Siamese coaxial cable DVR assembly Figure 1 Required and optional features of a BusSecure system ...

Page 7: ...OOLS NECESSARY FOR INSTALLATION Ÿ Laptop viewing station Ÿ Electrical volt meter Ÿ BNC crimper Ÿ Molex pin crimper Ÿ Riv nut gun Ÿ Socket set up to 5 8 in Ÿ Wrenches up to 5 8 in Ÿ Phillips and flathead screwdrivers Ÿ Solder gun with solder Ÿ Wire strippers Ÿ Drill Ÿ Drill bits up to 5 8 in Ÿ Hole saws up to 1 1 8 in Ÿ Locktite blue Ÿ Torx bit secured 10 Ÿ Wire snake Ÿ Extension cords Ÿ 8 in tie w...

Page 8: ...ns Camera types fields of view and cable lengths will be determined by the customer specific system layout The Front Door camera is located at the front of the bus over the driver s head looking at the front passenger entry The Forward Facing camera is located in the front of the bus looking in front of the bus The Front to Rear camera is located in the front of the bus looking down the center ais...

Page 9: ...insert grommets in the holes to protect the cable if possible This may not be feasible in a retrofit situation If it is not feasible make sure that the protective outer CL2 jacket is maintained when passing cable through hole When pulling cable through the conduit do not jerk or over pull the cables These actions will stretch and damage the cable Attach a pull line to the cable jacket not to the c...

Page 10: ...the template in Appendix A to mark the location of the cable entry hole and two mounting holes See Figure 4 2 Using a 3 16 inch 5 mm drill bit drill the two mounting holes 3 Using a 1 inch 25 4 mm drill bit drill the cable entry hole 4 Install a 3 4 inch 20 mm interior diameter grommet on the cable entry hole or where feasible 5 Connect the video and power cables to the camera and feed the excess ...

Page 11: ...4 inch 81 mm hole in the appropriate location on the mounting surface 3 Using the housing as a template mark the location of the mounting holes 4 Using a 3 16 inch 5 mm drill bit drill the mounting holes 5 Connect the video and power cables to the camera assembly 6 Mount the camera assembly to the vehicle surface using two fasteners screwed into panel nuts See Figure 7 or 8 depending on the type o...

Page 12: ...e of the camera see Figure 11 and perform the following 1 Loosen the camera s pivot screws 2 Rotate the camera to the correct angle 3 Retighten the pivot screws Surface mount cameras are configured at the factory to be installed onto the ceiling of the vehicle If you are installing a surface mount camera on the side of the vehicle see Figure 12 and perform the following to rotate the camera lens C...

Page 13: ...t the top of the camera 2 For cameras mounted on the streetside of the bus or surface mounted facing backward remove the two side set screws as shown in Figure 14 and lift the camera out of its bracket 3 Rotate the entire camera assembly 180º See Figure 14 4 Insert the camera into the bracket and replace set screws The lens set screw and the wiring harness should now be positioned at the bottom of...

Page 14: ... 1 Using the Impact Sensor as a template mark the location of the two mounting holes The Impact Sensor should be aligned so that it is square with the front and rear of the vehicle See Figure 16 2 Drill the mounting holes with an appropriate size drill bit 3 Mount the Impact Sensor 4 Route the provided cable to the DVR Connections to the P1 terminal block on the DVR Rear Panel Assembly are as foll...

Page 15: ...e cable to the DVR Connections to the P1 terminal of the DVR Rear Panel Assembly are as follows N C and common 2 wires both yellow to terminals 3 and 4 normal wire green to terminal 13 check wire red to terminal 15 positive wire gray to terminal 18 negative wire white present only on the panic button with key reset to terminal 17 6 Mount the panic button 2 7 INSTALLING THE MICROPHONE OPTIONAL The ...

Page 16: ...ou must leave enough space to pull the latch and remove the HDD See Figure 21 and perform the following 1 Mount the mounting plate to the vehicle using four nuts and bolts not provided 1 4 20 inch bolts are recommended 2 Remove the four acorn nuts and locking washers from the top of the vibration isolators Do not remove the vibration isolators or the bolts and nuts holding them in place 3 Place th...

Page 17: ...ate slot and tighten the terminal screw 3 Reinstall the P1 terminal block 1 2 3 4 5 6 7 8 9 10 11 12 13 14 15 16 17 18 19 20 P2 GND CAM1 ETHERNET 10 100 POWER FUSE CAM2 CAM3 CAM4 P1 Ethernet connector Use of this connector is optional Four pin Molex power management board BNC connectors Video inputs Cam 1 Cam 4 P2 Terminal Block Alarm inputs outputs status indication and impact sensor Upper Connec...

Page 18: ...nd Ground Ground 5VDC RS485A RS485B Power 1 5V power for future use Power 2 RS485 communication for future use Power 3 Power 4 3 2 1 2 BNC CONNECTIONS Connect each camera s video output cable to its corresponding BNC connector on the rear panel assembly see Figure 24 Figure 24 BNC connectors Figure 23 P1 terminal block connections Lower Connector CAM1 CAM2 CAM3 CAM4 ...

Page 19: ...er device must have a normally closed connection with the DVR and be connected as shown in Figure 25 All wires should be stripped 3 8 of an inch Note Terminal 18 also may be used for a panic button or impact sensor up to three wires can go into terminal 18 1 2 3 4 5 6 7 8 9 10 11 12 13 14 15 16 17 18 19 20 Normally Closed Normally Closed Normally Closed Normally Closed GND GND GND GND 12 VDC GND A...

Page 20: ... these outputs are as interfaces to a vehicle relay system or lights To interface with a vehicle relay system contact the vehicle manufacturer To connect the status lights on the Panic Button to the status outputs see Figure 28 and perform the following 1 Connect the normal wire green to terminal 13 2 Connect the check wire red to terminal 15 3 Connect the positive wire gray to terminal 18 4 If yo...

Page 21: ...AWG wire from the vehicle power source to the DVR location 2 Make connections to the vehicle source contact the vehicle manufacturer for information on connecting to the vehicle power source 3 Crimp the wire pins using a Molex crimper and make connections to the DVR s four pin Molex according to Figure 30 4 Test the four pin Molex wire harness for power both continuous 12 VDC and engine running ig...

Page 22: ...e perform the following 1 Launch a web browser on the PC We recommend MicroSoft Internet Explorer version 5 0 and above Enter the BusSecure s default IP address of 3 18 173 0 in the browser s address bar 2 When successfully connected the Enter Network Password window will appear Enter the default User Name and Password of admin 3 Entering the correct username and password will cause the configurat...

Page 23: ...Configuration 0150 0263A May 2003 23 4 1 CONFIGURATION Click on Configure the unit to display the configuration page The configuration options on this page include Configure Network Configure Cameras Configure Inputs Configure System ...

Page 24: ...is also available Click the Accept button to enter the changes or click the Reset button to undo any changes Note Once the Accept button is clicked the buttons on the bottom of the screen change to a Save and Cancel button Clicking on Save at this point will cause your changes to be written and the BusSecure to reboot If you have more changes to make on the other configuration screens first click ...

Page 25: ... Level Automatic Gain Control Positive numbers makes the images brighter Negative numbers make the images darker and 0 is the default value Select from 5 to 5 A Reset Defaults button is also available Click the Accept button to enter the changes or click the Reset button to undo any changes Note The Normal and Trigger record rate programming feature of any camera in the system depends on the captu...

Page 26: ...nclude Name User supplied input name or designation Type Input type Alarm Trigger or Not Used Pre Trigger Time Various increments from 0 seconds to 10 minutes Post Trigger Time Various increments from 0 seconds to 10 minutes Camera Group Select from Cameras 1 through 4 A Reset Defaults button is also available Click the Accept button to enter the changes or click the Reset button to undo any chang...

Page 27: ...kmark to enable Auto Daylight Savings Time Checkmark to enable Video Standard Select from PAL or NTSC A Reset Defaults button is also available Click the Accept button to enter the changes or click the Reset button to undo any changes Note Once the Accept button is clicked the buttons on the bottom of the screen change to a Save and Cancel button Clicking on Save at this point will cause your chan...

Page 28: ...e the unit to display the configuration page Click on the Browse button and navigate to the upgrade file Click on the Send File button The following screen will appear Click the Confirm button to execute the upgrade process Upon completion the BusSecure will reboot and the upgrade process will be complete ...

Page 29: ...are optional devices Note Some properties customize the DVR status outputs and use another device such as an IO or PLC to control the lights Output 1 corresponds to Check System and Output 2 corresponds to Normal Output 2 the DVR is running and capturing images Output 1 and 2 the DVR is running and capturing images with an exception e g loss of signal from a camera Check the Recorder Log of the DV...

Page 30: ...E FRONT OF THE DVR ARE NOT ALTERNATELY FLASHING 1 The DVR will not capture images if the key lock of the unit is open or unlocked Close and lock the door then turn off the vehicle After the vehicle has shut down restart the engine 2 Shortly after the DVR restarts image capture can be verified by the green status light or combination of green and red status lights BUSSECURE OPERATING NORMALLY BUT S...

Page 31: ...IN CAPTURED IMAGES CHECK FOR VIDEO AT THE BUSSECURE CONNECTION BOX AND THE CAMERA 1 If there is no video displayed verify on the two pin Molex camera power connector that 12 VDC is present 2 Verify that the power connection on the camera is intact 3 Verify that the power connection on the P1 terminal strip is correct 4 Check the integrity of the coaxial cable and the BNC connectors 5 Ensure that t...

Page 32: ...Appendix A BusSecure User Manual 32 0150 0263A May 2003 APPENDIX A CAMERA MOUNTING PLATE TEMPLATE All measurements shown in inches ...

Page 33: ...uous power fuse or circuit breaker Battery ground Chassis ground 12 VDC bus running fuse or breaker SAS N C input Impact Sensor input Normal status negative output Check status negative output Camera cables 1 4 Camera cable BNCs 1 4 Camera 1 field of view Camera 2 field of view Camera 3 field of view Camera 4 field of view System enclosure secure Camera cables Camera cable BNCs Date Signature ...

Page 34: ...dium Low Camera 2 Color B W Disable Camera Name ________________ Capture Rate Fast Slow Normal Picture Quality High Medium Low Camera 2 Trigger Capture Rate Fast Slow Normal Camera 2 Trigger Picture Quality High Medium Low Camera 3 Color B W Disable Camera Name ________________ Capture Rate Fast Slow Normal Picture Quality High Medium Low Camera 3 Trigger Capture Rate Fast Slow Normal Camera 3 Tri...

Page 35: ...larm Time 00 seconds to 10 minutes ____________ Input 4 Type Alarm Trigger Disabled Input 4 Name ____________ Input 4 Pre Alarm Time 00 seconds to 10 minutes ____________ Input 4 Post Alarm Time 00 seconds to 10 minutes ____________ 4 Group Cameras to Input 1 1 2 3 4 2 1 2 3 4 3 1 2 3 4 4 1 2 3 4 5 Set up System Variables System Capture Rate 1 3 6 9 12 15 18 21 24 Selecting 24 will set the capture...

Page 36: ...s RMA department at 800 469 1676 for a return materials authorization RMA number Processing may be delayed on units that are received without an RMA number For all warranty repairs GE Interlogix Kalatel division will cover all costs including parts labor and shipping Repaired equipment will be returned via the same method of shipment in which it was received For all non warranty repairs the custom...

Page 37: ...Advance replacements will be sent for a fee of 100 If you have questions about this policy please contact GE Interlogix Kalatel division s RMA department at 800 469 1676 Note GE Interlogix Kalatel division makes no express warranties beyond those stated in this warranty statement GE Interlogix Kalatel division disclaims all other warranties express or implied including without limitation implied w...

Reviews: