background image


  ODOR CONTROL SECTION – MEDIA BED TYP


Replacing the Media and Filters 


CAUTION - each odor module weighs approximately 28 

lbs. and may be awkward to handle particularly when 

accessing the unit from overhead. It is highly 

recommended that a heavy-duty steel wheeled ladder be 

used when removing modules when located overhead.  

Utilize (2) technicians where possible to safely remove and 

shuttle modules to an area where service can be 

performed.


CAUTION - Exhaust fan must be off before opening the 

odor control media access door.


Replacing the media is a relatively simple task not requiring 

any special tools. Follow steps 1-11:


Step 1.  Deactivate the exhaust fan utilizing the C-7000 

Command center, AirVantage, or wall fan 

switch.  Locate and turn the exhaust fan 

disconnect to prevent the fan from turning on 

during service.


Step 2.  Provide safe sturdy access to the odor control 

module. 


Step 3.  Pull tee-handles on each side of the access 

cover.  Remove access cover and securely set 

aside.  Inspect access panel gaskets and 

replace as necessary.  

CAUTION: 

Store access 

cover in a location where it will not be 

susceptible to damage or falling onto staff or 

other equipment. 


Step 4.  Remove and Inspect final filter.  Note filter(s) 

slide in and out of the unit through a rack.  

Replace as necessary.  Replacement is 

required when: 1) Back side of filter is 

contaminated 2) AirVantage Yellow Alert is 

present at the Command Center 3) hood(s) 

starts to perform poorly 

(Smoke Loss). 


Step 5. 

Odor Media Panels

: Carefully slide the panels 

out of the unit. 


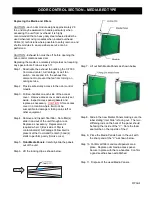
Step 6.  Lift the locking clip as shown below. 


Step 7.  Lift out both Media Panels as shown below. 


Step 8.  Slide in the new Medial Panels making sure the 

label stating “Inlet Side” is facing out.  The two 

stiffening rods on the back of the panel should 

be facing the inside of the “V”.  Note the foam 

seal will be on the top side of the V. 


Step 9.  Place the Media Panels back in the unit with 

the sharp end of the “V” as shown below. 


Step 10. Confirm all filters and media panels are in 

place.  Replace odor media access panel.  

Secure in place with the tee-handles.  Confirm 

a good seal has been established.  


Step 11.  Dispose of the used Media Panels. 


ODOR CONTROL SECTION – MEDIA BED TYPE 

9|PAGE 

Summary of Contents for ClearAir RSPC-TPF-PCV Series

Page 1: ...maintenance can cause property damage injury or death Read the installation operation and maintenance instructions thoroughly before installing or servicing this equipment Only trained and qualified service personnel should install or service this equipment 10900 S W AVERY STREET TUALATIN OR 97062 USA PHONE 503 691 2010 TOLL FREE 800 547 9696 FAX 503 692 6048 email info gaylordventilation com www ...

Page 2: ...s of efficient effective and trouble free operation In addition this unit has undergone rigorous quality control inspections and was fully operationally tested prior to shipment If you have further questions please contact us toll free at 1 800 547 9696 or info gaylordventilation com We are more than happy to help Sincerely Gaylord Industries STREET ADDRESS 10900 S W Avery Street Tualatin Oregon 9...

Page 3: ...THIS BOOK MAY BE REPRO DUCED STORED IN A RETRIEVAL SYSTEM OR TRANSMITTED IN ANY FORM BY AN ELECTRONIC MECHANICAL PHOTOCOPYING RECORD ING MEANS OR OTHERWISE WITHOUT THE WRITTEN PERMISSION OF GAYLORD INDUSTRIES 2020 The manufacturer reserves the right to modify the materials and specifications resulting from a continuing program of product improvement or the availability of new materials Additional ...

Page 4: ... OF CONTENTS RECEIVING INSTALLATION 5 HORIZONTAL INSTALLATION GUIDELINES 6 VERTICAL INSTALLATION GUIDELINES 7 SERVICE AND MAINTENANCE 8 REPLACING FILTERS AND MEDIA PANELS 9 WARRANTY Inside Back Cover 3 PAGE ...

Page 5: ...al connections to be made in the field It is recommended that the Authority Having Jurisdiction AHJ be consulted regarding local codes and installation procedures Gaylord Industries is not responsible for obtaining necessary approvals and permits which may be required for installation nor is it responsible for verifying that the unit has been installed in accordance with national state and local c...

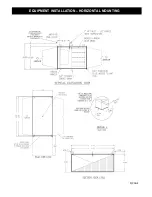
Page 6: ...EQUIPMENT INSTALLATION HORIZONTAL MOUNTING 5 PAGE ...

Page 7: ...THIS PAGE INTENTIONALLY LEFT BLANK 6 PAGE ...

Page 8: ...r to them becoming loaded It is recommended that the filters be inspected in accordance with the Odor Control Media Inspection Frequency Chart on this page and replaced when necessary Note that failure to maintain the final filter will accelerate the degradation of the odor media thus a regular schedule of change outs needs to be established Replacement filters can be purchased through Gaylord Ind...

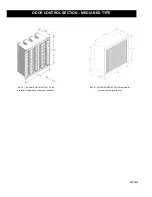
Page 9: ...Ref 1 Air Guard Vari Plus filter To be used on all applications except solid fuel Ref 2 MICRO GUARD 95 MH Filter used for systems serving solid fuel ODOR CONTROL SECTION MEDIA BED TYPE 8 PAGE ...

Page 10: ...anel gaskets and replace as necessary CAUTION Store access cover in a location where it will not be susceptible to damage or falling onto staff or other equipment Step 4 Remove and Inspect final filter Note filter s slide in and out of the unit through a rack Replace as necessary Replacement is required when 1 Back side of filter is contaminated 2 AirVantage Yellow Alert is present at the Command ...

Page 11: ...HIS WARRANTY All replacement parts furnished under this warranty shall be F O B Gaylord Industries of Tualatin Oregon The owner shall pay the necessary freight delivery charges and necessary labor for removal and installation of parts and any federal state or local taxes SPECIFIC ITEMS NOT COVERED BY THIS WARRANTY 1 Fan belts if equipped with an exhaust fan 2 Pre filters bag filters final filters ...

Page 12: ...FORM NO TM RSPC TPF PCV 23188 032020 2020 GAYLORD INDUSTRIES LITHO USA ...

Reviews: