background image

14

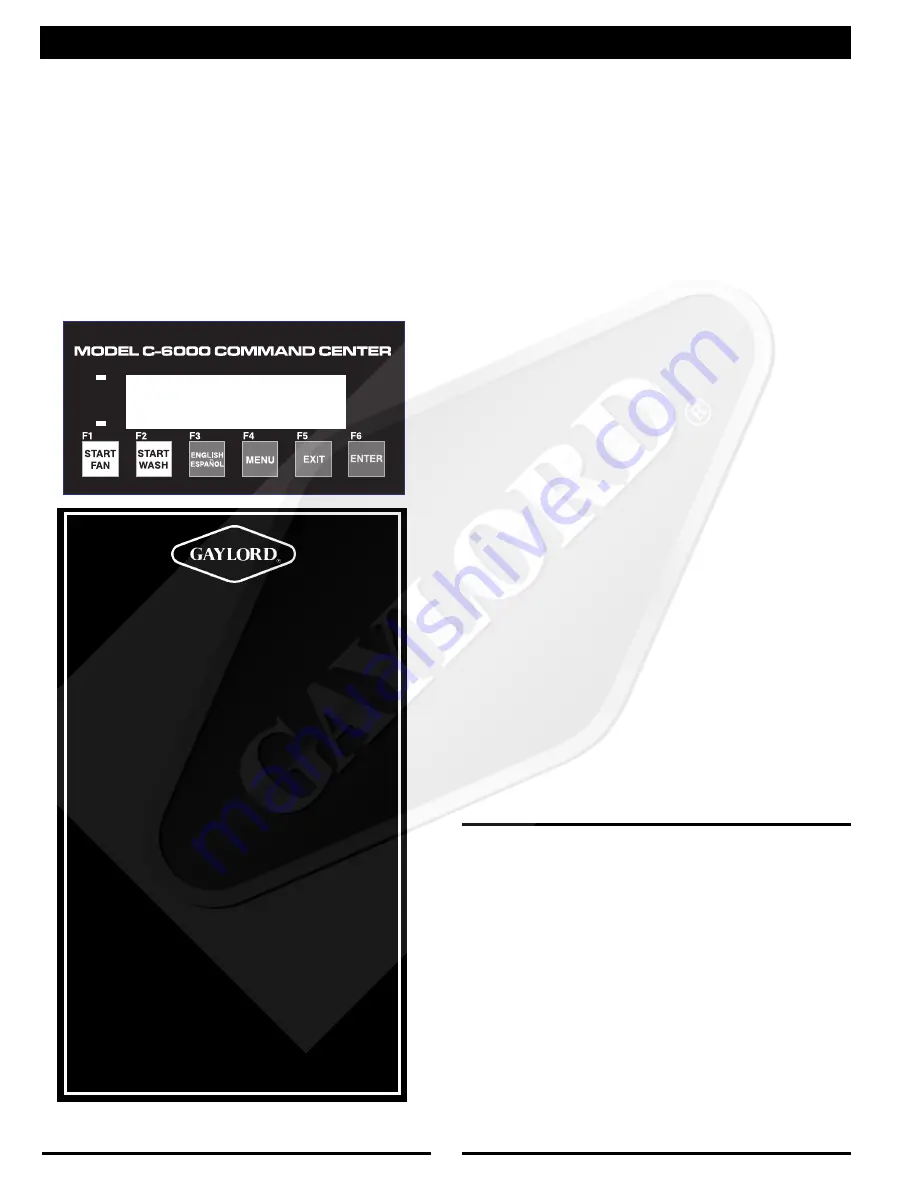
MODEL C-6000 SERIES COMMAND CENTER - INSTRUCTIONS

General Description:

The C-6000 Command Center is designed to start and stop the
exhaust fan and wash up to 5 groups of ventilators in sequence
with a delay period between each group. A sequence wash may
be necessary if the building’s hot water system is not capable
of supplying the required volume of water at one given time.

The exhaust fan and wash sequence may be started Manu-
ally
 by pushing the “Start Fan” or “Start Wash” buttons, or
may be programmed for Automatic operation.

Programmed operations may include:

1.

Starting the exhaust fan once within a 24-hour period.

2.

Stopping the exhaust fan and starting the wash cycle
sequence once within a 24-hour period

The C-6000 Command Center provides information and pro-
gramming for various functions by accessing nine different menu
catagories. An overview of the nine menu items are as follows:

1.

Service - Displays Gaylord's website address:
gaylordusa.com

2.

Detergent - Displays Toll-Free Number to order deter-
gent:                                        800-286-2010

3.

Wash Length - Sets length of each wash cycle from 3 to
9 minutes

4.

Delay Time (for sequence wash units only) - Sets delay
between washes from 1 minute to 99 minutes

5.

Set Clock - Day, hour and minutes

6.

AutoMode [M or A] - Sets the C-6000 to Manual or
Automatic modes. In Automatic mode, the C-6000 will
start the Fan and Wash at the preset times that were set
using the Set Wash Times option.

A = Automatic / M = Manual

Also allows individual days (Mon, Tues., etc.) to be set ON
or OFF when Automatic mode is selected.

7.

Set Wash Times - Sets Start Times for Automatic start
of Fan and wash when C-6000 is set to Automatic mode.

8.

Wash Test - Runs through a complete Wash Cycle with
decresed times

Damper Closing Time = 10 sec.
Wash Times = 10 sec.
Water Heating Time = 10 sec.
Exits menu when finished.

9. Number of Washes - Preset at factory and protected with

a password. Allows the number of washes to be changed
from 1 to 5  (S1 to S5).

Spanish (Español) Instructions:

The C-6000 Command Center has the ability to display its
commands and messages in either English or Spanish
(Español).

Press the "ENGLISH / ESPAÑOL" [F3] button to toggle the
language displayed from English to Spanish (Español) or from
Spanish (Español) to English.

NOTE: All messages displayed by pressing the "MENU"
[F4]button only appear in English. They will not appear in
Spanish (Español).

Using the Menu:

To Enter the Menu, press the MENU button [F4].

To navigate the Menu:

•  Press [F1] to go to the Next menu item
•  Press [F2] to go to the Previous menu item

FIGURE 9

C-6000 COMMAND CENTER

3.

Programming the length of the wash cycles and delay
periods between the wash cycles. The maximum length
of a wash cycle is 9 minutes. The maximum length of the
delay period is 99 minutes.

4.

Skipping a day so the exhaust fan and wash cycle do not
operate for holidays or specific days within a 7-day week
when the kitchen is not operating.

OPERATING INSTRUCTIONS

1. Push "Start Fan" before turning on cooking equipment.

Note: There is a 45 second delay after pushing the button

before the fan starts to allow the damper to open to the

"Exhaust" position.

2. At the end of the day, or whenever cooking is completed,

push "Start Wash".  This will turn off the exhaust fan and

close the damper forward to the "Wash" position.

Note:


There is a 45 second delay after pushing the button

before the wash cycle starts, to allow the damper, if so

equipped, to close to the "Wash" position.  After closing, the

timed wash cycle begins.  Damper stays closed until "Start

Fan" is pushed.  

Note:

 24 hour kitchens must push "Start Wash"

at least once a day, or as needed for proper cleaning.

3. To set the length of the time for the wash cycle, press

"Menu", then press [F1] until "Wash Length" appears on the

display.  Follow the instructions on the display to edit the

length of washes as necessary.

Note:

 Refer to the programming instructions on the inside of

this cabinet for more information on programming the

C-6000 Command Center.

LOW DETERGENT

The green light will flash and

 "Low Detergent" 

will be displayed

on the C-6000 Command Center indicating the detergent

is low.

FIRE CONDITION

1. A flashing red light and the message 

"Ext. Fire Active"

indicates the control is in an 

External Fire Mode

 - exhaust

fan on, damper open, and water wash nozzles on.

2. A continuous red light and the message 

"Fire In Hood"

indicates the control is in an 

Internal Fire Mode

 - exhaust

fan off, damper closed, and water wash nozzles on.

MODEL C-6000 COMMAND CENTER

Summary of Contents for C-6000 Series

Page 1: ...FOR THE CG3 SERIES WATER WASH VENTILATORS WITH MODEL C 6000 COMMAND CENTER 10900 S W AVERY STREET TUALATIN OREGON 97062 1149 U S A 1 800 547 9696 503 691 2010 FAX 503 692 6048 email info gaylordusa com GAYLORD INDUSTRIES EFFECTIVE DATE 04 2005 ...

Page 2: ...ase refer to the corresponding supplementary equipment manuals If you have further questions please visit our web site at www gaylordusa com or call us toll free at 1 800 547 9696 We are more than happy to help Sincerely Gaylord Industries STREET ADDRESS 10900 S W Avery Street Tualatin Oregon 97062 8549 U S A PHONE 503 691 2010 800 547 9696 FAX 503 692 6048 email gaylord gaylordusa com www gaylord...

Page 3: ...LCABINET 34 MODELGPC 6000 SSERIESCONTROLCABINET 35 OPTIONALCONTINUOUSCOLDWATERMIST 36 MODELC 6000ORC 6000 ASERIESCONTROL 37 MODELC 6000 BSERIESCONTROL 38 DAMPERCONTROLMOTORANDCG3 FDLWIRING 39 DETERGENTPUMP 40 MISCELLANEOUSVENTILATORPARTS 41 WIRINGDIAGRAMS 42 49 STANDARDVENTILATORMODELS 50 METRICCONVERSIONCHART 51 START UPINSPECTIONREPORT 52 LIMITEDWARRANTY Insidebackcover TABLE OF CONTENTS Patent ...

Page 4: ...collar and there is a single thermostat toactivatethefiremodeinthecontrolcabinet and ventilator No Belimo One Thermo stat CG3 ND Inlet damper is fixed No Fire Damper at duct collar A bracket Fire Damper Lockout has been added to show that the damper will not close to the fire position No Damper motor No Thermostats Summary of CG3 Ventilators The CG3 and CG3 FDL are very similar Both have a damper ...

Page 5: ...5 CG3 VENTILATOR DESCRIPTIONS ...

Page 6: ...the fire mode When the Start Fan button is pushed on the control cabinet the damper opens to the exhaust mode position 1 to become the preliminary grease CG3 SERIES VENTILATOR PRINCIPLE OF OPERATION extraction baffle There is a small sloped grease collecting gutter on the back side of the damper which drains off liquefied grease preventing it from re entraining into the airstream Baffle 2 This baf...

Page 7: ...which leads to the building drain system Spray nozzles are located on 8 to 10 centers on the wash manifold mounted on the interior back wall of the ventilator At the end of the wash cycle the water automatically shuts off and the interior of the ventilator is clean ready for the next day s operations The damper remains in the wash position until the exhaust fan is restarted This is to prevent cond...

Page 8: ... on until the thermostat cools down below 250 F CG3 SERIES VENTILATOR PRINCIPLE OF OPERATION CAUTION In case of severe fire the thermostats located in the plenum will activate As a precautionary measure it is recommended that the thermostats be replaced FIG 4 FIRE CYCLE 7 A red light on the Command Center illuminates 8 If the Command Center is intertied with a building alarm or monitoring system a...

Page 9: ...he break glass fire switch if used would normally be located at the exit of the kitchen When the External Fire Mode is activated the following occurs 1 The Exhaust Fan comes on immediately if it was off to help remove smoke heat etc 2 The Supply Fan shuts off immediately 3 The digital display reads Ext FireActive and alternates between Reset FireSwitch and Fan On Wash On 4 A red light on the Comma...

Page 10: ... the digital display reads Wash On Wash 1 xxx seconds xxx is the coundown in seconds until the wash system shuts off 6 Upon completion of the wash cycle the damper stays in the closedwashpositionuntiltheexhaustfanisre started This istopreventconditionedairfromgoinguptheexhauststack during off hours N A on CG3 FDD and CG3 ND 7 The digital display now reads Fan Off 12 00 current time and Start Fan F...

Page 11: ...monthly to remove any foreign material such as paper towels order chits etc Every Six Months 1 Exhaust fan s should be checked every six months for belt tightness belt alignment and lubrication of neces sary moving parts NOTE A blue lithium based grease is best suited for high heat and speed bearing lubrication 2 Check for proper velocity at air inlet slot Refer to Pages 21 through 23 for method o...

Page 12: ...itial Operation To prime and operate the pump for the first time it is recom mended that water be used instead of detergent to prevent detergent from spilling in case of leaks at the system s fittings Priming The Pump The detergent pump is self priming Push the pump test switch located on the junction box of the motor and hold down until liquid climbs up the vinyl tubing and fills the pump head Th...

Page 13: ... Spray on and rinse or wipe off For extremely soiled areas gentle agitation followed by a soaking period will result in more thorough cleaning DON TbeafraidtoexperimentwithFORMULAG 510because it contains no phosphates nitrates enzymes sulfates sul fonates or silicates DETERGENT FOR THE WASH SYSTEM LIMITEDWARRANTY G 510 CHEMICAL DIVISION warrants that FOR MULAG 510willnotcausecleansingagent damage ...

Page 14: ...button to toggle the language displayed from English to Spanish Español or from Spanish Español to English NOTE All messages displayed by pressing the MENU F4 button only appear in English They will not appear in Spanish Español Using the Menu To Enter the Menu press the MENU button F4 To navigate the Menu Press F1 to go to the Next menu item Press F2 to go to the Previous menu item FIGURE 9 C 600...

Page 15: ...r keep pressing F3 to cycle around if necessary Press F1 to go to the current Minute Press F3 to increase the Minute keep pressing F3 to cycle around if necessary Press F5 EXIT to return to the menu 6 AutoMode A or M Used to select M anual or A utomatic mode If A is displayed the C 6000 is set to operate in Automatic mode If M is displayed the C 6000 is set to operate in Manual mode Press F6 ENTER...

Page 16: ...D 4 F p U 3 F f i c t e 2 h s a W t x e N o t s e o g t x e N 1 F g n i s s e r P l o r t n o c l a i t n e u q e S a s a p u t e s s i l o r t n o c f i 2 h s a W f o h t g n e L e h t t s u j d a o t 1 F s s e r P e l b a c i l p p a 5 F s s e r P T I X E u n e m e h t o t n r u t e r o t 4 e m i T y a l e D t e S o T s r a e p p a e m i T y a l e D 4 l i t n u 1 F s s e r P e m i T y a l e D 4 ...

Page 17: ... e s U e d o m c i t a m o t u A o t t e s s r a e p p a e m i T h s a W t e S 7 l i t n u 1 F s s e r P s e m i T h s a W t e S 7 r e t n E 6 F t i x E 5 F h t i w s e l g g o T v e r P 2 F t x e N 1 F 6 F s s e r P R E T N E e m i t t r a t S e h t y a l p s i d o t y a d n u S n o n a F e h t r o f n a F n u S 4 2 4 1 n a F n u S r u o H e h t e s a e r c n i o t 3 F s s e r P s e t u n i M e h...

Page 18: ...18 FIG 10A TYPICAL ARRANGEMENT WITH VACUUM BREAKER CHECK VALVE FOR BACKFLOW PREVENTION FIG 10B TYPICAL ARRANGEMENT WITH BUILT IN RP DEVICE FOR BACKFLOW PREVENTION ENGINEERING DATA ...

Page 19: ...verage 1 67 GPM Lineal Ft 80 PSI Average The length of the wash cycle may be set between 3 minutes and 9 minutes The length of time is dependent upon the type of cooking equipment being used Typical settings are 3 minutes for light duty equipment 5 minutes for medium duty equipment and9minutesforheavy dutyequipment However adequate cleaning is dependent upon water pressure water temperature daily ...

Page 20: ...ous discharge of water out the relief valve when the ventilator is not in a wash cycle do the following A Leave the inlet hand valve open and close the outlet hand valve If there is still continuous discharge it indicates that foreign material is preventing the first check valve from closing If flushing will not clear the unit remove and clean the first check valve B If there is continuous dischar...

Page 21: ...tion efficiency are depen dentupontheproperairvelocityattheinletslotoftheventilator The Air Velocity Chart below gives the optimum inlet slot velocity and the minimum and maximum allowed velocities If the slot velocity is below or above the minimum or maximum the exhaust fan must be adjusted accordingly NOTE Theheightoftheinletslotcanvarydependinguponthe design of the ventilator It is therefore im...

Page 22: ...nlet slot as illustrated 6 Using the 16 second averaging feature on the meter slide the sensing head along the slot back and forth for a 3 0 to 4 0 distance and record the velocity at the end of the 16 second mark Continue this process for the full length of the ventilator Imortant Note If the ventilator includes custom air baffles as illustrated in Fig 12B always take separate readings on the sec...

Page 23: ...ONNECT TO NFPA 13 SPRINKLER SYSTEM WATER SUPPLY ONLY SERIAL NO MODEL NO HOOD MOUNTING REQUIREMENTS W G W G ENGINEERING DATA EXHAUST HOOD WITH EXHAUST DAMPER LISTED 370Y UL CG31001 THIS EXHAUST HOOD IS ALSO LISTED AS AN EXHAUST HOOD WITHOUT EXHAUST DAMPER WHEN EQUIPPED WITH FIRE DAMPER LOCKOUT PART NUMBER FDL FOR USE ONLY WITH GAYLORD INDUS TRIES LISTED SUB ASSEMBLY CONTROL CABINET MODEL NUMBER GPC...

Page 24: ...xhaust fan opening the control cabinet door and check the water pressure gauge in the cold water loop Water flow pressure should be at 40 psi If it is not adjust the pressure regulator until 40 psi is achieved 2 Mist Nozzles Turn on the exhaust fan look into the air inlet slot and check each mist nozzle for proper spray Remove and clean the nozzle if necessary TROUBLE SHOOTING 1 If the mist nozzle...

Page 25: ...GX2 normally closed thermostats It has 6 terminals on the TB2 terminal strip on the lower portion of the board Terminals 5 and 6 were added to the TB2 terminal strip to accommodate a 2nd Damper Positioner and the Fire Test Switch A Jumper is required from 6 from the TB2 terminal strip to 3 on the TB1 terminal strip 6000 10 B ICGL02 102 This control will drive up to 10 damper motors 10 sections of ...

Page 26: ...a e b d l u o h s s r e v u o l e h t g n i c r o f r o g n i t c e r i D r o t a l i t n e v e h t m o r f y a w a s e t a e r c y l l a c i p y t r o t a l i t n e v e h t t a r i a p u e k a m s s o l e k o m s n i g n i t l u s e r s t f a r d s s o r c f o t n e m e c a l p e r r o f d e i l p p u s e b t s u m r i a p u e k a M t s u a h x e n e h c t i k l l a h g u o r h t d e t s u a h x ...

Page 27: ... X G r e f e r G N I T O O H S E L B U O R T e h t n i E L C Y C E R I F o t n o i t c e s r e t r a t s c i t e n g a m e h t n o n o t t u b t e s e R e h t h s u P e h t n o n o t t u b n a F t r a t S e h t h s u p e h t d n a r e t n e c d n a m m o c c i t a m o t u a e h t o t r o t c e l e s n r u t d n a h c t i w s k c e h C n o i t i s o p r e k a e r b t i u c r i c t e s e R f i e c a...

Page 28: ...p o n o s i e l c y c h s a w e h t e l i h W k c e h c y l l a u s i v d n a y l t h g i l s r o o d n o i t c e p s n i d e g g o l c s i e l z z o n a f I s e l z z o n f o y a r p s e r i w l l a m s a g n i n n u r y b n a e l c d n a e v o m e r t i h g u o r h t g n i t o o h s e l b u o r t r o f 2 1 e g a P o t r e f e R p m u p t n e g r e t e d y l k e e w t n e g r e t e d l l i f d n ...

Page 29: ... c r u o s l a n r e t x e e t a g i t s e v n i s p o t s e d o m e s u a c e v o m e r d n a e h t n o t h g i l s u t a t s e t a i r p o r p p a e h t k c e h C n o t r a h c t h g i l s u t a t s C L P e h t o t r e f e R C L P e h t n o t o n s i t h g i l t u p t u o e h t f I 1 3 e g a P r o d e m m a r g o r p e r e b o t s d e e n C L P d e c a l p e r y l b i s s o p e h t n o r o t a l...

Page 30: ... o l f e v o r e t a w e l c y c h s a w a g n i r u d f I t o l s t e l n i t u o s e m o c d n a r e t t u g e h t A B C D h c a E e t o N t e l t u o n i a r d d e g g o l C n i a r d n w o s t i s a h n o i t c e s r o t a l i t n e v t e l t u o n a h t e r o m f I d e g g o l c m e t s y s n i a r D t i g n i n i a r d t o n s i m e t s y s r o t a l i t n e v e n o s i m e t s y s n i a r d...

Page 31: ...SCRIPTION PLC 0 On when Wash Solenoid 1 should be open 1 On during an Internal or External Fire Mode On during Cool Down Cycle 2 On when Detergent Pump should be on 3 On when Exhaust Fan should be on COM Never comes on 4 On when Supply Fan should be on COM Never comes on 5 On when damper is in Wash position or while damper is moving to Wash position Y Outputs SEQUENTIAL WASH S2 S5 DESCRIPTION EXPA...

Page 32: ...uel Shutoff Control Closed Closed Closed Open Open FS Input from Remote Fire Switch 0 VAC 0 VAC 0 VAC 0 VAC 120 VAC 120 VAC 120 VAC 120 VAC 120 VAC 120 VAC 0 VAC 0 VAC 0 VAC 0 VAC 0 VAC GX Power for GX2 Damper Actuators 0 VAC 24 VAC 0 VAC 0 VAC 24 VAC 15 Output to Thermostat s 24 VAC 24 VAC 24 VAC 24 VAC 24 VAC 17 24 VAC Common 14 VDC 6 VDC 14 VDC 6 VDC 6VDC 24 VAC 0 VAC 24 VAC 0 VAC 0 VAC 19 Powe...

Page 33: ...ize 1 14389 Pipe Size 1 1 4 14390 Pipe Size 1 1 2 14391 3 Detergent Tank 2 Gallon 10221 4 Pressure TemperatureGauge 10175 5 Detergent Brass Check Valve 10265 6 FS 4 Series Detergent Flow Switch Optional 16892 7 DetergentPump 120Volt 10222 220Volt 10223 8 CommandCenterModelC 6000Series Refer to Page 37 38 9 VacuumBreaker Specify Size A Vacuum Breaker Repair Kit Specify Size 10 Water Check Valve Spe...

Page 34: ...t Pipe Size 3 4 14388 Pipe Size 1 14389 Pipe Size 1 1 4 14390 Pipe Size 1 1 2 14391 2 Detergent Tank 2 Gallon 10221 3 Pressure TemperatureGauge 10175 4 Detergent Brass Check Valve 10264 5 FS 4 Series Detergent Flow Switch Optional 16892 6 DetergentPump 120Volt 10222 220Volt 10223 7 CommandCenterModelC 6000Series Refer to Page 37 38 8 Backflow Preventer RP Device Type Specify Size 9 LineStrainer Sp...

Page 35: ...14387 Pipe Size 3 4 14388 Pipe Size 1 14389 Pipe Size 1 1 4 14390 Pipe Size 1 1 2 14391 2 Detergent Tank 2 Gallon 10221 3 Pressure TemperatureGauge 10175 4 Brass Check Valve 10264 5 FS 4 Series Detergent Flow Switch Optional 16892 6 DetergentPump 120Volt 10222 220Volt 10223 7 CommandCenterModelC 6000Series Refer to Page 37 38 8 Backflow Preventer RP Device Type Specify Size 9 LineStrainer Specify ...

Page 36: ...rts for the hot water loop are shown on pages 33 34 and 35 1 1 2 Ball Valve 11258 2 1 2 Solenoid Valve NC 10135 A ReplacementCoil 120Volt 10156 220Volt 10157 B Solenoid Valve Repair Kit Pipe Size 1 2 14387 3 PressureGauge 10276 4 1 2 Water Pressure Reducing Valve 10924 5 1 2 Vacuum Breaker 10177 A Vacuum Breaker Repair Kit 10178 6 1 2 Water Check Valve 10195 7 1 2 Line Strainer 10151 GAYLORD PART ...

Page 37: ...rator Interface Cable 18868 7 Operator Interface 75636 8 100 VA Transformer 18861 9 Fuse F1 2 Amp 24VDC Power Supply 13062 BUSS AGC 2 10 Fuse F2 4 Amp PLC 120 VAC 10039 BUSS AGC 4 11 Fuse F3 1 Amp Supply Fan Mag Starter 19027 BUSS MDL 1 12 Fuse F4 1 Amp Exhaust Fan Mag Starter 19027 BUSS MDL 1 13 Expansion Module Optional used for S2 S5 18867 14 Flash Guard Not Shown 18877 MODEL C 6000 OR C 6000 A...

Page 38: ... w p ro g ra m M y la r la b e l 7 5 8 7 1 9 O p e ra to r In te rfa c e M y la r L a b e l 1 9 0 1 0 1 0 1 0 0 V A Tra n s fo rm e r C 6 0 0 0 1 0 1 8 9 8 1 C o n tro l R e la y S P D T C R 9 E S P F ire S ig n a l 1 1 3 9 9 S o c k e t S P D T 1 1 1 2 1 3 1 4 1 7 1 8 2 0 1 1 4 1 3 C o n tro l R e la y S P D T C R 1 0 1 1 3 9 9 S o c k e t S P D T 1 1 4 1 3 C o n tro l R e la y S P D T C R 1 1 1 ...

Page 39: ...C NO DES CRIP TION GAYLORD P ART NO 1 For C 6000 or C 6000 A Dam per Control M otor A F24 S R 24 V olt 30204 1 For C 6000 B Dam per Control M otor A F24 M FT P 10050 24 V olt or A F24 M FT S 0001 24 V olt 18979 Used in CG3 CG3 FDL and CG3 FDT only ...

Page 40: ...40 DETERGENT PUMP ...

Page 41: ...H G I L T N E C S E D N A C N I r e n i a t e R s n e L t h g i L d e s s e c e R 2 1 x 2 1 E M A R F S N E L T H G I L T N E C S E R O U L F 0 1 2 3 1 r e n i a t e R s n e L t h g i L d e s s e c e R t F 2 1 1 1 0 1 r e n i a t e R s n e L t h g i L d e s s e c e R t F 3 2 1 1 0 1 r e n i a t e R s n e L t h g i L d e s s e c e R t F 4 S T A T S O M R E H T T C U D T S U A H X E 5 6 4 8 1 F 0 5 ...

Page 42: ...42 WIRING DIAGRAM FOR MODEL C 6000 10 120 VOLT ...

Page 43: ...43 WIRING DIAGRAM FOR MODEL C 6000 10 220 VOLT ...

Page 44: ...44 WIRING DIAGRAM FOR MODEL C 6000 10 A 120 VOLT ...

Page 45: ...45 WIRING DIAGRAM FOR MODEL C 6000 10 A 220 VOLT ...

Page 46: ...46 WIRING DIAGRAM FOR MODEL C 6000 10 B 120 VOLT ...

Page 47: ...47 WIRING DIAGRAM FOR MODEL C 6000 20 B 120 VOLT ...

Page 48: ...48 WIRING DIAGRAM FOR MODEL C 6000 10 B 220 VOLT ...

Page 49: ...49 WIRING DIAGRAM FOR MODEL C 6000 20 B 220 VOLT ...

Page 50: ...This method of introducing make up air into the kitchen is flexible and has many advantages Make up air is discharged through stainless steel perforated panels as illustrated MAW Series or optional registers Typical supply volume is 80 of the exhaust or more depending on air bal ance desired Supply air temperatures should range from 60 to 65 F 16 to 18 C but may be as low as 50 F 10 C depending on...

Page 51: ...ters L s liters per second N Newtons dm decimeters Kpa 1000 Pascals N m2 Newtons per square meter CFM cubic feet per minute psi pounds per square inch C degrees Celsius m3 s cubic meters per second kg m2 kilograms per square meter BAR one atmospheric pressure meter L Liters F degreesFahrenheit 1000 millibars 14 7 psi WATERFLOW VOLUME TOCONVERT TO MULTIPLYBY U S ounce Liters 02958 U S gal Liters 3 ...

Page 52: ..._______ FIRE MODETEST CAUTION Before any fire tests are performed check with building superintendent to see if Gaylord control cabinet is tied into building alarm monitoring system and or Fire Department THERMOSTAT TEST For CG3 CG3 FDL and CG3 FDT With the exhaust fan on open electrical compartment on Control Cabinet and push and hold for 20 seconds the Fire Test Switch The following should occur ...

Page 53: ...nufacturer or its authorized representative SuchlaborshallonlybeprovidedMondaysthroughFridaysduringthehoursbetween 8 a m and 4 p m Requests for repairs or replacement parts should be made to GAYLORD INDUSTRIES P O Box1149 Tualatin Oregon97062 1149 Outside the United States all replacement parts furnished under this warranty shall be F O B GaylordIndustries Inc Tualatin OregonU S A Theownershallpay...

Page 54: ...ENCY VISIT OUR WEB SITE WWW GAYLORDUSA COM OR CONTACT US AT GAYLORD INDUSTRIES 10900 S W AVERY STREET TUALATIN OREGON 97062 1149 U S A Phone 503 691 2010 1 800 547 9696 Fax 503 692 6048 email info gaylordusa com LOCAL SERVICE AGENCY FORM NO TM CG3 0304 30507 COPYRIGHT 2005 GAYLORD INDUSTRIES LITHO IN U S A ...

Reviews: