background image


__ 


Copyright © 2008 Gator. All Rights Reserved.  

41 


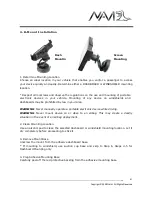
4. R-Mount Installation  


1. Determine Mounting Location 
Choose  an  ideal  location  in  your  vehicle  that  enables  you  and/or  a  passenger  to  access 
your device quickly and easily. Determine either a DASHBOARD or WINDSHIELD mounting 
location. 
 
* Respect all local laws and observe the regulations on the use and mounting of portable 
electronic  devices  in  your  vehicle.  Mounting  of  any  device  on  windshields  and 
dashboards may be prohibited by law in your area. 
 

WARNING

: Never manually operate a portable electronic device while driving. 

WARNING

:  Never  mount  device  on  or  close  to  an  airbag.  This  may  create  a  deadly 

situation in the event of an airbag deployment. 

 
2. Clean Mounting Location 
Use an alcohol pad to clean the selected dashboard or windshield mounting location. Let it 
dry completely before proceeding to stick it. 
 
3. Remove Mount Base 
Unscrew the mount from the adhesive dashboard base. 
*  If  mounting  to  windshield,  use  suction  cup  base  and  skip  to  Step  6.  Steps  4-5  for 
Dashboard Mounting only 
 
4. Prep Adhesive Mounting Base 
Carefully peel off the red protective backing from the adhesive mounting base. 


Dash 
Mountin

Screen 
Mounting 

Summary of Contents for iDriveZ Navi 430

Page 1: ...Gator iDriveZ Portable Navigation Device PND User Manual...

Page 2: ...__ Copyright 2008 Gator All Rights Reserved 2 Model 430 431 433...

Page 3: ...safe driving For your safety do not operate the navigator device while driving Its mandatory for most countries to use hands free or Bluetooth function during driving please respect local laws All im...

Page 4: ...any means electronic mechanical photocopy recording or otherwise without the prior written permission of Gator DISCLAIMER AND LIMITATION OF LIABILITY Gator and its subsidiaries make no representations...

Page 5: ...ion 12 2 5 Using MicroSD card 13 2 6 Start Navigation 13 3 Operation Details 15 3 1 Navigation functions 15 3 2 Multimedia functions 15 3 2 1 Music player 16 3 2 2 Video Player 18 3 2 3 Picture Viewer...

Page 6: ...served 6 3 4 6 System information 40 4 R Mount Installation 41 5 Sync GPS Device with PC 43 5 1 Application and functions 43 5 2 Operating Environment 43 5 3 Active sync software installation 43 5 4 U...

Page 7: ...the following items If any defect was found please contact your local dealer or distributor GPS device overview Item Quantity Item Quantity GPS 1 USB Cable 1 Stylus 1 User manual CD 1 AC car charger 1...

Page 8: ...antenna K Reset button To reset device L Battery cover Contain 1500mAhLi Polymer battery 1 3 Product Feature Bluetooth Hands free Build in Bluetooth function enables hands free operation and phone ca...

Page 9: ...g temperature 10 C to 60 C Storage temperature 20 C to 70 C Operating humidity 45 to 80 RH Storage humidity 30 to 90 RH System Specifications CPU speed 400MHz CPU SAMSUNG S3C2451XH RAM DDRII 128MB ROM...

Page 10: ...cquisition time Average 0 1s Hot start Less than 3s Warm start Average 40s Cold start Less than 100 s Maximum positioning height 18 000m Maximum rate 515m s Acceleration 4g Built in antenna type Built...

Page 11: ...Attention When the battery is low device will beep to alert user and turn into Sleep mode If there is no power supply device will switch off If device cannot be turn on please check if the battery is...

Page 12: ...ention To ensure the lithium polymer battery working under best condition please take note of the followings Do not attempt to charge battery in high temperature environment eg at balcony or under the...

Page 13: ...ess into the slot until it is securely locked To release press the card again 1 Please insert MicroSD correctly into the slot at the right side of the device 2 Do not eject MicroSD card during operati...

Page 14: ...own below 3 Click to browse and select the directory 4 Select the navigation software filename with extension of exe and double click Select your choice by ticking or for Navigation Autorun at Power o...

Page 15: ...device may take 1 2 minutes depending on the search process Example Attention The navigation software provided by your local vendor or distributor may differ from the picture above Please refer to you...

Page 16: ...2 Add music file a When there is no music file in the Music Player directory the system will list both NANDFlash and StorageCard MiscroSD Select music files from these directories to add to Music Pla...

Page 17: ...music click to pause click to slide on sound volume bar and adjust the volume e Click to go to Playlist and click to add music files to playlist f Music Player functions Button Function Remark Button...

Page 18: ...r instructions are same as above 3 2 2 Video Player 1 Access Video Player In My Media menu click on Movie 2 Add video file a System will open NANDFlash and MicroSD directory if there is no video file...

Page 19: ...yer Pause Pause video Volume Adjust volume Previous Play previous video Full screen See full screen video Next Play next video Playlist Video Playlist Back Back to previous menu Main Menu Back to Main...

Page 20: ...See picture list Back Return to previous menu Main Menu Return to Main Menu 3 2 4 Ebook Reader 1 In My Media click Ebook to launch Ebook Reader 2 Add Ebook Click to access ebook list and click to add...

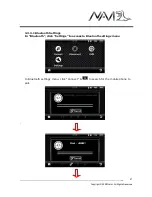
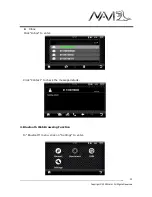
Page 21: ...y In Main Menu click Phone to access to Bluetooth menu 3 3 1 Bluetooth setting After mobile phone is paired with this device via Bluetooth you may use this device to make calls receive calls and hands...

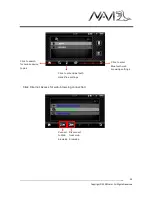
Page 22: ...to access Bluetooth menu b Bluetooth setting In Phone Menu click Settings Bluetooth on standby Click to activate or deactivate Bluetooth on standby Button shows it means Bluetooth remains activated i...

Page 23: ...setting and return to previous menu 2 Pairing with mobile phone a Activate Bluetooth device search function of your mobile phone to pair with this device b Input PIN code for pairing default pairing...

Page 24: ...ing Bluetooth 2 Click your mobile device is in the list to select for Bluetooth connection Note Bluetooth function in mobile device must be turn on 3 Click to disconnect connectivity between GPS devic...

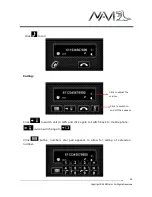
Page 25: ...s e g extension number click for dial pad Eg Adjust volume Click on or to increase or decrease call volume Click speaker button to turn on or off Switch between GPS device and mobile phone Click to sw...

Page 26: ...by certain mobile phones In default call list display all the call history you may click on the right panel to check incoming calls missed calls and outgoing calls 1 Outgoing calls 2 Incoming calls 3...

Page 27: ...ght 2008 Gator All Rights Reserved 27 3 3 3 1 Bluetooth Settings In Bluetooth click Settings to access to Bluetooth settings menu In Bluetooth settings menu click Connect to search for the mobile phon...

Page 28: ...PIN code 1234 Pairing method for different mobile phone may vary please refer to your mobile phone manual 2 Handsfree operation Making call After pairing completes click Dial Pad in Bluetooth mode to...

Page 29: ...call Calling Click to switch call to GPS and click again to switch back to mobile phone the icon will change to Click button numbers dial pad appears to allow for calling of extension number Click to...

Page 30: ...l List In Bluetooth menu click on Call List to check the call history The call list is retrieved from your mobile phone connected to this device via Bluetooth this function may vary or not be supporte...

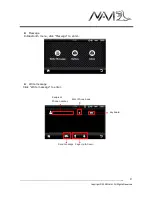
Page 31: ...right 2008 Gator All Rights Reserved 31 Message In Bluetooth menu click Message to enter Write message Click Write message to enter Page Up Down Send message Keyboard Enter Phone book Recipient Phone...

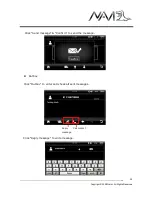
Page 32: ...right 2008 Gator All Rights Reserved 32 Click Send message Confirm to send the message Outbox Click Outbox to enter and check all sent messages Click Reply message to write message Reply message Call...

Page 33: ...__ Copyright 2008 Gator All Rights Reserved 33 Inbox Click Inbox to enter Click Contact to check the message details 3 Bluetooth Web Browsing Function In Bluetooth menu click on Settings to enter...

Page 34: ...k Connect to search for mobile phone to pair Select the mobile device to be connected click to pair input PIN code for pairing default pairing PIN code is 1234 Pairing method for different mobile phon...

Page 35: ...ed 35 Click Internet Access for web browsing connection Connect to Web browsing Disconnect from web browsing Click to enter Bluetooth Handsfree settings Click to enter Bluetooth web browsing settings...

Page 36: ...r All Rights Reserved 36 Click Internet Access Bluetooth menu appears click on Internet to start web browsing URL address bar Refresh Stop New web page Favourites History Exit Internet Access Keyboard...

Page 37: ...Rights Reserved 37 3 4 Settings For iDriveZ 430 431 Click Settings in Main Menu to access setting interface 3 4 1 Calibrate touch screen 1 In Settings menu click System 2 Click Calibration to calibra...

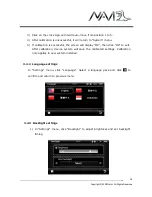
Page 38: ...cessful the screen will display OK then click OK to exit After calibration device system will save the calibrated settings Calibration only applies to new system installed 3 4 2 Language settings In S...

Page 39: ...3 4 4 Volume settings 1 In Settings menu click Volume to adjust system sound volume and set Touch tone option Volume setting can also be accessed by clicking the small speaker icon on top right of scr...

Page 40: ...H hour or M minute and or to set time 4 Click to switch time format between 12 hours and 24 hours 5 Click to return to previous menu 3 4 6 System information In Settings menu click System System infor...

Page 41: ...your area WARNING Never manually operate a portable electronic device while driving WARNING Never mount device on or close to an airbag This may create a deadly situation in the event of an airbag dep...

Page 42: ...n 7 Secure Mount to Base Place mount onto base thread Secure mount to base by tightening nut Ensure device can be viewed safely properly in chosen location 8 Mount Device to Base Using Included Adapte...

Page 43: ...2 Operating Environment Hardware platform PIII hardware and above Software platform Microsoft Windows 98 ME 2000 2003 XP Requirements This software is compiled by Windows Install Installation of this...

Page 44: ...__ Copyright 2008 Gator All Rights Reserved 44 2 Input your personal information as required and click Next 3 Choose directory and click Next to proceed to click Install...

Page 45: ...er installation process complete Icon of this software will appear on task bar column 5 After installation of this software an icon of Mobile Device will show in My Computer When GPS device is connect...

Page 46: ...served 46 5 4 Using Active Sync software 1 Switch on GPS device and connect to PC Icon will rotate and shine 2 Tick in Establish Connection and click Next to proceed to settings choose Default Setting...

Page 47: ...8 Gator All Rights Reserved 47 3 Clicking Complete will start connection of GPS device and PC 4 Click Browse to see GPS device information and access to folders in the device User may copy cut paste a...

Page 48: ...gnal is affected by the following factors Bad weather condition Existence of obstacles e g building tunnel overhead bridge trees windscreen coating and etc Interference by other in car wireless device...

Reviews: