


79
www.gateway.com
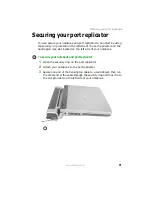
Adding or replacing memory
12
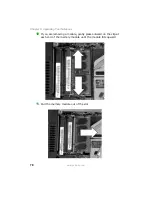
Hold the new or replacement module at a 30-degree angle and press
it into the empty memory slot. This module is keyed so it can only
be inserted in one direction. If the module does not fit, make sure
that the notch in the module lines up with the tab in the memory
bay.
13
Gently push the module down until it clicks in place.
14
Replace the memory bay cover, then tighten the cover screws.
15
Replace the keyboard screw.
16
Replace the batteries, then turn your notebook over.
17
Reconnect the optional port replicator.
18
Connect the power adapter, modem cable, and network cable, then
turn on your notebook.
Important
Use only memory modules designed for your
Gateway notebook.
Summary of Contents for M460
Page 1: ...Gateway Notebook User Guide ...
Page 2: ......
Page 26: ...20 www gateway com Chapter 2 Checking Out Your Gateway Notebook ...
Page 50: ...44 www gateway com Chapter 3 Getting Started ...
Page 68: ...62 www gateway com Chapter 4 Using Drives and Ports ...
Page 78: ...72 www gateway com Chapter 5 Managing Power ...
Page 79: ...Chapter 6 73 Upgrading Your Notebook Adding and replacing memory Replacing the hard drive ...
Page 90: ...84 www gateway com Chapter 6 Upgrading Your Notebook ...
Page 98: ...92 www gateway com Chapter 7 Using the Optional Port Replicator ...
Page 136: ...130 www gateway com Chapter 9 Troubleshooting ...
Page 158: ...152 www gateway com ...
Page 159: ......
Page 160: ...MAN M460 MYSTQ USR GDE R2 6 05 ...


