background image

38

Replacing and Adding System Components

5

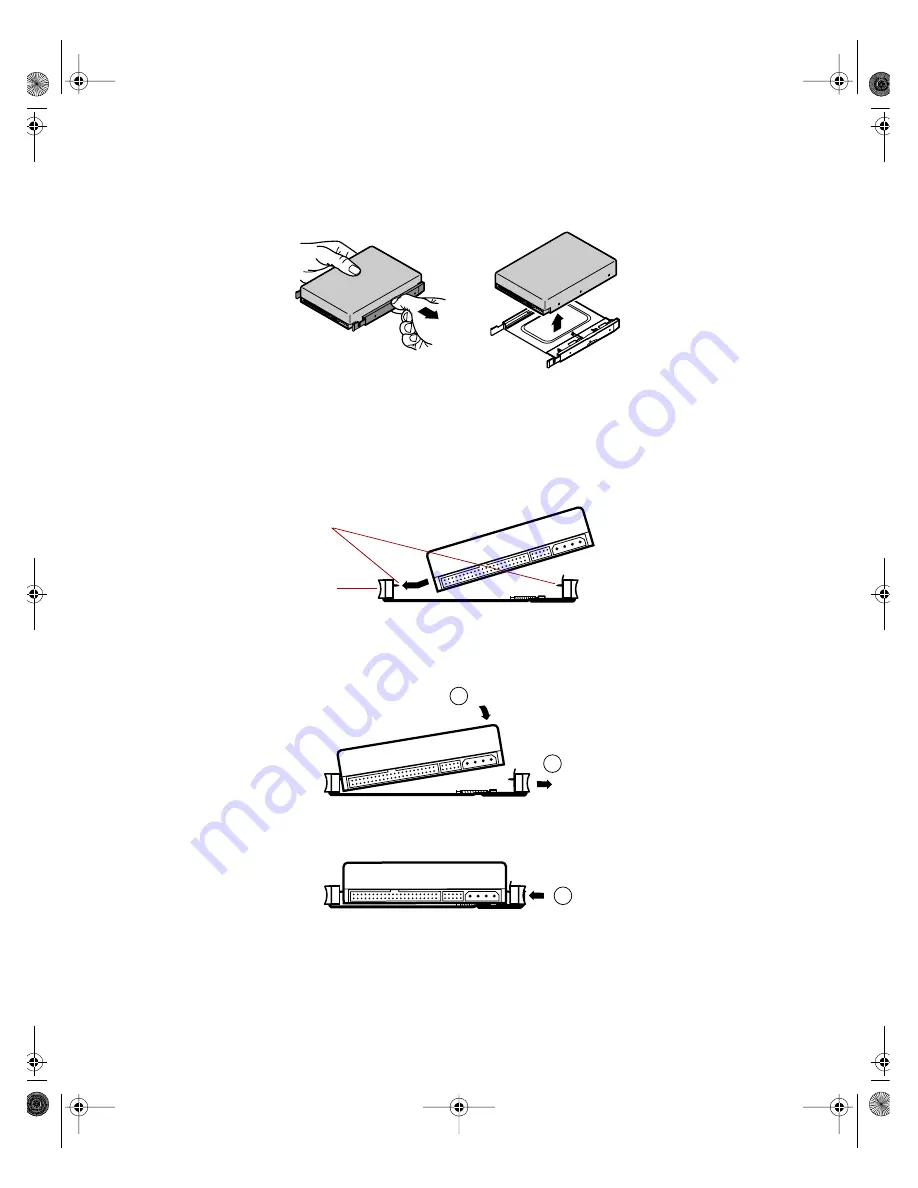
Pull on the rail to expand the tray, then remove the drive from the tray.

6

Set any jumpers on the new drive. (See the drive documentation for more 
information.)

7

Align the threaded holes on the side of the hard drive with the metal 
points on the tray, then press the drive against the side rail.

8

Expand the tray until it fits the size of your drive, then lower the drive 
into the tray. Release the tray so it can contract to secure the drive.

Metal points

Side rail

1

2

3

05957.book Page 38 Monday, May 8, 2000 10:09 AM

Summary of Contents for E3400

Page 1: ...MAN US E3400 MT SYS GDE R0 04 00 E3400 Mid Tower System Manual...

Page 2: ...ower On Self Test 15 Setting up the operating system 15 Turning off your system 16 Resetting your system 16 3 Case Access 17 Static electricity precautions 17 Opening the case 19 Removing the side pan...

Page 3: ...ard drive maintenance utilities 71 Hard drive management practices 72 System integrity 75 Protecting against viruses 75 Checking system health with LANDesk 76 System recovery 77 Creating a startup dis...

Page 4: ...dem problems 87 Peripheral adapter problems 88 Printer problems 90 System problems 92 Video problems 94 Error messages 97 9 Safety Regulatory and Notices 101 A Specifications 113 Index 115 05957 book...

Page 5: ...iv 05957 book Page iv Monday May 8 2000 10 09 AM...

Page 6: ...ess the keys at the same time Setup Commands to be entered options to select and messages that appear on your monitor are printed in bold User s Guide Names of publications are printed in italic Impor...

Page 7: ...ay products Some types of information you can access are Hardware driver and program updates Technical tips Service agreement information Technical documents and component information Frequently asked...

Page 8: ...Tower system Intel Pentium III FC PGA 370 i256K processors Two DIMM sockets that support up to 512 megabytes MB of Synchronous Dynamic Random Access Memory SDRAM Intel i815 chipset AGP 4X expansion sl...

Page 9: ...board port PS 2 mouse port 2 serial ports parallel port two Universal Serial Bus USB ports video port and audio line out microphone in and audio line in ports 200 watt power supply 05957 book Page 2 M...

Page 10: ...ol controls the volume of an audio CD Diskette drive writes to and reads from 3 5 inch 1 44 MB diskettes Diskette eject button ejects diskettes from the diskette drive Hard drive LED lights when the h...

Page 11: ...s using full power The amber light indicates your computer is in power conservation mode Reset button restarts a system that becomes non responsive Right panel release button lets you easily remove th...

Page 12: ...phones Kensington lock slot permits the use of a cable lock to secure the system Keyboard port connects a Personal System 2 PS 2 compatible keyboard Mouse port connects a PS 2 compatible mouse Paralle...

Page 13: ...instrument digital interface MIDI device USB ports connect external Plug and Play devices such as keyboards and pointing devices that are automatically configured when they are plugged into the compu...

Page 14: ...ows locations of various system components A System board B Riser card C Power supply release lever D Power supply E Hard drive hard drive shown here in top bay bay location may vary F Diskette drive...

Page 15: ...ures System board A DIMM slots 2 B AGP slot C Configuration jumper JP6 D Video connector E Parallel port F Serial port B G Serial port A P O N M L K J I A G E C B D F H 05957 book Page 8 Monday May 8...

Page 16: ...use port I PS 2 keyboard port J USB ports 2 K Audio line out connector L Microphone in connector M Audio line in connector N Battery O Processor socket PGA370 P CPU fan connector 05957 book Page 9 Mon...

Page 17: ...if the computer cover is removed It also includes five PCI connectors for add on cards Front A Secondary IDE connector B CD diskette drive power connector C Wake on LAN connector WOL D Net Alert conne...

Page 18: ...drive power connector K Primary IDE connector L Remote lock unlock M Chassis fan connector N Front panel connector O SCSI LED connector P CD audio connector Q Diskette drive connector Back A Power sup...

Page 19: ...12 System Features 05957 book Page 12 Monday May 8 2000 10 09 AM...

Page 20: ...erature and humidity Do not expose your system to direct sunlight heater ducts or other heat generating objects Keep your computer away from equipment that generates magnetic fields such as unshielded...

Page 21: ...then turn on the power strip 2 Turn on the monitor by pressing the power button 3 Turn on the computer by pressing the power button The power light emitting diode LED on the front panel is lit when t...

Page 22: ...irst time you start your computer the operating system takes a few minutes to set up Refer to your software documentation for specific questions To complete the operating system setup 1 After the comp...

Page 23: ...o close any programs that are not responding If closing unresponsive programs does not restore your computer to normal operation you may have to reset the system Refer to the software documentation of...

Page 24: ...harge 1 Wear a grounding wrist strap available at most electronics stores 2 Turn off the computer power 3 Discharge any static electricity by touching a bare metal surface on the back of the case 4 Un...

Page 25: ...bags since only the inside of the bags provides antistatic protection Always hold cards by their edges and their metal mounting brackets Avoid touching components on the cards and the edge connectors...

Page 26: ...and provides access to most of the internal components of the system The left panel is removed by sliding a tab located on the top of the chassis Removing the side panels To remove the right panel 1...

Page 27: ...release button located in the lower right hand corner of the front bezel The bottom portion of the right panel unlatches from the chassis Right panel release button Right panel 1 2 05957 book Page 20...

Page 28: ...Opening the case 21 4 Lift up on the right panel then lift the panel up and away from the chassis Right panel 05957 book Page 21 Monday May 8 2000 10 09 AM...

Page 29: ...on page 19 for instructions 2 Slide the left panel release tab toward the rear of the chassis This unlatches the left panel from the chassis 3 Grasp the left panel then lift the panel up away from th...

Page 30: ...damage the computer do not collect inside the computer Replacing the side panels To replace the left panel 1 Align the tabs at the bottom of the panel with the tab holes at the base of the chassis 2 I...

Page 31: ...assis 2 Insert the tabs into the tab holes 3 Push the bottom of the right panel towards the chassis until the tabs engage the tab holes at the bottom of the chassis The chassis automatically locks int...

Page 32: ...r Two 5 25 inch drive bays that can be accessed from outside the computer Three 3 5 inch drive bays that can only be accessed from inside the computer As you prepare to install drives keep the followi...

Page 33: ...tart up to access the BIOS Setup utility program The drive cage Releasing the drive cage You do not have to remove any screws to release the drive cage The drive cage is secured in the chassis by a dr...

Page 34: ...ocated above the drive cage Using your other hand press the drive cage release button while pulling the drive cage toward the front of the chassis 1 2 Drive cage release button Drive cage handle Relea...

Page 35: ...28 Replacing and Adding System Components 4 Slide the drive cage forward until the drive cage release button snaps into the forward locking hole 05957 book Page 28 Monday May 8 2000 10 09 AM...

Page 36: ...n push the drive cage back into the chassis with the other hand until the release button snaps into the rear locking hole 2 Replace the right panel See Replacing the side panels on page 23 for instruc...

Page 37: ...skette drive 1 Turn off the computer disconnect the power cord modem cord if installed and all external peripheral devices 2 Remove the right panel See Removing the side panels on page 19 and observe...

Page 38: ...he threaded holes on the diskette drive align with the locking tab holes on the drive cage 7 Replace the drive locking tab 8 Connect the power and data cables to the drive 9 Replace the right panel Se...

Page 39: ...s 2 Remove the right panel See Removing the side panels on page 19 and observe the Static electricity precautions on page 17 3 Disconnect the power data and audio cables from the back of the drive 4 R...

Page 40: ...threaded holes on the drive align with the locking tab holes on the drive cage 8 Replace the drive locking tab 9 Connect the power data and audio cables to the drive 10 Replace the right panel see Rep...

Page 41: ...pheral devices 2 Remove the right panel See Removing the side panels on page 19 and observe the Static electricity precautions on page 17 3 Release the drive cage and slide it forward in the chassis u...

Page 42: ...on the front bezel by squeezing the two tabs on the left side of the filler panel The filler panel then ejects 6 Set any jumpers on the new drive See the drive documentation for more information Fill...

Page 43: ...king tab 9 Connect the power and data cables to the drive 10 Push the release button in and slide the drive cage back into the chassis until the button snaps into the rear locking hole 11 Replace the...

Page 44: ...the computer disconnect the power cord modem cord if installed and all external peripheral devices 2 Remove the right panel See Removing the side panels on page 19 and observe the Static electricity p...

Page 45: ...n for more information 7 Align the threaded holes on the side of the hard drive with the metal points on the tray then press the drive against the side rail 8 Expand the tray until it fits the size of...

Page 46: ...he drive tray into the drive cage until the release tabs snap into place 11 Connect the power and data cables to the drive 12 Replace the right panel See Replacing the side panels on page 23 for instr...

Page 47: ...nels on page 19 and observe the Static electricity precautions on page 17 3 Choose the bay in the drive cage where you want to install the additional hard drive The metal tray that will hold the hard...

Page 48: ...the hard drive with the metal points on the tray 7 Expand the tray until it fits the size of your drive then lower the drive into the tray Release the tray so it can contract to secure the drive Meta...

Page 49: ...ush the drive tray into the drive cage until the release tabs snap into place 10 Connect the power and data cables to the drive 11 Replace the right panel See Replacing the side panels on page 23 for...

Page 50: ...56 MB DIMMs in any combination to expand the system memory up to 512 MB No jumper settings are required for the memory size or type because the BIOS automatically detects this information To install o...

Page 51: ...socket and align the two bottom notches in the DIMM with the two notches in the DIMM socket 6 Gently press the DIMM into the socket until the plastic socket clamps on each side of the socket snap into...

Page 52: ...drive tray See Reinserting the drive cage on page 29 for instructions 8 Close the case See Closing the case on page 23 for instructions 9 Reconnect the cords you removed then turn on the computer 059...

Page 53: ...in the slots To add a PCI expansion card 1 Set any jumpers and switches on the card see the card documentation for instructions 2 Turn off the computer disconnect the power cord modem cord if installe...

Page 54: ...uter press the slot cover clamp down and toward the back of the chassis then lift the slot cover up and out of the chassis Slot cover clamp Slot cover Card alignment guide Card alignment guide Plastic...

Page 55: ...ff to accommodate the installation the card 7 Close the slot cover clamp to secure the card 8 Connect any cables to the card see the card documentation for proper jumper settings and cable orientation...

Page 56: ...moving the side panels on page 19 and observe the Static electricity precautions on page 17 3 Using a Phillips screwdriver remove the screw that secures the AGP card to the rear panel then pull out th...

Page 57: ...you can reenter them after you replace the battery For more information see About the BIOS Setup utility on page 63 3 Turn off the computer disconnect the power cord modem cord if installed and all e...

Page 58: ...anel See Replacing the side panels on page 23 for more information 9 Reconnect the power cord and all other cords you removed then turn on the system 10 Using the data you recorded in Step 2 enter the...

Page 59: ...ing the side panels on page 19 and observe the Static electricity precautions on page 17 3 Pull the power supply release lever away from the chassis This releases the power supply from its connector a...

Page 60: ...8 Replace the right side panel See Replacing the side panels on page 23 for more information 9 Reconnect the power cord and all other cords you removed then turn on the system If the system does not...

Page 61: ...ard To remove the system board tray assembly 1 Turn off the computer disconnect the power cord modem cord if installed and all external peripheral devices 2 Remove the right and left side panels See R...

Page 62: ...m the chassis Caution Do not release the tray assembly until you have lifted it off the hinges and can safely place it on a work surface The hinges are designed to make it easy for you to lift the tra...

Page 63: ...that are not included with the new board such as processor retention brackets 2 Remove the four screws that attach the system board to the system board tray assembly then lift out the system board 3 R...

Page 64: ...graphics card See Replacing the AGP card on page 49 Devices from the old system board that are not included with the new board such as processor retention brackets To replace the system board tray ass...

Page 65: ...tray in place 5 Turn the chassis around and press down on the top edge of the system board to make sure that it is firmly seated in the riser card slot 6 Replace or reconnect the peripheral devices to...

Page 66: ...sor you must perform the following tasks Remove the heat sink Remove the processor Install the new processor Replace the heat sink To remove the heat sink 1 Turn off the system and disconnect the powe...

Page 67: ...le and unhook the clip from the other tab Lift the heat sink off of the processor To remove the processor 1 Open the locking level on the processor socket by moving the lever slightly out to the side...

Page 68: ...lever latches into place The processor will slip into place without pressure when aligned correctly To replace the heat sink 1 Replace the heat sink by hooking the metal clip on the heat sink to the t...

Page 69: ...62 Replacing and Adding System Components 05957 book Page 62 Monday May 8 2000 10 09 AM...

Page 70: ...tup utility screen which may not look exactly like the screen shown below opens BIOS Setup Utility Main Advanced Security Power Boot Exit Item Specific Help BIOS Version Processor Type Processor Speed...

Page 71: ...utility F7 exits the BIOS Setup utility and discards any changes made F9 opens a screen that lets you return all values to their default settings F10 opens a screen that lets you save all parameters t...

Page 72: ...download the BIOS update from the technical support area on the Gateway Web site www gatewayatwork com and install the new version from a diskette Click on the link for downloading and extracting file...

Page 73: ...age the update may not be successful You can then attempt to recover the BIOS by setting the JP6 jumper When you are attempting to recover the BIOS no image appears on your monitor Caution Moving the...

Page 74: ...rive A turn off the computer then disconnect the power cord If you do not hear two beeps the BIOS recovery was not successful See the following troubleshooting section for further information 7 Open t...

Page 75: ...68 Using the BIOS Setup Utility 05957 book Page 68 Monday May 8 2000 10 09 AM...

Page 76: ...seconds This may cause data to be lost or the system may be damaged as a result To protect against power surges use a surge suppressor The surge suppressor absorbs voltage surges and prevents them fro...

Page 77: ...tem from the small daily fluctuations in voltage from an electrical supply Most systems can handle this variation or line noise without problems However some electrical sources include more line noise...

Page 78: ...hold data A lost allocation unit is a group of sectors that has lost its place in the table that the operating system uses to locate files Utilities such as ScanDisk and Check Disk check the hard dri...

Page 79: ...p old files to a network drive or tape drive and delete the files from your hard drive You can use the software that came with your tape backup drive or your large capacity disk drive to back up the f...

Page 80: ...cache is full See your browser s Help files for instructions on emptying the disk cache You can save space on the hard drive by decreasing the size of the Internet disk cache See your browser s Help f...

Page 81: ...ependently or Use one setting for all drives 4 If you are configuring drives independently click the tab for the drive you want to configure 5 Move the slider to set the size of the Recycle Bin 5 is a...

Page 82: ...be safe never assume any virus is harmless Always protect your system against viruses To protect your system against viruses Use an anti virus program to scan your computer regularly Make sure to upda...

Page 83: ...ugh LANDesk you can view software and hardware properties You can also set LANDesk to notify you when system resources reach certain levels To install LANDesk Client Manager 1 In the C DMI folder on y...

Page 84: ...or visit the online help system of your operating system for specific instructions Keeping a record of system configuration Some operating systems allow you to print a summary of the configuration of...

Page 85: ...e hard drive and turn off the monitor The computer can still respond to an incoming signal from the modem or to certain LAN commands to allow remote access Power management options include Soft off Su...

Page 86: ...hen turn your mouse right side up The roller ball should drop into your hand If it does not gently shake the mouse until the ball drops out of the socket 4 Use adhesive tape to pick up any dust or lin...

Page 87: ...monitor cases Always turn off the computer and other peripherals before cleaning any components Use a damp lint free cloth to clean the computer case monitor case keyboard speakers and other parts of...

Page 88: ...te correctly re read the instructions for the procedures you have performed If an error occurs within an application consult the documentation supplied with the software This section identifies soluti...

Page 89: ...nes in mind Never remove the chassis cover while the computer is turned on Do not attempt to open the monitor Even if the monitor s power is disconnected stored energy within the monitor s components...

Page 90: ...a set of headphones to the line out jack to test the output If they work replace the speakers The sound card may not be installed correctly Open the system then reseat the sound card Make sure the cab...

Page 91: ...abled Restart your computer then press F1 to enter the BIOS Setup utility program From the Advanced IDE Configuration menu set the IDE Controller to Both and the Secondary IDE Master to Auto The CD ca...

Page 92: ...e primary IDE device may be configured incorrectly Restart your computer then press F1 to enter the BIOS Setup utility program From the Advanced IDE Configuration menu set the IDE Controller to Both a...

Page 93: ...memory chip is faulty Replace the card on which the faulty chip resides Third party diagnostic programs can help determine which chip or memory segment is failing Probable Cause Solution The processo...

Page 94: ...opriate port on the modem line port The modem is not configured with a valid interrupt or address Check the system settings for possible conflicts If one exists correct the problem by selecting an ava...

Page 95: ...n is terminated The device cables are not installed correctly Open the system and check all cables between the controller and the device Probable Cause Solution The diskette drive may be configured in...

Page 96: ...is closed unprotected Probable Cause Solution The diskette is corrupted Remove the diskette from the drive If the light remains on try restarting the system The cable to the drive is not connected pro...

Page 97: ...is not connected to the system Check the data cable between the printer and the system Make sure it is connected to the proper port Check the connector and cable for bent or broken pins The printer i...

Page 98: ...driver is being used for the selected printer From the Printers window Start Settings Printers select the printer From the File menu select Properties Make sure the printer is using the right printer...

Page 99: ...ssing the reset button If the system is still non responsive press and hold in the power button for 4 seconds to turn the system off Turn the system back on and follow the onscreen instructions Probab...

Page 100: ...connected properly Check the cable Make sure it is plugged in correctly The mouse driver did not load when the system started Load the appropriate mouse driver manually or contact technical support Th...

Page 101: ...rightness and contrast controls are turned down Adjust the brightness and contrast knobs to the center position The video card is not seated correctly Open the system and reseat the video card The vid...

Page 102: ...s The video card has failed Try another video card The display setup is incorrect From the Control Panel window Start Settings Control Panel double click Display and check the settings The correct vid...

Page 103: ...of electrical interference such as televisions unshielded speakers microwave ovens fluorescent lights and metal beams or shelves The monitor needs to be degaussed Turn off the computer and monitor fo...

Page 104: ...xxx expansion This is an informational message only No action is required Checking RAM on disk controller Your BIOS configuration is incorrect Enter the BIOS Setup utility then make sure of the param...

Page 105: ...is properly connected Open the BIOS Setup utility program then make sure that the correct drive type is selected Hard disk controller failure press F1 to try reboot The drive controller may be defect...

Page 106: ...e with the system You may have to change the switch setting to AT Keyboard not detected See The keyboard does not work on page 92 for possible solution Turn off the system then check the keyboard cabl...

Page 107: ...ke sure you entered the right command If you are trying to exit MS DOS to return to Windows type exit then press ENTER Syntax error Make sure you entered the right command If you are trying to exit MS...

Page 108: ...dards for safety of information technology equipment However to ensure safe use of this product it is important that the safety instructions marked on the product and in the documentation are followed...

Page 109: ...tlet If you use an extension cord with this system make sure that the total ampere rating on the products plugged into the extension cord does not exceed the extension cord ampere rating If your syste...

Page 110: ...ts and accessories recommended by Gateway Important Do not use Gateway products in areas classified as hazardous locations Such areas include patient care areas of medical and dental facilities oxygen...

Page 111: ...elocate the receiving antenna Increase the separation between the equipment and receiver Connect the equipment into an outlet on a circuit different from that to which the receiver is connected Consul...

Page 112: ...e company will notify you in advance that temporary discontinuance of service may be required The telephone company may request that you disconnect the equipment until the problem is resolved The tele...

Page 113: ...certified connector assembly The customer should be aware that compliance with the above conditions may not prevent degradation of service in some situations Repairs to certified equipment should be...

Page 114: ...tachment requirements for pan European approval for connection to the analogue Public Switched Telephone Networks PSTNs of TE excluding TE supporting voice telephony services in which network addressi...

Page 115: ...adjacent area thereto and conforms to the standards set by the Voluntary Control Council for Interference by Information Technology Equipment aimed at preventing radio interference in such residentia...

Page 116: ...pment shall not be set up to make automatic calls to the Telecom 111 Emergency Service Some parameters required for compliance with Telecom s Telepermit requirements are dependent on the equipment PC...

Page 117: ...rge unit size of grounding conductors location of antenna discharge unit connection to grounding electrodes and requirements for the grounding electrode Lightning protection For added protection of an...

Page 118: ...1 Electric service equipment 2 Power service grounding electrode system NEC Art 250 Part H 3 Ground clamps 4 Grounding conductors NEC Section 810 21 5 Antenna discharge unit NEC Section 810 20 6 Groun...

Page 119: ...tial damages resulting from any defect or omission in this manual even if advised of the possibility of such damages In the interest of continued product development Gateway reserves the right to make...

Page 120: ...ports up to four IDE devices hard drives CD ROMs LS 120s using two integrated PCI IDE adapters Diskette drive A diskette controller is integrated on the system board Support available for primary and...

Page 121: ...nternal temperature 10 C to 35 C Humidity 20 to 80 Altitude 200 ft to 10 000 ft CPU clearance 0 4 inch after installation top and sides Certification FCC Class B UL CUL CE Mark VCCI CB Scheme 05957 bo...

Page 122: ...esk 76 cleaning computer case 80 monitor case 80 monitor screen 80 mouse 80 system 79 conditioner line 70 copyright notice 112 cover removing left panel 22 removing right panel 19 replacing left panel...

Page 123: ...umpers BIOS recovery 66 clearing passwords 66 setting 66 K keyboard cleaning 80 troubleshooting 92 L LANDesk Client Manager installing 76 restoring 76 left panel removing 22 replacing 23 line conditio...

Page 124: ...ng 3 5 inch drive cage 29 5 25 inch drive cage 29 battery 50 CD drive 32 diskette drive 30 hard drive 37 heat sink 60 left panel 23 power supply 52 right panel 24 system board 56 restoring LANDesk Cli...

Page 125: ...BIOS recovery 67 CD drive 83 checklist 82 error messages 97 guidelines 82 hard drive 85 memory 86 modem 87 peripherals 88 printer 90 processor 86 system 92 video 94 troubleshooting guidelines 82 U up...

Page 126: ...MAN US E3400 SYS GDE R0 04 00 E3400 Mid Tower System Manual...

Reviews: