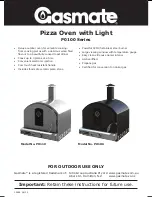
background image

5

4

GENERAL ASSEMBLY

Connecting & Disconnecting to 

Gas Source 

Familiarise yourself with the general information 

and safety guidelines located at the front of this 

manual.

Check:

1. The cylinder is filled. A sloshing sound will be 


  heard when shaken.

2. The burner control is in the ‘OFF’ position

Connecting:

1. Ensure cylinder valve is in its full off position.
2. Check for any damage to either the cylinder 


  connection or the hose. NEVER attempt to use 


  damaged equipment.

3. When connecting the hose to the cylinder 


  tighten the nut to a positive stop by hand 


  or spanner.

4. Open cylinder valve fully. If a leak can be heard 


  at either end of the hose turn cylinder off and  

  tighten joint. Wait 5 minutes before re-testing  

  and use a soapy water solution to check the  

  joint. If bubbles appear, the connection will 


  need to be re-tightened.

Disconnecting:

1. Ensure burner control is in the  ‘OFF’ position.
2. Ensure cylinder valve is in the full off position.
For storage and cylinder exchange, disconnect 

hose at the cylinder only, DO NOT disconnect hose 

from appliance.

LIGHTING PROCEDURE

Burner Operation &  

Ignition System Check

1. With cylinder valve in ‘OFF’ position press the 

electronic ignitor button. Check for sparking to 

the burner.

2. If spark is not evident at the burner ignition 


point, check that the ignition lead is firmly  

attached to the control and sparker tip.

3. 

Open the door and ensure that it remains  

open while lighting the burner.

4.  With sparking established turn the cylinder  

valve ‘ON’. Then push and turn the control 

knob to ‘HIGH’ and press the ignitor button.

5. If the burner fails to light after several attempts 


turn off gas supply at cylinder and inspect for  

obstructions to gas flow.

If re-ignition is necessary while the appliance is 

still hot, you must wait for a minimum of  

5 minutes before commencing to re-ignite  

(this allows accumulated gas fumes to clear).

 IMPORTANT

• Before connecting and disconnecting to gas  

source, make sure burner control is in ‘OFF’  

position.

• 

Caution:

 When the appliance is not in use,  

the gas must be turned off at the cylinder.

• 

Important:

 The appliance control knob must  

be in the ‘OFF’ position before opening the 


cylinder valve.

• Be aware of the hot door if re-igniting after  

use.

• Check performance of burner prior to 


installing ceramic stone.

• Do not smoke when attempting to ignite 


burner.

• Always use protective gloves when handling 


hot components.

• During use the side and top surfaces will


be 

HOT.

• 

Note: 

If for some reason, ignitor fails to 


produce a spark at the electrode, appliance 

can be lit by a long barbecue match. With 

door open insert lighted match into the gap on 

the front of the ceramic stone. Push and turn 

control knob to ‘HIGH’. Burner ignition can be 

checked through this gap.

Nominal Hourly Gas Consumption

Gas Type

Number of 

Burners

Injector Size 

Main Burner

Total Gas  

Consumption

MJ/h

Gas

Pressure

kPa

Propane

1

1.25mm

21 MJ/h

2.75 kPa

Natural Gas

1

2.3mm

22 MJ/h

1kPa

Summary of Contents for P0100 Series

Page 1: ...n for versatile cooking from cooking pizzas with a delicious wood fired flavour to a beautifully cooked roast dinner Cooks up to 3 pizzas at a time Convenient electronic ignition Cool touch heat resistant handle Includes food safe ceramic pizza stone Powerful 22MJ h stainless steel burner Large viewing window with temperature gauge Easy clean vitreous enamel interior AGA certified Propane gas Cert...

Page 2: ...lways ensure the appliance is kept away from flammable materials and the gas cylinder clear of any heat source When changing over from an empty gas cylinder to a full one make sure this procedure is carried out in a flame free atmosphere Gas Cylinder Use Safety This is a low pressure appliance and must only be used with the hose and regulator supplied It is designed for use with 9Kg propane gas cy...

Page 3: ...inder Read carefully before assembling and operating your appliance Location of your Appliance DO NOT use in garages porches sheds breezeways or other enclosed areas Your appliance is to be used OUTDOORS and is not intended to be installed in or on recreational vehicles and or boats and should not be placed on any surface that will burn Do not obstruct the flow of combustion and ventilation air ar...

Page 4: ...Open the door and ensure that it remains open while lighting the burner 4 With sparking established turn the cylinder valve ON Then push and turn the control knob to HIGH and press the ignitor button 5 If the burner fails to light after several attempts turn off gas supply at cylinder and inspect for obstructions to gas flow If re ignition is necessary while the appliance is still hot you must wai...

Page 5: ...ck Spiders and small insects occasionally spin webs or make nests in the burner tubes during warehousing and transit These webs can lead to a gas flow obstruction which could result in a fire in and around the burner tubes This type of fire is known as FLASH BACK and can cause serious damage to your appliance and create an unsafe operating condition for the user Although an obstructed burner tube ...

Page 6: ...en using this product including the following When storing the Product gently wind the Cord around the Cord Wrap if provided otherwise loosely coil the cord Avoid wrapping the Cord around the Product Avoid contacting moving parts Keep hands hair and clothing well away from the Product while it is in operation DO NOT operate or place any part of this Product on or near any hot surfaces such as a ga...

Page 7: ...r to replace the Cord or a special Cord is required Note This transformer must only be used with the light in your pizza oven OPERATING INSTRUCTIONS 1 Plug the Power Cord into a Power Outlet and turn ON To avoid damage to the Power cord make sure it is kept away from the Product when in use 2 When unattended we recommend you make sure the Product is turned OFF and DISCONNECTED from the Power Suppl...

Page 8: ...h Note Remove any transit protection material STEP 1 Lay the Pizza Oven on it s back and attach the washers and rubber feet by using 4 M5 screws 30mm long STEP 2 Stand the Pizza Oven on it s feet and attach the chimney to the body by using 3 M4 screws 8mm long Then attach the control knob ...

Page 9: ...4 Position the wire racks ensuring the folded down tabs locate into the holes of the front of the rack supports Locate the ceramic stone into the bottom rack and position it at the rear of the appliance STEP 5 Attach the hose connection thread 1 4 B S P and tighten securely with a spanner Leak test using a soapy water solution ...

Page 10: ... tighten by screwing it clockwise OPTIONAL If you have an oven stand attach the transformer onto the back panel using 4 M4 screws 12mm long and nuts with the plug down then connect the end of the electrical wire from the oven to the outlet of the transformer and tighten by screwing it clockwise ...

Page 11: ...hall not exceed 3 metres in length The internal diameter of the hose must not be less than 10mm 2 Check with local and state plumbing and heating codes regarding sizing of the gas lines 3 All gas pipe connections must be sealed with a gas pipe compound resistant to Natural Gas 4 Installation of a drip leg if required in the gas supply line must conform to AS5601 5 When checking for gas leaks do no...

Page 12: ...artial enclosure that includes an overhead cover and no more than two walls see Example 2 3 Within a partial enclosure that includes an overhead cover and more than two walls the following will apply at least 25 of the total wall area is completely open and at least 30 of the remaining wall area is open and unrestricted see Example 4 5 In the case of balconies at least 20 of the total wall area sh...

Reviews: