15
14
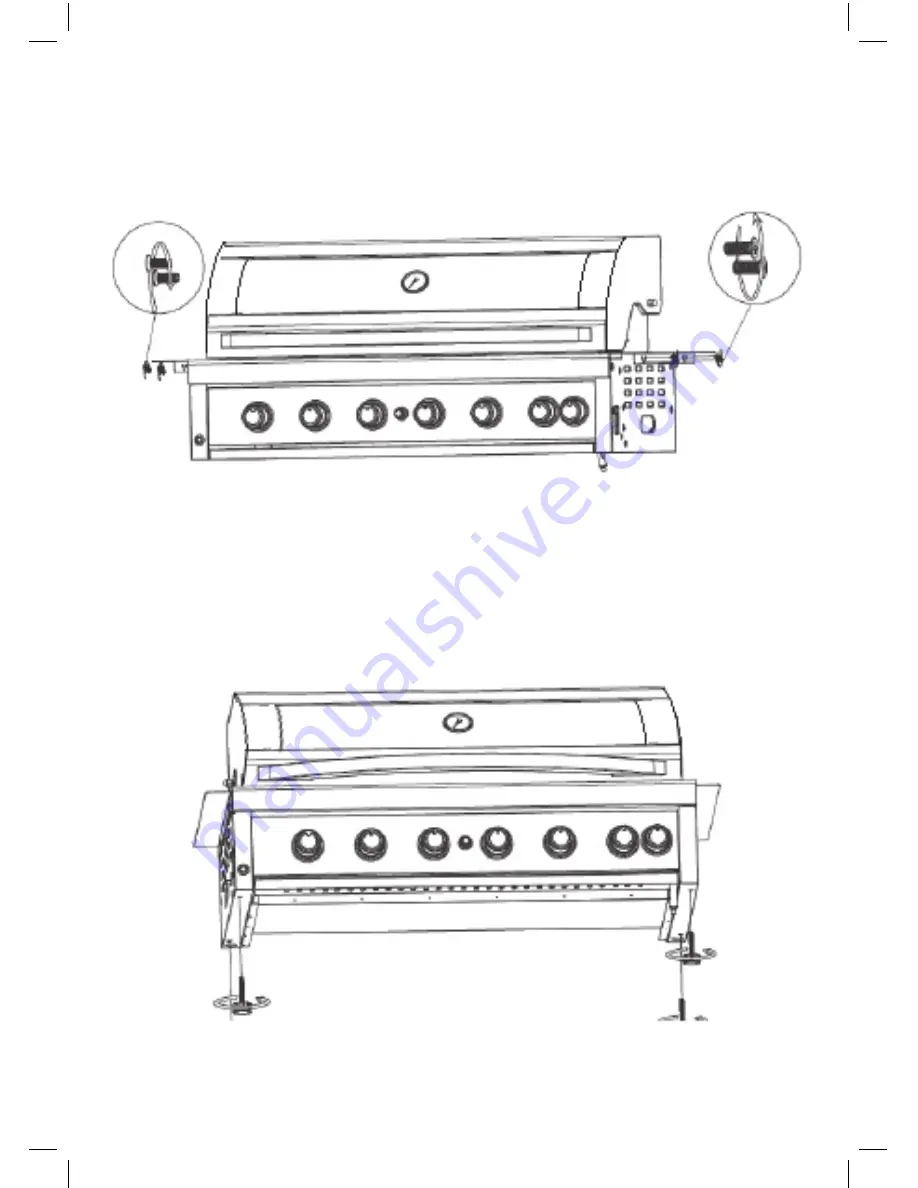
ASSEMBLY INSTRUCTIONS
STEP 1
Assemble the side bracket or adjustable feet.
Page 1: ...emark of Sitro Group Australia Pty Ltd www gasmate com au Aber N Z www gasmate co nz GALAXY BBQ MODULES DRAWER MODULE Model No BQ1093 BQ1093BL STORAGE MODULE Model No BQ1092 BQ1092BL SINK MODULE Model...
Page 2: ...ottle apply the soap solution to the gas line and each join in the gas line including the gas connection at the inlet of the BBQ all gas hose connections the gas connection at the gas cylinder If bubb...
Page 3: ...id unnecessary twisting of hose Visually inspect the hose prior to each use for cracks excessive wear or other damage Replace the hose if necessary GENERAL INFORMATION Never test for gas leaks with a...
Page 4: ...se specified by the barbecue manufacturer When connecting the hose and regulator assembly to the gas cylinder take care to avoid unnecessary twisting of the flexible hose After the assembly has been s...
Page 5: ...for other than its intended use as described in these instructions This Product is intended for Normal Domestic Household Use only The use of accessory attachments other than those recommended by the...
Page 6: ...1 Ensure the burner control is in the OFF position 2 Ensure cylinder valve is in the full off position For storage and cylinder exchange disconnect hose at the cylinder only DO NOT disconnect hose fro...
Page 7: ...e BBQ wait 5 minutes and try the lighting procedure again Before cooking for the first time operate the barbecue for about 15 minutes with the lid closed and the gas turned on HIGH This will heat clea...
Page 8: ...HIGH and LOW Use this setting for most grilling and for cooking hamburgers and vegetables LOW setting Use this setting when cooking very lean cuts such as fish These temperatures vary with outside te...
Page 9: ...tubes Cleaning with a soft brush before use and at least every six months is recommended This type of fire is known as FLASH BACK and can cause serious damage to your barbecue and create an unsafe ope...
Page 10: ...nd gas cylinder 2 Remove cooking grates and grease tray 3 Remove clip at end of burner 4 Carefully lift each burner up and away from valve openings CAUTION Inspect burner for any damage cracks or hole...
Page 11: ...bottle holder 1 15 Trolley left inner panel 1 17 Shelf inside cabinet 1 19 Trolley left panel 1 21 Castor without brake 2 Key Description Quantity 2 Flame tamer 6 4 Cooking plate 1 8 Trolley right pa...
Page 12: ...older STEP 1 Unscrew ignition cap and place a Battery size AA into place with the end facing outwards Screw cap back on Upon pressing the ignition button you should hear a clicking sound STEP 2 For ma...
Page 13: ...7 6 2 8 9 10 11 7 8 Key Description Quantity 1 Main body 1 3 Warming rack 1 5 Cooking grid 2 7 Side bracket 2 9 Transformer 1 Key Description Quantity 2 Flame tamer 6 4 Cooking plate 1 6 Side burner g...
Page 14: ...14 ASSEMBLY INSTRUCTIONS STEP 1 Assemble the side bracket or adjustable feet...
Page 15: ...mm MINIMUM GAS CYLINDER NOT TO BE INSTALLED UNDERNEATH 150mm MINIMUM NOTE TO BE INSTALLED BY AN AUTHORISED PERSON PLEASE NOTE MINIMUM CLEARANCE TO COMBUSTIBLES UNDER FAT TRAY IS 150mm THE MATERIAL FOR...
Page 16: ...rised Person Clean the Burner Ports and top with a Soft Brush Inspect and clean all combustion air inlets then replace the Burner ensuring it is firmly secured Minimum Clearance for Ventilation Rear 5...
Page 17: ...that includes an overhead cover and no more than two walls Within a partial enclosure that includes an overhead cover and more than two walls the following will apply at least 25 of the total wall are...
Page 18: ...d Standard Phillips head screw driver To join your kitchen together use 2 wing screws and nuts as shown IMPORTANT Remove all packing and transit protection before assembly CAUTION Ensure no packing ma...
Page 19: ...19 SINK MODULE BQ1091 BQ1091BL The sink module is flexible follow the below steps to interchange it Bin support interchange...
Page 20: ...t each of the front corners see diagram below Finally secure by tightening the screws SINK MODULE BQ1091 BQ1091BL Insert the tap thread through the hole in the top and secure with the nut from underne...
Page 21: ...21 Add the shelves total 6pcs into the cabinet in the same way as for the Sink Module see BQ1091 STORAGE MODULE BQ1092 BQ1092BL DRAWER MODULE BQ1093 BQ1093BL...
Page 22: ...e or BBQ side panels Fix the infill panel at the base with a screw and nut to each module TOP FOR 1 DOOR BAR FRIDGE BQ1094 Rest the Frame top onto the fridge with the front fascia overhanging at the f...
Page 23: ...he front Push the frame backwards until the front of the frame catches under the front of the fridge Attach the brackets to the underside of the frame using the screws provided as shown below And tigh...
Page 24: ...all Customer Service Australia Only 1300 174 876 Hours of operation Monday to Friday 8 30am 5 30pm EST Do not return to place of purchase Keep your purchase receipt this will be required to make any c...