


11
5
、
Safety Precautions
5.1
Safety Notes
:
The heating of the induction cooker is based on the principium of the magnetic
induction so that some induction electric current could be caused around the cooker.
Although the test shows that induction cookers do not harm the standard pacemaker
users, but you are still advised to consult your doctor before using the induction cooker.
The induction cooker should be immediately plugged out or switch of the socket should
be turned off as soon as cooking is finished.
No other objects then cookware to be placed on the calefaction area.
Do not insert any objects like iron wire etc. into the vent in order to prevent any electric
shock.
Do not put anything to block the air outlet
-
Do not heat up unopened tins of food on the heating zone as pressure will build up in
the tin and it can explode, which in turn could result in injury and scalding or damage.
Do not use the induction cooker in a high temperature environment. Keep it far away
from fire.
Do not lay object, which are susceptible to the magnetic fields such as credit cards,
diskettes in the immediate vicinity of the induction cooker.
Always keep children away from the induction cooker.
5.2
、
Warning
:
The induction cooker must not be installed over any metal work top or electrical
appliances such as dishwasher, oven, and fridge etc.
Do not place metallic objects such as knives, forks, scoops or spoons on the induction
cooker, calefaction area in order to prevent any danger caused by high temperature
The plate of the induction cooker is hot after cooking; do not touch the heating area by
hand.
If power wire is broken, you must shut off the power supply immediately and contact
our After Sales Service professional to change the broken wire. User does not allow
repairing by yourself, otherwise the maintenance of the induction cooker will be invalid.
Do not smash the glass surface, switch off the induction cooker when the glass surface is
cracked.
Summary of Contents for EC-2368IC
Page 1: ...1 Two Zone Induction Cooker Model EC 2368IC Installation Operating Instructions...
Page 14: ...14 15 I II 16 18 19 20 22 I II III IV V 23 I II 24 24 25 I II...
Page 15: ...15 I Garwoods EC EC 2368IC II 99 1 2 3 4 5 6 7 8...
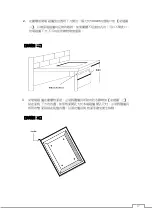
Page 16: ...16 1 2 3 4 100mm 5 6 7 30cm 8 100mm 9 13 1 100mm mm 280 x 490 x 100...
Page 17: ...17 2 100c 3...
Page 18: ...18 3 4 15cm 100c...
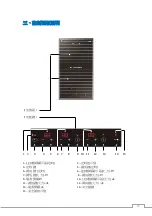
Page 22: ...22 IV 1 2 3 4 5 6 7 V 4 20 LED E2...
Page 23: ...23 I II...
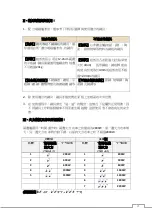
Page 24: ...24 EC 2368IC AC220 50 2800 x x 288x 510x 65 7...
Page 25: ...25 I LED E0 E1 E2 E3 E4 IGBT E5 E6 II z 789 IMO D e D 789 789 789 S D IY G S D 78 9G 789e D...