background image

Position Reporting

: Shares your position information with 

Garmin to improve content.

Travel History

: Allows the device to record information for the 

myTrends, Where I’ve Been, and Trip Log features.

Clear Travel History

: Clears your travel history for the 

myTrends, Where I’ve Been, and Trip Log features.

Restoring Settings

You can restore a category of settings or all settings to the 

factory default values.

1

Select 

Settings

.

2

If necessary, select a settings category.

3

Select   > 

Restore

.

Device Information

Specifications

Water resistance

IEC 60529 IPX7

Operating temperature 
range

From -20° to 55°C (from -4° to 131°F)

Charging temperature 
range

From 0° to 45°C (from 32° to 113°F)

Power input (CLA, 
motorcycle, or external 
power)

From 12 to 24 Vdc

Battery life

Up to 4 hr., depending on usage and 
settings

Battery type

Lithium-ion battery

Battery voltage range

From 3.5 to 4.1 V

Radio frequency protocol

2.4 GHz ANT+

®

 wireless communications 

protocol
2.4 GHz Bluetooth wireless technology

*The device withstands incidental exposure to water of up to 1 m 

for up to 30 min. For more information, go to 

www.garmin.com

/waterrating

.

Charging the Device

NOTE: 

This Class III product shall be powered by an LPS power 

supply.
You can charge the battery in the device using any of these 

methods.
• Install the device in the mount, and connect the mount to 

vehicle power.

NOTICE

Do not connect the device directly to the vehicle power cable.

• Connect the device to a computer using a USB cable.

The device may charge slowly when connected to a 

computer. Some portable computers may not charge the 

device.

• Connect the device to an optional power adapter accessory, 

such as a wall power adapter.
You can purchase an approved Garmin AC-DC adapter 

suitable for home or office use from a Garmin dealer or 

www.garmin.com

.

Device Maintenance

Device Care

NOTICE

Avoid dropping your device.

Do not store the device where prolonged exposure to extreme 

temperatures can occur, because it can cause permanent 

damage.
Never use a hard or sharp object to operate the touchscreen, or 

damage may result.

Cleaning the Outer Casing

NOTICE

Avoid chemical cleaners and solvents that can damage plastic 

components.

1

Clean the outer casing of the device (not the touchscreen) 

using a cloth dampened with a mild detergent solution.

2

Wipe the device dry.

Cleaning the Touchscreen

1

Use a soft, clean, lint-free cloth.

2

If necessary, lightly dampen the cloth with water.

3

If using a dampened cloth, turn off the device and disconnect 

the device from power.

4

Gently wipe the screen with the cloth.

Avoiding Theft

• Remove the device and mount from sight when not in use.
• Remove the residue left on the windshield by the suction cup.
• Do not keep your unit in the glove compartment.
• Register your device at 

http://my.garmin.com

.

Resetting the Device

You can reset your device if it stops functioning.

Hold the power key for 12 seconds.

Removing the Device, Mount, and Suction 

Cup

Removing the Device from the Mount

1

Press the release tab or button on the mount.

2

Tilt the device forward.

Removing the Mount from the Suction Cup

1

Turn the device mount to the right or left.

2

Apply pressure until the socket on the mount releases the 

ball on the suction cup.

Removing the Suction Cup from the Windshield

1

Flip the lever on the suction cup toward you.

2

Pull the tab on the suction cup toward you.

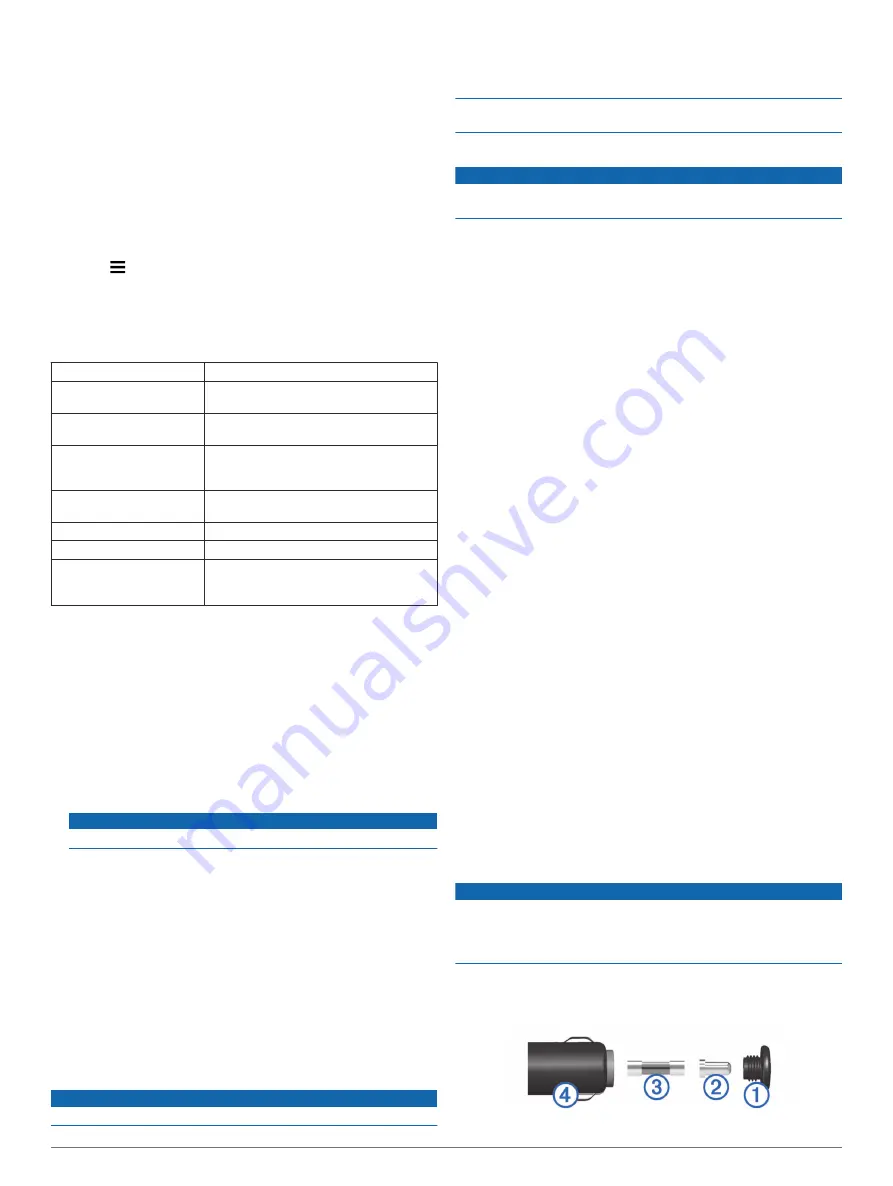
Changing the Fuse in the Vehicle Power 

Cable

NOTICE

When replacing the fuse, do not lose any of the small pieces 

and make sure they are put back in the proper position. The 

vehicle power cable does not work unless it is assembled 

correctly.

If your device does not charge in your vehicle, you may need to 

replace the fuse located at the tip of the vehicle adapter.

1

Rotate the end piece 

À

 counter clockwise to unlock it.

TIP: 

You may need to use a coin to remove the end piece.

Device Information

17

Summary of Contents for zumo 395LM

Page 1: ...Owner s Manual January 2016 190 02000 00_0A Questo manuale d istruzione fornito da trovaprezzi it Scopri tutte le offerte per Garmin Zumo 395LM o cerca il tuo prodotto tra le migliori offerte di Navig...

Page 2: ...mark and logos are owned by the Bluetooth SIG Inc and any use of such marks by Garmin is under license microSD is a trademark of SD 3C Windows is a registered trademark of Microsoft Corporation in th...

Page 3: ...ing Off Road 8 Fuel Tracking 8 Enabling Fuel Tracking 8 Setting a Low Fuel Warning 8 Resetting the Fuel Tank Mileage 8 Enabling Dynamic Fuel Stops 9 Finding and Saving Locations 9 Finding a Location U...

Page 4: ...ttings 17 Device Information 17 Specifications 17 Charging the Device 17 Device Maintenance 17 Device Care 17 Cleaning the Outer Casing 17 Cleaning the Touchscreen 17 Avoiding Theft 17 Resetting the D...

Page 5: ...ebar Base 1 Place the U bolt around the handlebar and thread the ends through the handlebar base 2 Tighten the nuts to secure the base NOTE The recommended torque is 50 lbf in 5 65 N m Do not exceed t...

Page 6: ...o windshield mounting WARNING This product contains a lithium ion battery To prevent the possibility of personal injury or product damage caused by battery exposure to extreme heat store the device ou...

Page 7: ...ailable updates click Install All To install a single update click View Details and select an update The Garmin Express software downloads and installs the updates onto your device Map updates are ver...

Page 8: ...keyboard languages or layouts in the language and keyboard settings Language and Keyboard Settings page 16 Select or to view more characters Select to switch to other keyboard languages and layouts Ri...

Page 9: ...it the course of the route select Edit Route and add shaping points to the route Shaping Your Route page 6 The device calculates a route to the location and guides you using voice prompts and informat...

Page 10: ...nctions on major roadways if available Viewing the Entire Route on the Map 1 While navigating a route select anywhere on the map 2 Select Adding a Location to Your Route Before you can add a location...

Page 11: ...ion in the trip To add a new location after the selected location select To remove the location select Changing Routing Options for a Trip You can customize how the device calculates the route when yo...

Page 12: ...a Custom Avoidance You can disable a custom avoidance without deleting it 1 Select Settings Navigation Custom Avoidances 2 Select an avoidance 3 Select Disable Deleting Custom Avoidances 1 Select Set...

Page 13: ...he nearest location in your search results appears on the map indicates the locations of other search results 2 Select one or more options To view more search results touch and drag the map To select...

Page 14: ...d Locations Select Where To Recent Clear Yes Finding Your Last Parking Spot When you disconnect the device from vehicle power while the device is on your current location is saved as a parking spot Se...

Page 15: ...road on which you are traveling Up Ahead page 11 Turns Displays a list of upcoming turns in your route Viewing Turns and Directions page 6 Trip Data Displays customizable trip data such as speed or mi...

Page 16: ...nsions 3 Select Save Bluetooth Connected Features The device has several Bluetooth connected features for your compatible smartphone Hands free calling Allows you to place and receive phone calls usin...

Page 17: ...lect To hang up select Saving a Home Phone Number TIP After you save a home number you can edit the home number by editing Home in your list of saved locations Editing a Saved Location page 10 1 Selec...

Page 18: ...ation message when the sensor pairs successfully TIP If the sensor does not pair successfully you should remove the sensor battery and repeat steps 6 and 7 8 Enter the recommended pressure for the tir...

Page 19: ...Apps Service History 2 Select Delete Categories 3 Select the service categories to delete 4 Select Delete Renaming Service Categories 1 Select Apps Service History 2 Select the category to be renamed...

Page 20: ...bling Bluetooth 1 Select Settings Bluetooth 2 Select Bluetooth Display Settings Select Settings Display Orientation Allows you to set the display to portrait vertical or landscape horizontal Color Mod...

Page 21: ...re NOTICE Avoid dropping your device Do not store the device where prolonged exposure to extreme temperatures can occur because it can cause permanent damage Never use a hard or sharp object to operat...

Page 22: ...does not appear as either a portable device or a removable drive or volume on my computer 1 Disconnect the USB cable from your computer 2 Turn off the device 3 Connect the USB cable to your device and...

Page 23: ...s connected to your computer as a removable drive or volume you must safely disconnect your device from your computer to avoid data loss If your device is connected to your Windows computer as a porta...

Page 24: ...ID number 16 intersections finding 10 K keyboard 4 language 16 layout 16 L language keyboard 16 voice 16 latitude and longitude 10 locations 10 15 calling 13 current 10 recently found 10 saving 10 se...

Page 25: ...erts 14 profiles 14 sensors 14 sleep mode 15 tolls avoiding 8 tools maps 11 TracBack 14 tracks 13 transportation modes 4 travel history 16 trip information 12 resetting 12 viewing 12 trip log viewing...

Page 26: ...5 69 33 99 39 02 36 699699 52 001 855 792 7671 0800 427 652 0800 0233937 47 815 69 555 00800 4412 454 44 2380 662 915 35 1214 447 460 386 4 27 92 500 0861 GARMIN 427 646 27 0 11 251 9800 34 93 275 44...

Reviews: