


Tall
: Enables you to capture a large, vertical viewing area using
a 4:3 aspect ratio. This mode is particularly useful for close-
up action shots and when using a chest mount.
HD Video
: Enables you to capture high-speed action shots.
1080p works well as a default setting when you need high-
resolution shots.
Slow-Mo
: Enables you to capture slow-motion playback in 720p
HD or widescreen standard definition.
Timelapse
: This high-resolution mode enables you to capture
slow-moving or long-term action that is ready for playback or
sharing immediately (
).
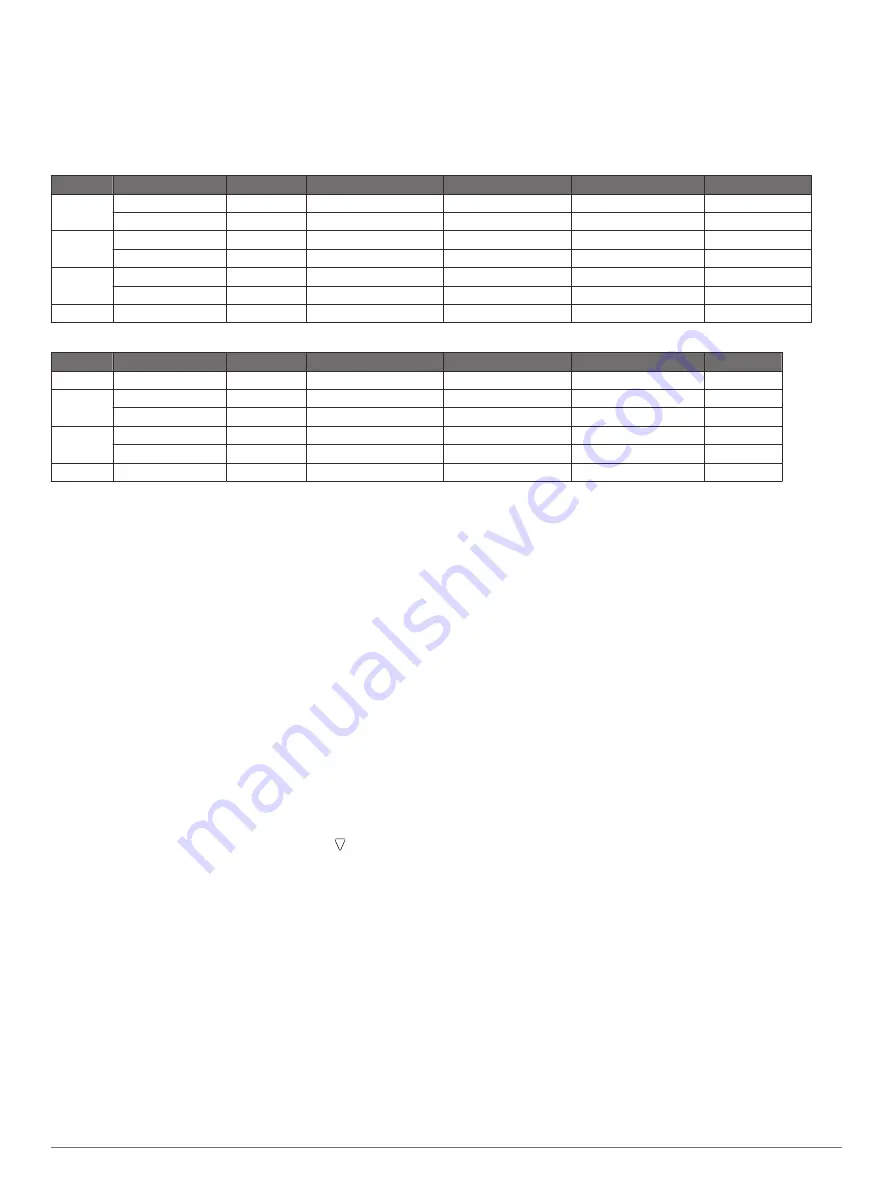
VIRB XE Video Mode Specifications
Mode
Resolution (pixels) Aspect Ratio NTSC Frame Rate (fps) PAL Frame Rate (fps) Field of View (fov)
Speed
Tall
1440p (1920x1440) 4:3
30, 24
25, 24
Wide
1x
960p (1280x960)
4:3
100, 60, 48
100, 50, 48
Wide
1x
HD Video 1080p (1920x1080) 16:9
60, 48, 30, 24
50, 48, 25, 24
Wide, zoom, ultra zoom 1x
720p (1280×720)
16:9
120, 60, 30
100, 50, 25
Wide, zoom, ultra zoom 1x
Slow-Mo
720p (1280×720)
16:9
120
100
Wide, zoom, ultra zoom 1x, 1/4x, 1/2x
480p (848x480)
16:9
240
240
Wide
1x, 1/8x, 1/4x, 1/2x
Timelapse 1080p (1920×1080) 16:9
30
25
Wide, zoom, ultra zoom Varies
VIRB X Video Mode Specifications
Mode
Resolution (pixels) Aspect Ratio NTSC Frame Rate (fps) PAL Frame Rate (fps) Field of View (fov)
Speed
Tall
960p (1280x960)
4:3
30
25
Wide
1x
HD Video 1080p (1920x1080) 16:9
30
25
Wide, zoom, ultra zoom 1x
720p (1280×720)
16:9
60, 30
50, 25
Wide, zoom, ultra zoom 1x
Slow-Mo
720p (1280×720)
16:9
60
50
Wide, zoom, ultra zoom 1x, 1/2x
480p (848x480)
16:9
120
100
Wide
1x, 1/4x, 1/2x
Timelapse 1080p (1920×1080) 16:9
30
25
Wide, zoom, ultra zoom Varies
Field of View Settings
You can change the field of view when Lens Correct is set to
Off.
Hold
MENU
, and select
Video
>
Field of View
.
Wide
: Captures a wide view of your surroundings. Use this
option for open areas, close-range video, and to capture as
much of your viewing area as possible.
Zoom
: Captures a tighter view. Use this option for medium-
range video.
Ultra-Zoom
: Captures a very focused view. Use this option for
long-range video and closed or covered surroundings.
Setting the Video Format
You can set the video standard for your region. The video
standard affects the available video frame rate options (FPS).
1
Hold
MENU
.
2
Select
System
>
Format
.
3
Select
NTSC
or
PAL
.
Pro Settings
Hold
MENU
, and select
Video
>
Pro Settings
>
Status
.
TIP:
While on the home screen, you can select to view the
current pro settings.
NOTE:
Pro settings are available for the VIRB XE device only.
Color
: Sets the color palette. You can use the Vivid option for a
more vibrant color palette, or the Flat option for a more
neutral color palette.
White Bal.
: Adjusts the color tone based on your surroundings.
The device can automatically adjust the white balance, or you
can manually adjust the white balance. You can use the
2800K option for incandescent light, the 4000K option for
fluorescent light, the 5000K option for daylight, the 6500K
option for sunny conditions, or the 7500K option for cloudy
conditions.
Sharpness
: Sets the level of sharpness. You can use the High
option for a sharper look, the Medium option for moderate
sharpness, or the Low option for a softer look.
ISO Limit
: Sets the level of sensitivity and image noise. Higher
ISO values have more visible noise or grain. Higher ISO
values are best for use in low light environments or indoors.
Lower ISO values are best for use in sunlight. You can use
the 6400 option for brighter video in low light, the 1600 option
for moderate brightness in low light, or the 400 option for
darker video in low light.
EV Bias
: Sets the exposure bias. Exposure bias affects the level
of brightness.
EV Lock
: Enables or disables exposure lock. You can enable
exposure lock to ensure consistent light sensitivity in your
video capture. When recording a time-lapse video, this helps
eliminate stray frames with slightly brighter or darker images.
Recording Video Automatically
You can set the device to record video automatically when the
device is moving. This feature allows you to conserve space on
your memory card by recording only the important parts of your
activity.
1
Hold
MENU
.
2
Select
Video
>
Auto Record
>
When Moving
.
The device records video when you are moving and stops
recording when you are still.
This feature automatically enables GPS in the system settings.
Recording a Time-Lapse Video
Time-lapse mode captures individual video frames at longer
intervals and creates a video that plays much faster than real
time. You can use time-lapse mode to record movements,
changes, or events that take place over a long period of time.
Time-lapse videos play at 30 frames per second. The length of
the video depends on the amount of time between video
frames. For example, if frames are recorded at a one-second
interval, each second of video covers 30 seconds of real time. If
frames are recorded at a 60-second interval, each second of
video covers 30 minutes of real time.
1
Hold
MENU
.
2
Select
Video
>
Mode
>
Timelapse
.
3
Select a time interval.
4
Video
Summary of Contents for VIRB
Page 1: ...VIRB X XE Owner s Manual June 2015 Printed in Taiwan 190 01870 00_0B...
Page 4: ......
Page 15: ......


