background image

GPS 152H Owner’s Manual 

Navigation 

Navigation

Main Pages

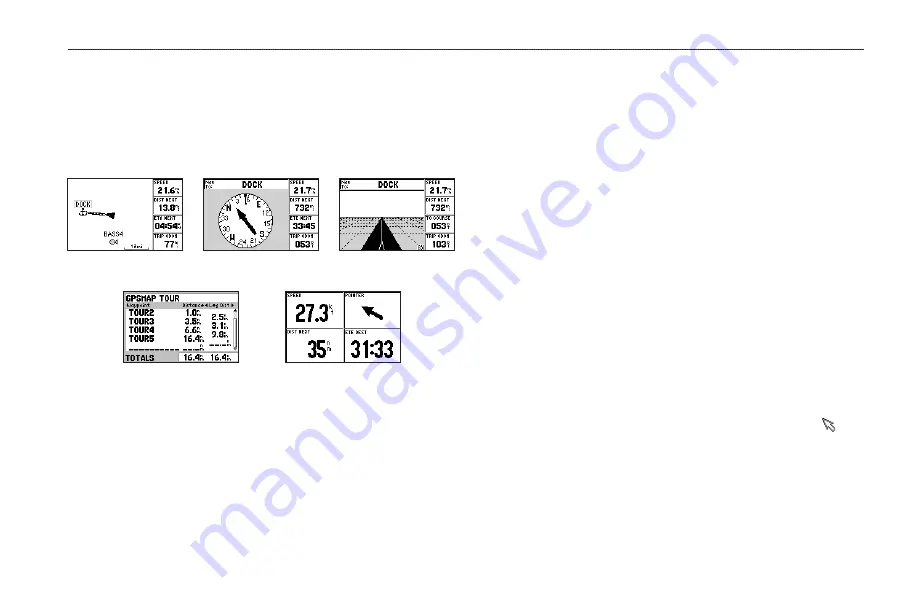
The GPS 152H has five Main pages.

To cycle through the Main pages, press 

Page

.

Map Page

Highway Page

Compass Page

Active Route Page

Numbers Page

Creating Waypoints

Waypoints are locations you record and store in the GPS 152H. You 

can store up to 3,000 waypoints with a user-defined symbol, name, 

and depth for each waypoint.

Marking Your Present Location as a Waypoint:

1.  From any Main page, press and hold 

ENTER/MARK

 until the 

New Waypoint screen appears.

2.  To change the default symbol, name, or depth of the waypoint, 

use the 

Rocker

 to highlight the field you want to change. Enter 

text as described on 

page 2

.

3.  Select 

OK

 to save the waypoint.

Creating a Waypoint by Entering Grid Coordinates

1.  From any Main page, press 

Menu

 twice.

2.  Highlight 

Wpt

, and press 

Menu

.

3.  Select 

New Waypoint

.

4.  Use the 

Rocker

 to highlight the coordinates field.

5.  To change the default symbol, name, or depth of the waypoint, 

use the 

Rocker

 to highlight the field you want to change. Enter 

text as described on 

page 2

.

6.  Select 

OK

 to save the waypoint.

Creating a Waypoint While on the Map Page

1.  From the Map page, use the 

Rocker

 to move the pointer ( ) to 

the location where you want to create a waypoint.

2.  Press and hold 

Enter/Mark

 until the New Waypoint screen 

appears.

Summary of Contents for GPS 152H

Page 1: ...P R E L I M I N A R Y GPS 152H owner s manual...

Page 2: ...d drive or other electronic storage medium to be viewed and to print one copy of this manual or of any revision hereto provided that such electronic or printed copy of this manual must contain the com...

Page 3: ...ext they indicate that you should highlight a series of items on the screen using the Rocker and press the Enter key after each item For example if you see Select Trk Record Mode you should 1 Use the...

Page 4: ...the Contrast 2 Entering Text in a Field 2 Navigation 3 Main Pages 3 Creating Waypoints 3 Navigating to a Destination 5 Creating Navigating and Editing Routes 6 Using Tracks 8 Settings 10 Customizing...

Page 5: ...enus highlight fields and enter data Enter Mark Press to select a highlighted item or mark a waypoint Menu Press to access additional settings and configuration options Press twice to display the Sett...

Page 6: ...more information about GPS visit the Garmin Web site at www garmin com aboutGPS Adjusting the Backlight and the Contrast 1 Press and release the Power key 2 Use the Rocker to adjust the light and the...

Page 7: ...or depth of the waypoint use the Rocker to highlight the field you want to change Enter text as described on page 2 3 Select OK to save the waypoint Creating a Waypoint by Entering Grid Coordinates 1...

Page 8: ...press Menu twice 2 Highlight Wpt 3 Highlight By Name or Nearest 4 Select the waypoint you want to delete 5 Select Delete OK Creating Waypoint Proximity Alarms You can define an alarm radius around sav...

Page 9: ...3 Select Go To Map Point Use the Map page the Compass page the Highway page or the Numbers page to navigate to your destination Map page shows your location your destination when zoomed out far enough...

Page 10: ...Numbers page To display only one data field press Menu and select Big Numbers NOTE To change which data fields are shown see page 10 To navigate to a man overboard MOB location 1 From any of the Main...

Page 11: ...or to change the symbol and then select OK 6 Continue to create the route waypoints until the route is complete 7 Press Menu and select Stop Editing Route 8 Optionally edit text as described on page...

Page 12: ...2 Highlight Rte 3 Select the route you want to invert 4 Highlight any waypoint and press Menu 5 Select Invert To delete a route 1 From any Main page press Menu twice 2 Highlight Rte 3 Highlight the r...

Page 13: ...to take 4 Select Original to follow the track as it was originally recorded or select Reverse to follow the track in the opposite direction Deleting a Saved Track 1 From any Main page press Menu twic...

Page 14: ...X Create on Map X Edit on Map X Full Screen Map X Map Page Compass Page Highway Page Active Route Page Numbers Page Hide Tracks X Invert X Loran TD X Measure Distance X Plan Route X Re evaluate X Rem...

Page 15: ...ointer indicated by ENT REF to the point you want to measure from and press Enter 3 Move the pointer to the point to which you want to measure The bearing the distance and the grid coordinates are dis...

Page 16: ...he Value field Resolution records the track based on a variance from your course This setting is recommended for the most efficient use of memory The value field defines the maximum error allowed from...

Page 17: ...ngs within the Map tab select Show Map to view the Map page while you are configuring the map To restore map defaults 1 From any Main page press Menu twice and highlight Map 2 Press Menu Restore Defau...

Page 18: ...le at which the course line will appear on the screen Using the Systems Tab From any Main page press Menu twice and highlight Page Beeper selects when the unit makes audible sounds Speed Filter averag...

Page 19: ...in proprietary data for communicating with Garmin software such as MapSource There are eleven Transfer Modes to choose from Host Request Almanac Request Proximity Request Routes Request Tracks Request...

Page 20: ...ain data The SNR range is 0dB to 30dB with 30dB being the best The Distance field may or may not show data depending upon the signal being broadcast from the DGPS site Using the Alarms Tab You can set...

Page 21: ...ceiver does not know your previous location This process can take up to five minutes Acquiring Satellites The receiver is looking for and collecting data from satellites visible at the last known or i...

Page 22: ...d on it starts the search for your location based on where you were when it was turned off AutoLocate is used by the GPS 152H to find your location when the unit does not know your previous location T...

Page 23: ...l Present time High tide Low tide The four data fields below the chart indicate event times and levels at which the tide changes To view tide information for a different date 1 From any Main page pres...

Page 24: ...hannel WAAS capable receiver Acquisition Times Average acquisition times for a stationary receiver with a clear view of the sky Warm Approximately 15 seconds Cold Approximately 45 seconds AutoLocate A...

Page 25: ...lite signals Check antenna connections or try moving to a location with a clear view of the sky Memory RAM Failed Unit Needs Repair contact your dealer or Garmin Product Support Memory ROM Failed Unit...

Page 26: ...name you have entered a saved track name that already exists in memory Modify the track name or delete the previous track name Track Memory Is Full Can t Create Track the track log memory is full No a...

Page 27: ...tem Information You can view the software version and the unit ID number for your chartplotter You may need this information to update the system software or when speaking with a Garmin Product Suppor...

Page 28: ...the lens using an eyeglass lens cleaner that is specified as safe for anti reflective coatings and a clean lint free cloth Software License Agreement BY USING THE UNIT YOU AGREE TO BE BOUND BY THE TER...

Page 29: ...up 13 create on map 11 D data fields 10 daylight savings time 12 depth units 15 detail 13 DGPS SNR 18 distance 11 DOP 18 dpth 15 dst spd alt 15 E edit existing waypoint 4 enable all pages 13 Enter ke...

Page 30: ...duct i restoring factory settings 23 restoring map defaults 13 reversing a route 8 Rocker 1 S settings menu 11 shallow wtr 16 simulator mode 23 small numbers 10 software license agreement 24 software...

Page 31: ......

Page 32: ...2010 Garmin Ltd or its subsidiaries Garmin International Inc 1200 East 151st Street Olathe Kansas 66062 USA Garmin Europe Ltd Liberty House Hounsdown Business Park Southampton Hampshire SO40 9LR UK G...

Reviews: