background image

26

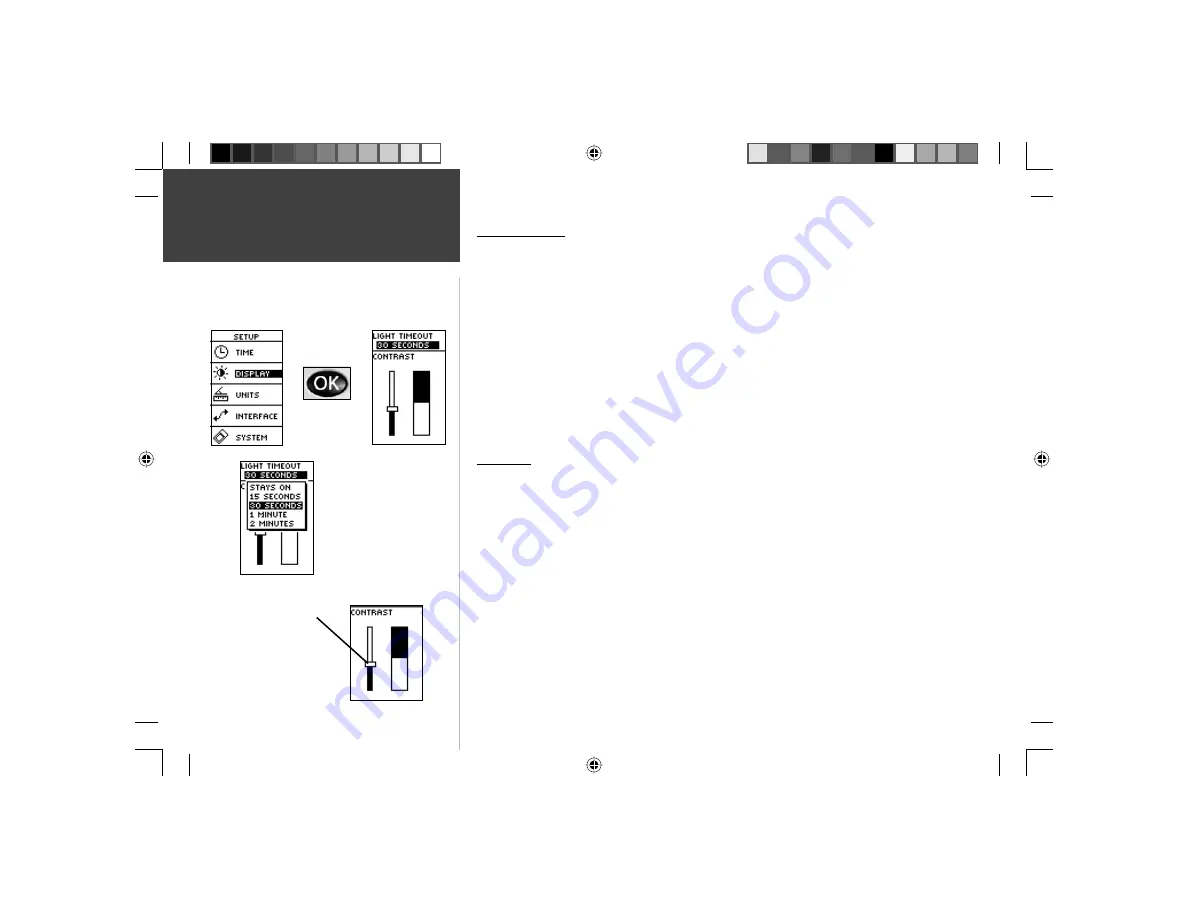
Light Timeout

The ‘LIGHT TIMEOUT’ option allows you to set the display backlight timeout (STAYS 

ON, 15 or 30 seconds, and 1 or 2 minutes).

To change the light timeout:

1.   From the SETUP Page press the 

UP

 or 

DOWN

 Button to highlight ‘DISPLAY’. Press the 

OK

 Button to display the DISPLAY Page.

2.   Press the 

UP

 or 

DOWN

 Button and highlight the ‘LIGHT TIMEOUT’ fi eld and press the 

OK

 Button. 

3.   Press the 

UP

 or 

DOWN

 Button and highlight your selection and press the 

OK

 Button. 

4.   Press the 

PAGE

 Button to return to the SETUP Page.

Contrast

The ‘CONTRAST’ option allows you to adjust the display contrast.

To adjust the Display contrast:

1.   From the SETUP Page press the 

UP

 or 

DOWN

 Button to highlight ‘DISPLAY’. Press the 

OK

 Button to display the DISPLAY Page.

2. Press the 

UP

 or 

DOWN

 Button to highlight the ‘CONTRAST’ Slider and press the

OK

Button.

3.   Press the 

UP

 or 

DOWN

 Button to adjust the contrast. 

4.   Press the 

PAGE

 Button twice to return to the SETUP Page.

Setup Page

Display

The Light Timeout options 
allow you to set the 
 backlight to stay on all the 
time, but watch the battery 
power!

Use the Display 
Contrast Slider to 
adjust the setting.

190-00297-01_0C.indd   26

10/2/2003, 1:41:18 PM

Summary of Contents for Geko 201

Page 1: ...owner s manual and reference guide Geko 201 Personal Navigator 201 Cover indd i 10 2 2003 1 46 53 PM ...

Page 2: ...otice and provided further that any unauthorized commercial distribution of this manual or any revision hereto is strictly prohibited Information in this document is subject to change without notice Garmin reserves the right to change or improve its products and to make changes in the content without obligation to notify any person or organization of such changes or improvements Web Site address w...

Page 3: ...provide all that you need to know to operate your Geko 201 Geko 201 Registration Help us better support you by completing your on line registration today Connect to our Web Site www garmin com and look for the Product Registration link on the home page Your unit s serial number is in the battery compartment Thanks for choosing the Garmin Geko 201 If you have any questions or comments regarding the...

Page 4: ...igation Page Page Basics 7 Options 8 Trip Computer Page Page Basics 9 Options 10 Introduction Main Menu Page Page Basics and Options 11 Mark 11 Waypoints 13 Tracks 16 Routes 19 Games 22 Setup 24 Setup Page Options Time 24 Display 26 Units 27 Interface 30 System 32 Appendices 34 36 Appendix A Specifications 34 Appendix B Accessories 35 Appendix C Wiring Diagram 36 Index 37 39 Warranty 40 Table of Co...

Page 5: ...his product its packaging and its components contain chemicals known to the State of California to cause cancer birth defects or reproductive harm This Notice is being provided in accordance with California s Proposition 65 If you have any questions or would like additional information please refer to our web site at www garmin com prop65 CAUTION The Global Positioning System GPS is operated by th...

Page 6: ...ervice center Unauthorized repairs can void your warranty and your authority to operate this device under Part 15 regulations FCC Compliance Statement BY USING THE Geko 201 YOU AGREE TO BE BOUND BY THE TERMS AND CONDITIONS OF THE FOL LOWING SOFTWARE LICENSE AGREEMENT PLEASE READ THIS AGREEMENT CAREFULLY Garmin grants you a limited license to use the software embedded in this device the Software in...

Page 7: ...ing it forward until the clip catches Alkaline batteries should last as long as 12 hours Rechargeable Alkaline NiMH NiCad or Lithium batteries may be used but cannot be charged while in the unit NOTE If you intend to store your Geko 201 for an extended period of time remove the batteries Follow the battery manufacturer s instructions for the proper care and handling of the batteries Battery usage ...

Page 8: ...r menu selection Press and hold to Mark your current position and access the Mark Waypoint Page The POWER Button Press and hold to turn the unit on and off Press and release with the unit on to turn the backlight on and off The PAGE Button Press to switch between the Main Pages Press to undo for the most recent action OK Button LCD Display with backlight POWER Button UP Button DOWN Button PAGE But...

Page 9: ...ound on five main pages or display screens These pages are the Satellite Map Navigation Trip Computer and Menu Press the PAGE Button to switch between pages Main Pages Basics Main Pages Satellite Trip Computer Map Navigation Menu 190 00297 01_0C indd 1 10 2 2003 1 41 01 PM ...

Page 10: ...tes When you see the READY TO NAVIGATE message on the Satellite Page the Geko 201 has found your location and you are ready to go To see the software version that the Geko 201 is currently using press the OK Button on the Satellite Page and select About Geko A PC compatible computer and Power Data cable not included are required to update the software A READY TO NAVIGATE message must display befor...

Page 11: ...ght Timeout options 3 Press the UP or DOWN Button to highlight the length of time and then press the OK Button to return to the Display Page Contrast The screen contrast is quickly adjustable from the Satellite Page You can also adjust the contast from the Setup Page of the System Menu Page See Page 26 To adjust the contrast from the Satellite Page 1 Press the UP or DOWN Button while on the Satell...

Page 12: ...yed in front of the animated figure The Heading Indicator shows the direction you are heading To make sure you can see your entire route you can change the map scale from 50 feet to 800 miles by pressing and holding the UP Button to view a larger area and the DOWN Button for viewing a smaller area You your location Heading Indicator Path to Destination Map Scale Trail track log When on the Map Page...

Page 13: ...ute until you manually change the zoom level When it s turned off you must press the UP or DOWN Button to select the appropriate map scale Waypoints Show or Hide Allows you to view the map with or without way points Goto Line Bearing or Course Determines whether the display pointer shows your current bearing or the direction to the next waypoint Options that do not display until you have a track l...

Page 14: ...k log before you start traveling because when the track log is full the new track points will overwrite the oldest track points Goto guides you from your current location to the waypoint selected while Mark creates a new waypoint for later use Mark is explained in detail beginning on Page 11 Zoom adjusts the level of viewable map detail To clear the track log 1 From the Map Page press the OK Butto...

Page 15: ...o go and displays a direction arrow in the compass ring To navigate simply follow the arrow Navigation Page Options The Navigation Page option STOP NAVIGATION only displays when you press the OK Button while actively navigating to a Waypoint The list of data fields is on the next page Compass Ring Straight Line Distance to the Destination Waypoint Destination Name Destination Symbol Direction Arrow...

Page 16: ...ings Trip Odometer the total distance you ve gone since the last reset The following fields display only when navigating Arrival Time the time of your arrival based on your current speed and distance left Bearing the compass direction from your current location to your destination Final Distance the route distance left from your current location to your destination Time To Go the estimated time at ...

Page 17: ...ghlight CHANGE FIELDS and press the OK Button 3 Press the UP or DOWN Button to highlight one the four fields to change and press the OK Button to display the data field options 4 Press the UP or DOWN Button to scroll through the list highlight an option and press the OK Button to accept that option 5 Repeat Steps 3 and 4 as necessary then press the PAGE Button to return to the Trip Computer Page The...

Page 18: ...al Speed the rate of altitude gain loss over time The following fields display figures only when navigating Bearing the compass direction from your location to your destination Course the direction from your starting location to a destination Final Dest Final Destination the last waypoint on your route Final Distance the distance from your current location to your destination Final ETA the estimated...

Page 19: ...gitude The ability to enter a known location then saving it as a Waypoint works well for the popular Geocaching activity To change the position data 1 From the MENU Page press the UP or DOWN Button to highlight MARK then press the OK Button to display the MARK WAYPOINT Page 2 Press the UP or DOWN Button and highlight the POSITION DATA field and press the OK Button to display the EDIT LOCATION Page ...

Page 20: ...change the elevation 1 From the MENU Page press the UP or DOWN Button to highlight MARK Press the OK Button to display the MARK Page 2 Press the UP or DOWN Button to highlight the ELEV field and press the OK Button to display the ENTER CORRECT ELEVATION Page 3 Use the UP or DOWN Button to highlight the desired digit and press the OK Button to display a selection window Press the UP or DOWN Button t...

Page 21: ...n press the OK Button 2 Select NEAREST and press the OK Button to see a listing of the nine closest waypoints by name and distance from your location 3 Press the UP or DOWN Button to highlight the waypoint and press the OK Button to display the REVIEW WAYPOINT Page To delete all waypoints 1 From the MENU Page press the UP or DOWN Button to highlight WAYPOINTS then press the OK Button 2 Select DELE...

Page 22: ...he waypoint press the UP or DOWN Button to highlight NO and press the OK Button To start a Goto 1 From the REVIEW WAYPOINT Page press the UP or DOWN Button to highlight GOTO 2 Press the OK Button to activate the Goto with the selected waypoint as the destina tion To view the selected waypoint on the Map Page 1 From the REVIEW WAYPOINT Page press the UP or DOWN Button to highlight MAP 2 Press the O...

Page 23: ... the next number in the field Select the digit you wish to change and press the OK Button to display the drop down number list 5 Press the UP or DOWN Button to highlight the correct number and press the OK Button When all numbers are entered correctly highlight OK and press the OK Button 6 Use the DOWN Button to highlight the bearing field and press the OK Button to display the EDIT ANGLE Page 7 Pre...

Page 24: ... marking any waypoints If you want to keep a record of a certain track log or use the TracBack feature it is recommended that you clear the track log before you start traveling The percentage of memory used by the current track log is displayed at the top of the page After the track log is CLEARED it will show zero percent When the display shows 99 the most recent track points will start overwriti...

Page 25: ...ton to highlight The saved track name and then press the OK Button to rename the saved track DELETE and then press the OK Button to delete this track NAVIGATE and then press the OK Button to begin navigation from either point To rename a saved track log 1 From the MENU Page highlight TRACKS and press the OK Button to display the TRACK LOG Page 2 Press the UP or DOWN Button to highlight a saved tra...

Page 26: ...e UP or DOWN Button to highlight YES and press the OK Button to complete the process If you change your mind press the UP or DOWN Button to highlight NO and press the OK Button to keep the tracks in memory or press PAGE to exit at any time To start TracBack navigation 1 On the TRACK LOG Page press the UP or DOWN Button and highlight the saved track from the SAVED TRACKS that you want to travel Pre...

Page 27: ...ch one waypoint the Geko 201 automatically guides you to the next waypoint on the route without needing to touch any button When you use the Goto feature you have to stop and select the next waypoint before you start moving When you plan a trip you can select waypoints from a waypoint list and put them into the Geko 201 s memory At least two waypoints up to a maximum of 125 are linked together to ...

Page 28: ...ypoint in the route The Geko 201 guides you following each waypoint in the route There are two ways to insert a waypoint into a route One way is to insert the waypoint before an existing waypoint in a route The other way is to insert the waypoint at the end of the waypoint list in a route To insert a waypoint into a route 1 From the MENU Page press the UP or DOWN Button to highlight ROUTES and pre...

Page 29: ...splay the route s waypoints 3 Press the UP or DOWN Button to highlight the waypoint and press the OK Button to display the INSERT REMOVE window 4 Press the UP or DOWN Button to highlight REMOVE and press the OK Button to remove the waypoint from the list To clear all route waypoints 1 From the MENU Page press the UP or DOWN Button to highlight ROUTES and press the OK Button to display the ROUTES P...

Page 30: ...are small medium and large with small fields being roughly 20 yards by 30 yards and large fields being 60 yards by 90 yards about the size of an American football field The difficulty levels Easy Normal and Hard determine how often Gekos appear on the screen The pace of the game quickens and point values vary as the difficulty levels increase Memory Race To win the Memory Race remember which square has...

Page 31: ... position in the maze and must explore the maze collecting flags The lower right corner of the game screen tells you how many flags remain The lower left corner is a timer telling how much time has passed so far Difficulty level determines how much of the maze you see at a time Seeing less of the maze makes exploring much more difficult HINT Pressing the OK Button and selecting Cheat On will enable a ...

Page 32: ...To change the time format 1 From the MENU Page press the UP or DOWN Button to highlight TIME and press the OK Button to display the TIME Page 2 Press the UP or DOWN Button to highlight the TIME FORMAT field and press the OK Button 3 Press the UP or DOWN Button to highlight 12 or 24 hour and press the OK Button 4 Press the PAGE Button to return to the page of your choice Time Zone The time zone can ...

Page 33: ...time To change the daylight saving field 1 Press the PAGE Button and switch to the MENU Page Press the UP or DOWN Button to highlight TIME and press the OK Button to display the TIME Page 2 Press the UP or DOWN Button to highlight the DAYLIGHT SAVING field and press the OK Button 3 Press the UP or DOWN Button highlight AUTO YES or NO and press OK Press the PAGE Button to return to the page of your c...

Page 34: ...ton to return to the SETUP Page Contrast The CONTRAST option allows you to adjust the display contrast To adjust the Display contrast 1 From the SETUP Page press the UP or DOWN Button to highlight DISPLAY Press the OK Button to display the DISPLAY Page 2 Press the UP or DOWN Button to highlight the CONTRAST Slider and press the OK Button 3 Press the UP or DOWN Button to adjust the contrast 4 Press...

Page 35: ... www nima mil To change the Position Format grid 1 From the UNITS Page press the UP or DOWN Button to highlight the POSITION FRMT field and press the OK Button 2 Press the UP or DOWN Button to highlight the desired format and press the OK Button 3 Press the PAGE Button to return to the SETUP Page Map Datums A map datum is a reference model of the Earth s shape Every map uses a map datum which is us...

Page 36: ... Press the UP or DOWN Button to highlight UNITS field and press the OK Button 3 Press the UP or DOWN Button to highlight the specific unit and press the OK Button 4 Press the PAGE Button to return to the SETUP Page North Reference Reference refers to the orientation of a map s grid Map makers try to align the vertical lines on a map with True North True North is the direction from any location on th...

Page 37: ... correct for the difference between Grid North and True North If you select User for North Reference the VARIATION field is highlighted for you to edit the declination To change the North Reference 1 From the MENU Page press the UP or DOWN Button to highlight UNITS and then press the OK Button to display the UNITS Page 2 Press the UP or DOWN Button to highlight the NORTH REF field and press the OK B...

Page 38: ...uning NMEA supports the output of standard NMEA 0183 version 3 0 data TEXT OUT supports the output of ASCII text location and velocity information RTCM IN allows DGPS input using a standard RTCM SC 104 format without any output capabilities RTCM TEXT allows DGPS input using a standard RTCM SC 104 format and simple ASCII text output of location and velocity information NONE provides no interfacing ...

Page 39: ...he OK Button to display the INTERFACE Page 2 Press the OK Button on the I O FORMAT field to display the format options 3 Press the UP or DOWN Button to highlight the desired format the press the OK Button 4 Press the PAGE Button to return to the SETUP Page Interface Setup Page 190 00297 01_0C indd 31 10 2 2003 1 41 21 PM ...

Page 40: ...d building where satellite reception is not possible There is no navigation possible in DEMO mode If you select the DEMO mode a window displays at the bottom of the screen asking you to verify that you want to turn the GPS off the unit will stop tracking satellites but not power off To change the GPS mode 1 From the MENU Page press the UP or DOWN Button to highlight the SYSTEM field Press the OK Bu...

Page 41: ... Follow the steps listed to edit the information To change the owner information 1 From the MENU Page press the UP or DOWN Button to highlight the SYSTEM field Press the OK Button to display the SYSTEM Page 2 Press the UP or DOWN Button to highlight OWNER INFO field and press the OK Button 3 Press the UP or DOWN Button to move from one character to the next To change that character press the OK Butt...

Page 42: ...eries3 Battery Life Up to 12 hours in Battery Save mode with alkaline batteries 4 Appendix A Specifications Specifications subject to change without notice 1 Subject to accuracy degradation to 100m 2DRMS under the U S DoD imposed Selective Availability program 2 With optional Garmin Differential Beacon Receiver Input such as Garmin GBR 21 or 23 3 The temperature rating for the Geko 201 may exceed th...

Page 43: ...unting Kit Allows the Geko 201 to be mounted on any flat surface Power Data Cable Provides power from an automobile cigarette lighter and allows for serial data transfer from a PC Suction Cup Mounting Kit Allows the Geko 201 to be mounted on a windshield Training Video NTSC Vehicle Mounting Kit Allows the Geko 201 to be mounted on the dashboard Appendix B Accessories Bicycle Mounting Kit Back attac...

Page 44: ...LIB beacon receiver control DGPS Differential GPS corrections are accepted in RTCM SC 104 version 2 0 format through the Data In line The Garmin GBR 21 is the recommended beacon receiver for use with the Garmin Other beacon receivers with the correct RTCM format may be used but may not correctly display status or allow tuning control from the GPS unit The Geko 201 may be hard wired to a serial con...

Page 45: ... Receiver Setup 30 Bearing 8 10 Buttons DOWN vi OK vi PAGE vi POWER vi UP vi C Cautions iii Change Data Fields 8 Daylight Savings 25 Time format 24 Time Zone 24 Clear Track Log 5 6 Contrast 3 Contrast Setup 26 Course 10 D Data Fields Arrival Time 10 Average Speed 8 Bearing 8 10 Changing 8 Date 8 Elevation 8 Final Distance 10 Heading 8 Location 8 10 Max Speed 8 10 Speed 8 Time 8 Time To Go 8 10 Tri...

Page 46: ...28 Map Page 4 Map Setup 5 Mark Location 11 Mark Page 11 12 Max Speed 8 10 Measure Distance 5 Memory Race 22 Menu Page 11 Moving Average 10 Time 10 Moving Average 10 N Navigation Page 7 8 Options 7 Nearest waypoints 13 Next Destination 10 Distance 10 ETA 10 ETE 10 Nibbons 23 NMEA 34 NMEA OUT 30 NONE 30 North Reference 28 O Odometer Trip 8 10 Off Course 10 OK Button vi Orient Map 5 Output Settings 3...

Page 47: ...ages 33 Owner Info 33 T TEXT OUT 30 Time Moving 10 Of Day 10 Stopped 10 Total 10 Time Date 8 Time Page 24 25 Time To Go 8 10 Time Zone 24 Total Time 10 To Course 10 Tracks Page 16 Track Logs 6 Trip Computer Page 9 Trip Odometer 8 10 Trip Time 10 Turn 10 U Units of Measure 28 Units Page 27 UP Button vi UTC offset field 24 V Velocity Made Good 10 Vertical Speed 10 View Nearest waypoints 13 Index Inde...

Page 48: ...DER ANY WARRANTY OF MERCHANTABILITY OR FITNESS FOR A PARTICULAR PURPOSE STATUTORY OR OTHERWISE THIS WARRANTY GIVES YOU SPECIFIC LEGAL RIGHTS WHICH MAY VARY FROM STATE TO STATE IN NO EVENT SHALL GARMIN BE LIABLE FOR ANY INCIDENTAL SPE CIAL INDIRECT OR CONSEQUENTIAL DAMAGES WHETHER RESULTING FROM THE USE MISUSE OR INABILITY TO USE THIS PRODUCT OR FROM DEFECTS IN THE PRODUCT Some states do not allow ...

Page 49: ...sold through online auctions are not eligible for rebates or other special offers from Garmin Online auction confirmations are not accepted for warranty verification To obtain warranty service an original or copy of the sales receipt from the original retailer is required Garmin will not replace missing components from any package purchased through an online auction Garmin International Inc 1200 Eas...

Page 50: ...42 Notes 190 00297 01_0C indd 42 10 2 2003 1 41 31 PM ...

Page 51: ...201 Cover indd iii 10 2 2003 1 47 21 PM ...

Page 52: ... 5 The Quadrangle Abbey Park Industrial Estate Romsey SO51 9DL U K Garmin Corporation No 68 Jangshu 2nd Road Shijr Taipei County Taiwan www garmin com Part Number 190 00297 01 Rev C For the latest free software updates throughout the life of your Garmin products visit the Garmin web site at www garmin com 201 Cover indd iv 10 2 2003 1 47 21 PM ...

Reviews: