


36
E-cimke szabályozási és megfelelőségi információk
A készülék elektronikus címkével rendelkezik. Az e-címke olyan szabályozá
-
si információkat tartalmazhat, mint az FCC által biztosított azonosítószámok,
vagy regionális megfelelőzésgi jelzések, valamint alkalmazható termék- és
engedélyinformációk.
Nyomjuk le hosszan a
Introduction
WARNING
See the
Important Safety and Product Information
guide in the
product box for product warnings and other important
information.
Always consult your physician before you begin or modify any
exercise program.
Keys
À
LIGHT
Hold to turn the device on.
Hold to view the controls menu.
Select to turn the backlight on and off.
Á
START
STOP
Select to start and stop the timer.
Select to choose an option or to acknowledge a message.
Â
BACK
Select to record a lap, rest, or transition during an activity.
Select to return to the previous screen.
Ã
DOWN Select to scroll through the widgets, data screens, options,
and settings.
Hold to manually change sports during an activity.
Ä
UP
Select to scroll through the widgets, data screens, options,
and settings.
Hold to view the menu.
GPS Status and Status Icons
The GPS status ring and icons temporarily overlay each data
screen. For outdoor activities, the status ring turns green when
GPS is ready. A flashing icon means the device is searching for
a signal. A solid icon means the signal was found or the sensor
is connected.
GPS
GPS status
Battery status
Smartphone connection status
Wi
‑
Fi
®
technology status
Foot pod status
Running Dynamics Pod status
Speed and cadence sensor status
Power meter status
tempe
™
sensor status
VIRB
®
camera status
Going for a Run
The first fitness activity you record on your device can be a run,
ride, or any outdoor activity. You may need to charge the device
before starting the activity (
Charging the Device
, page 26
).
1
Select
START
, and select an activity.
2
Go outside, and wait while the device locates satellites.
3
Select
START
to start the timer.
4
Go for a run.
5
After you complete your run, select
STOP
to stop the timer.
6
Select an option:
•
Select
Resume
to restart the timer.
•
Select
Save
to save the run and reset the timer. You can
select the run to view a summary.
•
Select
Resume Later
to suspend the run and continue
recording later.
>
Yes
to delete the run.
Activities
Your device can be used for indoor, outdoor, athletic, and fitness
activities. When you start an activity, the device displays and
records sensor data. You can save activities and share them
You can also add Connect IQ
™
activity apps to your device using
your Garmin Connect account (
Connect IQ Features
,
page 17
).
For more information about activity tracking and fitness metric
accuracy, go to
garmin.com/ataccuracy
.
Starting an Activity
When you start an activity, GPS turns on automatically (if
required). When you stop the activity, the device returns to
watch mode.
1
From the watch face, select
START
.
2
Select an activity.
3
If necessary, follow the on-screen instructions to enter
additional information.
4
If necessary, wait while the device connects to your ANT+
®
sensors.
5
If the activity requires GPS, go outside, and wait while the
device locates satellites.
6
Select
START
to start the timer.
NOTE:
The device does not record your activity data until
you start the timer.
Tips for Recording Activities
•
Charge the device before starting an activity (
Charging the
Device
, page 26
).
•
Select
to record laps.
•
Select
UP
or
DOWN
to view additional data pages.
Introduction
1
gombot, majd válasszuk a
Beállítások
>
Rend-
szer
>
Névjegy
pontot.
Készülék töltése
Vigyázat!
A készüléket egy beépített lítium-ion akkumulátor táplálja. A termékkel kap
-
csolatos figyelmeztetésekért és egyéb fontos információkért lásd a
Fontos
Biztonsági és Termékinformációk
útmutatót a termék dobozában.
Figyelem!
A rozsdásodást megelőzendő minden egyes töltés vagy számítógéphez tör
-
ténő csatlakoztatás előtt töröljük szárazra az érintkezőket és az azokat öve
-
1.
Az USB-kábel kisebbik végét illesszük az órán található töltő portba.
2
Select
Settings
>
System
>
About
.
Viewing E-label Regulatory and Compliance
Information
The label for this device is provided electronically. The e-label
may provide regulatory information, such as identification
numbers provided by the FCC or regional compliance markings,
as well as applicable product and licensing information.
1
From the watch face, hold .
2
Select
Settings
>
System
>
About
.
Charging the Device
WARNING
This device contains a lithium-ion battery. See the
Important
Safety and Product Information
product warnings and other important information.
NOTICE
To prevent corrosion, thoroughly clean and dry the contacts and
the surrounding area before charging or connecting to a
computer. Refer to the cleaning instructions (
Device Care
,
page 36
).
1
Plug the small end of the USB cable into the charging port on
your device.
2
Plug the large end of the USB cable into a USB charging
port.
3
Charge the device completely.
1
Connect the charger securely to the device to charge it using
the USB cable (
Charging the Device
, page 36
).
You can charge the device by plugging the USB cable into a
Garmin approved AC adapter with a standard wall outlet or a
USB port on your computer. Charging a fully depleted battery
takes up to two hours.
2
Remove the charger from the device after the battery charge
level reaches 100%.
Wearing the Device
• Wear the device above your wrist bone.
NOTE:
The device should be snug but comfortable. For more
accurate heart rate readings, the device should not move
while running or exercising. For pulse oximeter readings, you
should remain motionless.
NOTE:
The optical sensor is located on the back of the
device.
• See
Tips for Erratic Heart Rate Data
, page 12
for more
information about wrist-based heart rate.
• See
Tips for Erratic Pulse Oximeter Data
, page 20
for more
information about the pulse oximeter sensor.
• For more information about accuracy, go to
garmin.com
/ataccuracy
.
• For more information about device wear and care, go to
www.garmin.com/fitandcare
.
Device Care
NOTICE
Avoid extreme shock and harsh treatment, because it can
degrade the life of the product.
Avoid pressing the keys under water.
Do not use a sharp object to clean the device.
Avoid chemical cleaners, solvents, and insect repellents that can
damage plastic components and finishes.
Thoroughly rinse the device with fresh water after exposure to
chlorine, salt water, sunscreen, cosmetics, alcohol, or other
harsh chemicals. Prolonged exposure to these substances can
damage the case.
Do not store the device where prolonged exposure to extreme
temperatures can occur, because it can cause permanent
damage.
Cleaning the Device
NOTICE
Even small amounts of sweat or moisture can cause corrosion
of the electrical contacts when connected to a charger.
Corrosion can prevent charging and data transfer.
1
Wipe the device using a cloth dampened with a mild
detergent solution.
2
After cleaning, allow the device to dry completely.
TIP:
For more information, go to
www.garmin.com/fitandcare
.
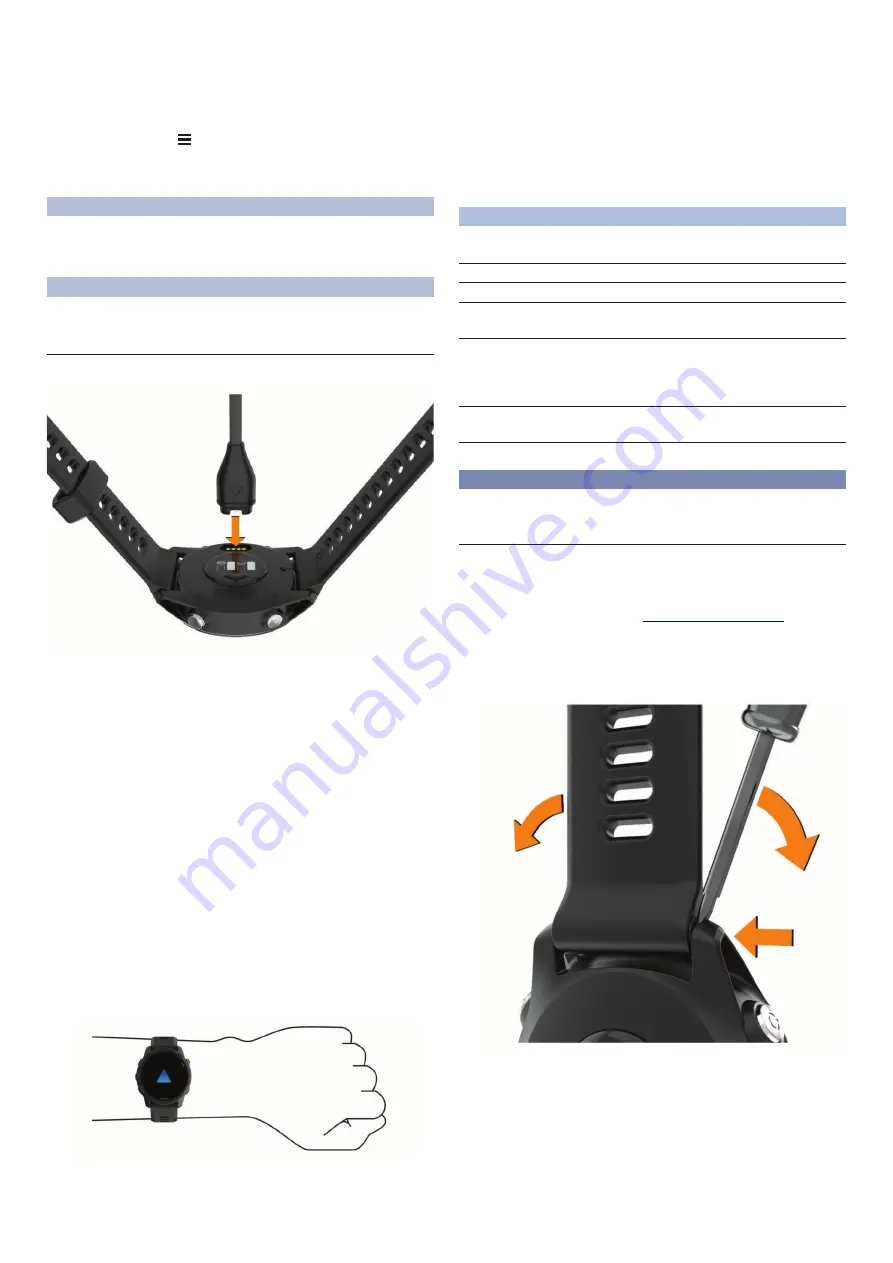
Changing the Bands
You can replace the bands with new Forerunner bands or
compatible QuickFit
®
22 bands.
1
Use the pin tool to push in the watch pin.
2
Remove the band from the watch.
36
Device Information
2.
A USB-kábel nagyobbik végét csatlakoztassuk a számítógép egy szabad
USB-portjához.
3.
Töltsük fel teljesen a készüléket.
Tippek a készülék töltéséhez
1.
Csatlakoztassuk megfelelően a készüléket és a töltőt egy USB ká-
bel segítségével (
).
A készüléket úgy is feltölthetjük, hogy az USB kábelt egy a Garmin ál
-
tal jóváhagyott AC adapterhez csatlakoztatjuk, ez utóbbit pedig egy
szabványos fali csatlakozóaljzatba vagy számítógépünk egy USB
portjába helyezzük. A készülék teljesen lemerült akkumulátorának fel
-
töltési ideje hozzávetőlegesen két órát vesz igénybe.
2.
Miután a készülék akkumulátorának töltötségi szintje eléri a 100%-ot, tá
-
volítsuk el a töltőből.
Karóra viselése
• Csuklócsontunk felett hordjuk az órát, a pulzusszám megfelelő mérésé
-
hez pedig a szíjat szorosan (de ne annyira, hogy a szíj kényelmetlenné
váljon) húzzuk meg csuklónk körül. Az óra futás vagy edzés közben ne
mozogjon, ne lötyögjön. Pulzoximéteres mérés során maradjunk mozdu
-
latlanok.
2
Select
Settings
>
System
>
About
.
Viewing E-label Regulatory and Compliance
Information
The label for this device is provided electronically. The e-label
may provide regulatory information, such as identification
numbers provided by the FCC or regional compliance markings,
as well as applicable product and licensing information.
1
From the watch face, hold .
2
Select
Settings
>
System
>
About
.
Charging the Device
WARNING
This device contains a lithium-ion battery. See the
Important
Safety and Product Information
guide in the product box for
product warnings and other important information.
NOTICE
To prevent corrosion, thoroughly clean and dry the contacts and
the surrounding area before charging or connecting to a
computer. Refer to the cleaning instructions (
Device Care
,
page 36
).
1
Plug the small end of the USB cable into the charging port on
2
Plug the large end of the USB cable into a USB charging
port.
3
Charge the device completely.
Tips for Charging the Device
1
Connect the charger securely to the device to charge it using
the USB cable (
Charging the Device
, page 36
).
You can charge the device by plugging the USB cable into a
Garmin approved AC adapter with a standard wall outlet or a
USB port on your computer. Charging a fully depleted battery
takes up to two hours.
2
Remove the charger from the device after the battery charge
level reaches 100%.
Wearing the Device
• Wear the device above your wrist bone.
NOTE:
The device should be snug but comfortable. For more
accurate heart rate readings, the device should not move
while running or exercising. For pulse oximeter readings, you
should remain motionless.
NOTE:
The optical sensor is located on the back of the
device.
• See
Tips for Erratic Heart Rate Data
, page 12
for more
information about wrist-based heart rate.
• See
Tips for Erratic Pulse Oximeter Data
, page 20
for more
information about the pulse oximeter sensor.
• For more information about accuracy, go to
garmin.com
/ataccuracy
.
• For more information about device wear and care, go to
www.garmin.com/fitandcare
.
NOTICE
Avoid extreme shock and harsh treatment, because it can
degrade the life of the product.
Avoid pressing the keys under water.
Do not use a sharp object to clean the device.
Avoid chemical cleaners, solvents, and insect repellents that can
damage plastic components and finishes.
Thoroughly rinse the device with fresh water after exposure to
chlorine, salt water, sunscreen, cosmetics, alcohol, or other
harsh chemicals. Prolonged exposure to these substances can
damage the case.
Do not store the device where prolonged exposure to extreme
temperatures can occur, because it can cause permanent
damage.
Cleaning the Device
NOTICE
Even small amounts of sweat or moisture can cause corrosion
of the electrical contacts when connected to a charger.
Corrosion can prevent charging and data transfer.
1
Wipe the device using a cloth dampened with a mild
detergent solution.
2
Wipe it dry.
After cleaning, allow the device to dry completely.
TIP:
www.garmin.com/fitandcare
.
Changing the Bands
You can replace the bands with new Forerunner bands or
compatible QuickFit
®
22 bands.
1
Use the pin tool to push in the watch pin.
2
Remove the band from the watch.
36
Device Information
FONTOS!
Az érzékelő a karóra hátoldalán található.
• További információkat lásd a
Javaslatok irreális pulzusszám adatok meg
szakaszban
.
• A pulzoximéterrel kapcsolatos további információkat lásd a
pulzoximéter adatok megjelenése esetén, 20. oldal
.
• A csuklóalapú pulzusszámmérés pontosságáról további információkat a
• A készülék viselésével és karbantartásával kapcsolatos további informá
-
ciókat a
Tisztítás, ápolás
FIGYELEM!
Lehetőleg kerüljük az erős rázkódásokat, ütéseket, ne bánjunk durván a ké
-
szülékkel, mivel ez jelentősen lecsökkenti annak élettarmát.
Ne nyomjuk le a gombokat, amikor a készülék víz alatt van
Ne használjunk éles tárgyat a készülék tisztításához
Ne használjunk erős vegyszereket, oldószereket, mivel ezek károsíthatják a
műanyag elemeket.
Amennyiben a készüléket tengervíz, klór, naptej, kozmetikai szer, alkohol,
vagy egyéb erős hatású vegyszer éri, tiszta, bő vízzel öblítsük át a készülé
-
ket. Amennyiben a készülék maró hatású vegyszernek tartósan kitéve ma
-
rad, a készülékház visszafordíthatatlanul károsodhat.
Ne tároljuk olyan helyen a készüléket, ahol tartósan szélsőséges hőmérsék
-
letnek van kitéve, mivel ez véglegesen károsíthatja a készüléket.
Tisztítás
Figyelem!
A töltő csatlakoztatásakor az elektromos érintkezőkön kirakódó pára, verej
-
ték még kis mennyiségben is rozsdásodást okozhat. A rozsdásodás akadá
-
lyozza a töltést és a fájlok átvitelét.
Enyhén szappanos vízzel megnedvesített kendővel töröljük át a készüléket,
majd töröljük szárazra.
Tisztítást követően várjunk, amíg a készülék teljesen meg nem szárad.
TIPP!
oldalt.
Szíjak cseréje
A szíjakat új Forerunner szíjakra vagy kompatibilis QuickFit™ 22 szíjakra is
cserélhetjük.
1.
Egy csavarhúzóval nyomjuk be a szíj tüskéjét.
2
Select
Settings
>
System
>
About
.
Viewing E-label Regulatory and Compliance
Information
The label for this device is provided electronically. The e-label
may provide regulatory information, such as identification
numbers provided by the FCC or regional compliance markings,
as well as applicable product and licensing information.
1
From the watch face, hold .
2
Select
Settings
>
System
>
About
.
Charging the Device
WARNING
This device contains a lithium-ion battery. See the
Important
Safety and Product Information
guide in the product box for
product warnings and other important information.
NOTICE
To prevent corrosion, thoroughly clean and dry the contacts and
the surrounding area before charging or connecting to a
computer. Refer to the cleaning instructions (
Device Care
,
page 36
).
1
Plug the small end of the USB cable into the charging port on
your device.
2
Plug the large end of the USB cable into a USB charging
port.
3
Charge the device completely.
Tips for Charging the Device
1
Connect the charger securely to the device to charge it using
the USB cable (
Charging the Device
, page 36
).
You can charge the device by plugging the USB cable into a
Garmin approved AC adapter with a standard wall outlet or a
USB port on your computer. Charging a fully depleted battery
takes up to two hours.
2
Remove the charger from the device after the battery charge
level reaches 100%.
Wearing the Device
• Wear the device above your wrist bone.
NOTE:
The device should be snug but comfortable. For more
accurate heart rate readings, the device should not move
while running or exercising. For pulse oximeter readings, you
should remain motionless.
NOTE:
The optical sensor is located on the back of the
device.
• See
Tips for Erratic Heart Rate Data
, page 12
for more
information about wrist-based heart rate.
• See
Tips for Erratic Pulse Oximeter Data
, page 20
for more
information about the pulse oximeter sensor.
• For more information about accuracy, go to
garmin.com
/ataccuracy
.
• For more information about device wear and care, go to
www.garmin.com/fitandcare
.
Device Care
NOTICE
Avoid extreme shock and harsh treatment, because it can
degrade the life of the product.
Avoid pressing the keys under water.
Do not use a sharp object to clean the device.
Avoid chemical cleaners, solvents, and insect repellents that can
damage plastic components and finishes.
Thoroughly rinse the device with fresh water after exposure to
chlorine, salt water, sunscreen, cosmetics, alcohol, or other
harsh chemicals. Prolonged exposure to these substances can
damage the case.
Do not store the device where prolonged exposure to extreme
temperatures can occur, because it can cause permanent
damage.
Cleaning the Device
NOTICE
Even small amounts of sweat or moisture can cause corrosion
of the electrical contacts when connected to a charger.
Corrosion can prevent charging and data transfer.
1
Wipe the device using a cloth dampened with a mild
detergent solution.
2
Wipe it dry.
After cleaning, allow the device to dry completely.
TIP:
For more information, go to
www.garmin.com/fitandcare
.
Changing the Bands
You can replace the bands with new Forerunner bands or
compatible QuickFit
®
22 bands.
1
Use the pin tool to push in the watch pin.
2
Remove the band from the watch.
36
Device Information
2.
Tá
volítsuk el a szíjat.


