23
Widgetek megtekintése
A widgetek gyárilag előre feltöltött tájékoztató ablakok, melyekre rápillanatva
azonnal leolvashatunk számunkra fontos adatokat. Egyes widgetekhez kom
-
patibilis okostelefont kell párosítanunk.
• Az óra számlapon nyomjuk meg az
UP
vagy
DOWN
gombokat
A készülék végig léptet a widget soron, és a megjeleníti az egyes widgetek
összefoglaló adatait. A teljesítmény widgethez szükség van pár, pulzus
-
méréssel kísért és GPS-vétel melletti szabadtéri futásra.
• A
START
gomb megnyomásával megjelennek az adott widgethez tartozó
funkciók és beállítások.
TIPP!
A
DOWN
gomb megnyomásával az adott widget további képernyő
-
it jeleníthetjük meg.
Időjárás widget
Az időjárás widget megtekintéséhez a készüléket kompatibilis okostelefonnal
kell párosítanunk Bluetooth kapcsolaton keresztül.
1.
Az óra számlapon nyomjuk meg az
UP
vagy
DOWN
gombot az időjárás
widget megtekintéséhez.
2.
Nyomjuk meg a
START
gombot a részletes időjárási adatok megtekinté
-
séhez.
3.
Nyomjuk meg az
UP
vagy
DOWN
gombot az óránkénti, napi és időjárási
tendencia szerinti időjárási adatok megtekintéséhez.
Mai nap widget személyre szabása
Személyre szabdhatjuk Mai nap widgetben megjelenített adatokat.
1.
Az ó
ra számlapon nyomjuk meg az
UP
vagy
DOWN
gombot a
Mai nap
widget megtekintéséhez.
2.
Nyomjuk le hosszan a
Introduction
WARNING
See the
Important Safety and Product Information
guide in the
product box for product warnings and other important
information.
Always consult your physician before you begin or modify any
exercise program.
Keys
À
LIGHT
Hold to turn the device on.
Hold to view the controls menu.
Select to turn the backlight on and off.
Á
START
STOP
Select to start and stop the timer.
Select to choose an option or to acknowledge a message.
Â
BACK
Select to record a lap, rest, or transition during an activity.
Select to return to the previous screen.
Ã
DOWN Select to scroll through the widgets, data screens, options,
and settings.
Hold to manually change sports during an activity.
Ä
UP
Select to scroll through the widgets, data screens, options,
and settings.
Hold to view the menu.
GPS Status and Status Icons
The GPS status ring and icons temporarily overlay each data
screen. For outdoor activities, the status ring turns green when
GPS is ready. A flashing icon means the device is searching for
a signal. A solid icon means the signal was found or the sensor
is connected.
GPS
GPS status
Battery status
Smartphone connection status
Wi
‑
Fi
®
technology status
Heart rate status
Foot pod status
Running Dynamics Pod status
Speed and cadence sensor status
Power meter status
tempe
™
sensor status
VIRB
®
camera status
Going for a Run
The first fitness activity you record on your device can be a run,
ride, or any outdoor activity. You may need to charge the device
before starting the activity (
Charging the Device
, page 26
).
1
2
Go outside, and wait while the device locates satellites.
3
Select
START
to start the timer.
4
Go for a run.
5
After you complete your run, select
STOP
to stop the timer.
6
Select an option:
•
Select
Resume
to restart the timer.
•
Select
Save
to save the run and reset the timer. You can
select the run to view a summary.
•
Select
Resume Later
to suspend the run and continue
recording later.
•
Select
Lap
to mark a lap.
•
Select
Discard
>
Yes
to delete the run.
Activities
Your device can be used for indoor, outdoor, athletic, and fitness
activities. When you start an activity, the device displays and
records sensor data. You can save activities and share them
with the Garmin Connect
™
community.
You can also add Connect IQ
™
activity apps to your device using
your Garmin Connect account (
Connect IQ Features
,
page 17
).
For more information about activity tracking and fitness metric
accuracy, go to
garmin.com/ataccuracy
.
Starting an Activity
When you start an activity, GPS turns on automatically (if
required). When you stop the activity, the device returns to
watch mode.
1
From the watch face, select
START
.
2
Select an activity.
3
If necessary, follow the on-screen instructions to enter
additional information.
4
If necessary, wait while the device connects to your ANT+
®
sensors.
5
If the activity requires GPS, go outside, and wait while the
device locates satellites.
6
Select
START
to start the timer.
NOTE:
The device does not record your activity data until
you start the timer.
Tips for Recording Activities
•
Charge the device before starting an activity (
Charging the
Device
, page 26
).
•
Select
to record laps.
•
Select
UP
or
DOWN
to view additional data pages.
Introduction
1
-t.
3.
Válasszuk az
Opciók
pontot.
4.
Válasszuk a mérési adatok mellett látható csúszkákat az éppen kijelölt
adat be- vagy kikapcsolásához.
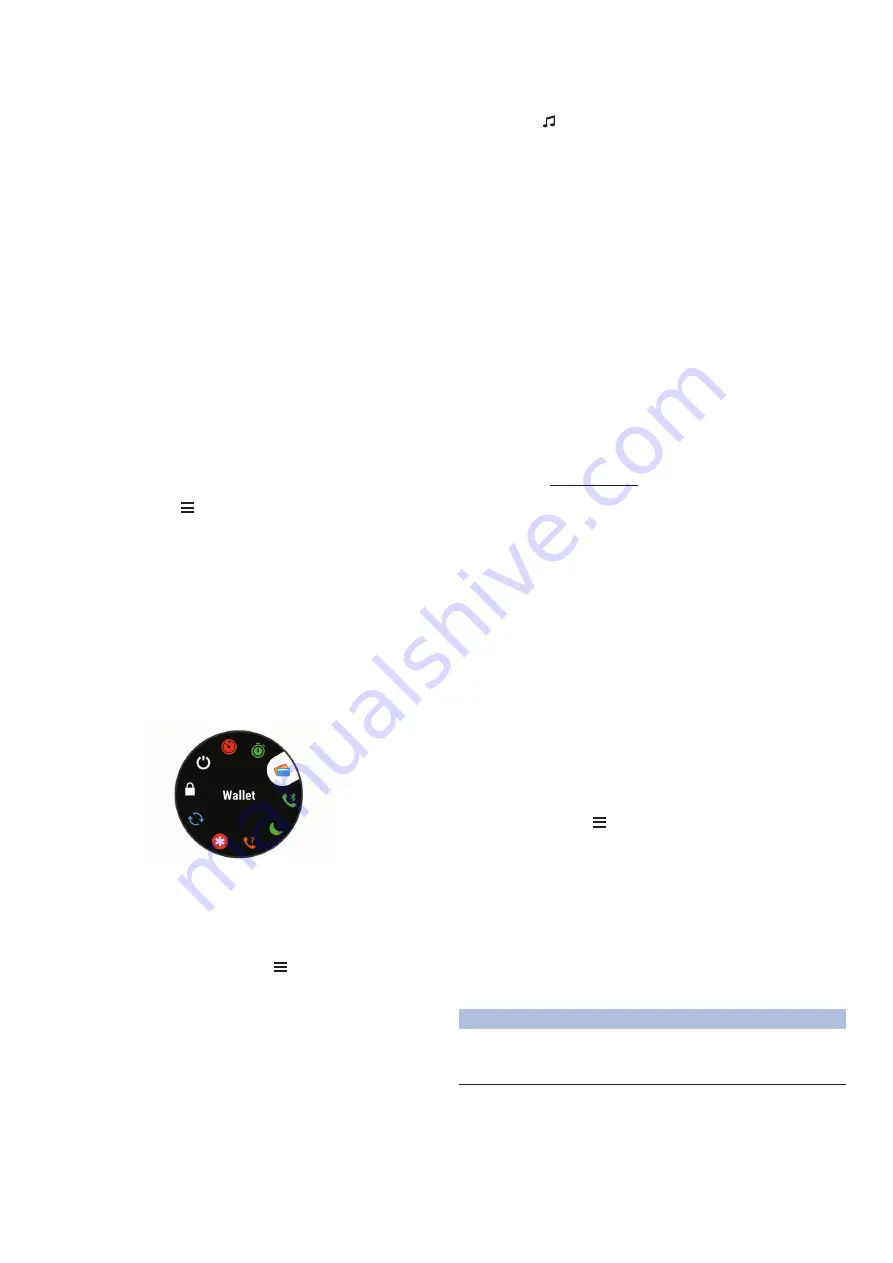
Vezérlő menü megtekintése
A vezérlő menüvel gyorsított módon érhetünk el olyan funkciókat, mint a „ne
zavarj” mód, a gombok lezárása vagy a készülék kikapcsolása. Innen elérhet
-
jük a Garmin Pay pénztárcát is.
NE FELEDJÜK!
A vezérlő menüben található menü opciókat, funkciókat el
-
távolíthatjuk, átrendezhetjük, de új funkcióval is bővíthetjük (
1.
Bármely képernyőről nyomjuk meg hosszan a
LIGHT
gombot.
Health stats
: Displays a dynamic summary of your current
health statistics. The measurements includes heart rate,
Body Battery level, stress, and more.
Heart rate
: Displays your current heart rate in beats per minute
(bpm) and a graph of your heart rate.
History
: Displays your activity history and a graph of your
recorded activities.
Intensity minutes
: Tracks your time spent participating in
moderate to vigorous activities, your weekly intensity minutes
goal, and progress toward your goal.
inReach
®
controls
: Allows you to send messages on your
paired inReach device.
Last activity
: Displays a brief summary of your last recorded
activity, such as your last run, last ride, or last swim.
Music controls
: Provides music player controls for your
smartphone or on-device music.
My day
: Displays a dynamic summary of your activity today. The
metrics include timed activities, intensity minutes, floors
climbed, steps, calories burned, and more.
Notifications
: Alerts you to incoming calls, texts, social network
updates, and more, based on your smartphone notification
settings.
Performance
: Displays performance measurements that help
you track and understand your training activities and race
performances.
Pulse oximeter
: Displays your most recent blood oxygen
saturation percentage and a graph of your readings.
Steps
: Tracks your daily step count, step goal, and data for
previous days.
Stress
: Displays your current stress level and a graph of your
stress level. You can do a breathing activity to help you relax.
Sunrise and sunset
: Displays sunrise, sunset, and civil twilight
times.
Training status
: Displays your current training status and
training load, which shows you how your training affects your
fitness level and performance.
VIRB controls
: Provides camera controls when you have a
VIRB device paired with your Forerunner device.
Weather
: Displays the current temperature and weather
forecast.
Xero
™
device
: Displays laser location information when you
have a compatible Xero device paired with your Forerunner
device.
Viewing the Widgets
Your device comes preloaded with widgets that provide at-a-
glance information. Some widgets require a Bluetooth
connection to a compatible smartphone.
• From the watch face, select
UP
or
DOWN
to view the
widgets.
Available widgets include heart rate and activity tracking. The
performance widget requires several activities with heart rate
and outdoor runs with GPS.
• Select
START
to view additional options and functions for a
widget.
About My Day
The My Day widget is a daily snapshot of your activity. This is a
dynamic summary that updates throughout the day. As soon as
you climb a flight of stairs or record an activity, it appears in the
widget. The metrics include recorded activities, intensity minutes
for the week, floors climbed, steps, calories burned, and more.
You can select START to view additional metrics.
Viewing the Controls Menu
The controls menu contains options, such as turning on do not
disturb mode, locking the keys, and turning the device off. You
can also open the Garmin Pay wallet.
NOTE:
You can add, reorder, and remove the options in the
1
From any screen, hold
LIGHT
.
2
Select
UP
or
DOWN
to scroll through the options.
Customizing the Controls Menu
You can add, remove, and change the order of the shortcut
menu options in the controls menu (
Viewing the Controls Menu
,
page 20
).
1
Hold .
2
Select
Controls
.
3
Select a shortcut to customize.
4
Select an option:
• Select
Reorder
to change the location of the shortcut in
the controls menu.
• Select
Remove
to remove the shortcut from the controls
menu.
5
If necessary, select
Add New
to add an additional shortcut to
the controls menu.
Viewing the Weather Widget
Weather requires a Bluetooth connection to a compatible
smartphone.
1
From the watch face, select
UP
or
DOWN
to view the
weather widget.
2
Select
START
to view hourly weather data.
3
Select
DOWN
to view daily weather data.
Opening the Music Controls
Music controls require a Bluetooth connection to a compatible
smartphone.
1
From the watch face, hold
LIGHT
.
2
Select .
3
Select
UP
or
DOWN
to use the music controls.
Connect IQ Features
You can add Connect IQ features to your watch from Garmin
and other providers using the Connect IQ website. You can
customize your device with watch faces, data fields, widgets,
and apps.
Watch Faces
: Allow you to customize the appearance of the
clock.
Data Fields
: Allow you to download new data fields that present
sensor, activity, and history data in new ways. You can add
Connect IQ data fields to built-in features and pages.
Widgets
: Provide information at a glance, including sensor data
and notifications.
Apps
: Add interactive features to your watch, such as new
outdoor and fitness activity types.
20
Smart Features
2.
Az
UP
és
DOWN
gombokkal válasszunk a funkciók, menü opciók közül.
Vezérlő menü beállítása
A vezérlő menüben szereplő gyors elérést biztosító menüpontokat, funkció
-
parancsokat kibővíthetjük újakkal, átrendezhetjük, valamint törölhetjük a már
szükségtelenné vált elemeket (
Vezérlő menü megtekintése, 23. oldal
1.
Az óra számlapon nyomjuk le hosszan a
Introduction
WARNING
See the
Important Safety and Product Information
guide in the
product box for product warnings and other important
information.
Always consult your physician before you begin or modify any
exercise program.
Keys
À
LIGHT
Hold to turn the device on.
Hold to view the controls menu.
Select to turn the backlight on and off.
Á
START
STOP
Select to start and stop the timer.
Select to choose an option or to acknowledge a message.
Â
BACK
Select to record a lap, rest, or transition during an activity.
Select to return to the previous screen.
Ã
DOWN Select to scroll through the widgets, data screens, options,
and settings.
Hold to manually change sports during an activity.
Select to scroll through the widgets, data screens, options,
and settings.
Hold to view the menu.
GPS Status and Status Icons
The GPS status ring and icons temporarily overlay each data
screen. For outdoor activities, the status ring turns green when
GPS is ready. A flashing icon means the device is searching for
a signal. A solid icon means the signal was found or the sensor
is connected.
GPS
GPS status
Battery status
Smartphone connection status
Wi
‑
Fi
®
technology status
Heart rate status
Foot pod status
Running Dynamics Pod status
Speed and cadence sensor status
Power meter status
tempe
™
sensor status
VIRB
®
camera status
Going for a Run
The first fitness activity you record on your device can be a run,
ride, or any outdoor activity. You may need to charge the device
before starting the activity (
Charging the Device
, page 26
).
1
Select
START
, and select an activity.
2
Go outside, and wait while the device locates satellites.
3
Select
START
to start the timer.
4
Go for a run.
5
After you complete your run, select
STOP
to stop the timer.
6
Select an option:
•
Select
Resume
to restart the timer.
•
Select
Save
to save the run and reset the timer. You can
select the run to view a summary.
•
Select
Resume Later
to suspend the run and continue
recording later.
•
Select
Lap
to mark a lap.
•
Select
Discard
>
Yes
to delete the run.
Activities
Your device can be used for indoor, outdoor, athletic, and fitness
activities. When you start an activity, the device displays and
records sensor data. You can save activities and share them
with the Garmin Connect
™
community.
You can also add Connect IQ
™
activity apps to your device using
your Garmin Connect account (
Connect IQ Features
,
page 17
).
For more information about activity tracking and fitness metric
accuracy, go to
garmin.com/ataccuracy
.
Starting an Activity
When you start an activity, GPS turns on automatically (if
required). When you stop the activity, the device returns to
watch mode.
1
From the watch face, select
START
.
2
Select an activity.
3
If necessary, follow the on-screen instructions to enter
additional information.
4
If necessary, wait while the device connects to your ANT+
®
sensors.
5
If the activity requires GPS, go outside, and wait while the
device locates satellites.
6
Select
START
to start the timer.
NOTE:
The device does not record your activity data until
you start the timer.
Tips for Recording Activities
•
Charge the device before starting an activity (
Charging the
Device
, page 26
).
•
Select
to record laps.
•
Select
UP
or
DOWN
to view additional data pages.
Introduction
1
-t
.
2.
Válasszuk a
Beállítások
>
Vezérlők
pontot.
3.
Válasszuk ki a módosítani kívánt funkcióparancsot, gyors menüt.
4.
Válasszunk az alábbiak közül:
•
Az
Átrendez
pontot választva a funkcióparancsot, gyors menüt áthe
-
lyezzük a vezérlők menün belül.
•
Az
Eltávolítás
pontot választva töröljük a funkcióparancsot, gyors me
-
nüt a vezérlők menüből.
5.
Igény esetén az
Új hozzáadása
ponttal új funkcióparanccsal, gyors me
-
nüvel bővíthetjük a vezérlők menüt.
Zene vezérlő megtekintése
A zene vezérlő kizárólag kompatibilis okostelefon Bluetooth-kapcsolaton ke
-
resztül történő csatlakoztatása esetén érhető el.
1.
Az óra számlapon nyomjuk meg hosszan a
LIGHT
gombot.
2.
Válasszuk a
3
Select
DOWN
to view daily weather data.
Opening the Music Controls
Music controls require a Bluetooth connection to a compatible
smartphone.
1
From the watch face, hold
LIGHT
.
2
Select .
3
Select
UP
or
DOWN
to use the music controls.
Bluetooth Connected Features
The Forerunner device has several Bluetooth connected
features for your compatible smartphone using the Garmin
Connect Mobile app. For more information, go to
www.garminconnect.com/start
.
Phone notifications
: Displays phone notifications and
messages on your Forerunner device.
LiveTrack
: Allows friends and family to follow your races and
training activities in real time. You can invite followers using
email or social media, allowing them to view your live data on
a Garmin Connect tracking page.
GroupTrack
: Allows you to keep track of other connections in
your group using LiveTrack directly on screen and in real
time.
Software Updates
: Allows you to update your device software.
Workout and course downloads
: Allows you to browse for
workouts and courses in the Garmin Connect Mobile app and
wirelessly send them to your device.
Connect IQ
: Allows you to extend your device features with new
watch faces, widgets, apps, and data fields.
Social media interactions
: Allows you to post an update to
your favorite social media website when you upload an
activity to the Garmin Connect Mobile app.
Weather updates
: Sends real-time weather conditions and
notifications to your device.
Music controls
: Allows you to control the music player on your
smartphone.
Audio prompts
: Allows the Garmin Connect Mobile app to play
status announcement prompts on your smartphone during a
run or other activity.
Bluetooth sensors
: Allows you to connect Bluetooth
compatible sensors, such as a heart rate monitor.
Find my phone
: Locates your lost smartphone that is paired
with your Forerunner device and currently within range.
Find my watch
: Locates your lost Forerunner device that is
paired with your smartphone and currently within range.
Updating the Software Using Garmin Connect Mobile
Before you can update your device software using the Garmin
Connect Mobile app, you must have a Garmin Connect account,
and you must pair the device with a compatible smartphone
(
Pairing Your Smartphone with Your Device
, page 15
).
1
Synchronize your device with the Garmin Connect Mobile
app (
Manually Syncing Data with Garmin Connect Mobile
,
page 17
).
When new software is available, the Garmin Connect Mobile
app automatically sends the update to your device.
2
Follow the on-screen instructions.
Manually Syncing Data with Garmin Connect Mobile
1
Hold
LIGHT
to view the controls menu.
2
Select .
Starting a GroupTrack Session
Before you can start a GroupTrack session, you must have a
Garmin Connect account, a compatible smartphone, and the
Garmin Connect Mobile app.
These instructions are for starting a GroupTrack session with
Forerunner devices. If your connections have other compatible
devices, you can see them on the map. The other devices may
not be able to display GroupTrack riders on the map.
1
Go outside, and turn on the Forerunner device.
2
Pair your smartphone with the Forerunner device (
Pairing
Your Smartphone with Your Device
, page 15
).
3
On the Forerunner device, hold , and select
Settings
>
GroupTrack
>
Show on Map
to enable viewing connections
on the map screen.
4
In the Garmin Connect Mobile app, from the settings menu,
select
LiveTrack
>
GroupTrack
.
5
If you have more than one compatible device, select a device
for the GroupTrack session.
6
Select
Visible to
>
All Connections
.
7
Select
Start LiveTrack
.
8
On the Forerunner device, start an activity.
9
Scroll to the map to view your connections.
TIP:
From the map, you can hold and select Nearby
Connections to view distance, direction, and pace or speed
information for other connections in the GroupTrack session.
Tips for GroupTrack Sessions
The GroupTrack feature allows you to keep track of other
connections in your group using LiveTrack directly on the
screen. All members of the group must be your connections in
your Garmin Connect account.
•
Ride outside using GPS.
•
Pair your Forerunner device with your smartphone using
Bluetooth technology.
•
In the Garmin Connect Mobile app, from the settings menu,
select
Connections
to update the list of connections for your
GroupTrack session.
•
Make sure all of your connections pair to their smartphones
and start a LiveTrack session in the Garmin Connect Mobile
app.
•
Make sure all your connections are in range (40 km or
25 mi.).
•
During a GroupTrack session, scroll to the map to view your
connections (
Adding a Map to an Activity
, page 22
).
Connect IQ Features
You can add Connect IQ features to your watch from Garmin
and other providers using the Garmin Connect Mobile app. You
can customize your device with watch faces, data fields,
widgets, and apps.
Watch Faces
: Allow you to customize the appearance of the
clock.
Data Fields
: Allow you to download new data fields that present
sensor, activity, and history data in new ways. You can add
Connect IQ data fields to built-in features and pages.
Widgets
: Provide information at a glance, including sensor data
and notifications.
Apps
: Add interactive features to your watch, such as new
outdoor and fitness activity types.
Downloading Connect IQ Features
Before you can download Connect IQ features from the Garmin
Connect Mobile app, you must pair your Forerunner device with
your smartphone.
Smart Features
17
-t.
3.
Az
UP
és
DOWN
gombokkal használhatjuk a zene vezérlőket.
Connect IQ funkciók
A Garmin Connect weboldalon a Garmintól vagy más külső fejlesztőtől
származó Connect IQ bővítményeket adhatunk a készülékhez. Óra szám
-
lapokkal, adatmezőkkel, widgetekkel, alkalmazásokkal bővíthetjük a ké
-
szüléket.
Óra számlapok:
egyedi megjelenést adhatunk az órának.
Adatmezők:
olyan új adattípusokkal bővíthetjük a készüléket, melyek
a mérők által közölt adatokat, a végzett tevékenységet, illetve a nap
-
ló tartalmát teljes új szemszögből mutatják be. A Connect IQ adatme
-
zőket a gyári funkciókhoz és képernyőkhöz gond nélkül hozzárendel
-
hetjük.
Widgetek:
információs ablakok, melyek révén egyetlen pillantással tájé
-
kozódhatunk a mérési adatokról, értesítésekről.
Alkalmazások:
interaktív funkciókkal bővítik az órát, pl. új szabadtéri és
sport tevékenységek.
Connect IQ funkciók letöltése számítógépről
1.
USB-kábellel csatlakoztassuk a készüléket a számítógéphez.
2.
Lépjünk fel az apps.garmin.com oldalra és lépjünk be fiókunkba.
3.
Válasszuk a
Connect IQ
funkciót, és töltsük le.
4.
Kövessük a képernyőn megjelenő utasításokat.
Wi-Fi
®
kapcsolattal elérhető funkciók
Tevékenység feltöltése a Garmin Connectre:
amint befejeztük a tevé
-
kenységet, az adatok elküldése automatikusan megtörténik a Garmin
Connectre.
Audio tartalmak:
audio tartalmakat tölthetünk le harmadik felektől.
Szoftverfrissítés:
Wi-Fi kapcsolaton keresztül a készülék automatikusan
letölti és telepíti a legújabb rendszerszoftver változatot.
Edzések és edzéstervek:
a Garmin Connect oldalon jelöljük ki a letölteni
kívánt edzésterveket, edzéseket, majd a legközelebb, amikor a készü
-
lék Wi-Fi kapcsolattal csatlakozik, a fájlok vezeték nélküli kapcsolaton
keresztül automatikusan letöltésre kerülnek a készülékre.
Csatlakozás Wi-Fi hálózathoz
Mielőtt Wi-Fi kapcsolatot létesítenénk, a készüléket először csatlakoztatnunk
kell okostelefonon a Garmin Connect alkalmazáshoz, vagy számítógépen a
Garmin Express™ alkalmazáshoz.
1.
Nyomjuk le hosszan a
Introduction
WARNING
See the
Important Safety and Product Information
guide in the
product box for product warnings and other important
information.
Always consult your physician before you begin or modify any
exercise program.
Keys
À
LIGHT
Hold to turn the device on.
Hold to view the controls menu.
Select to turn the backlight on and off.
Á
START
STOP
Select to start and stop the timer.
Select to choose an option or to acknowledge a message.
Â
BACK
Select to record a lap, rest, or transition during an activity.
Select to return to the previous screen.
Ã
DOWN Select to scroll through the widgets, data screens, options,
and settings.
Hold to manually change sports during an activity.
Ä
UP
Select to scroll through the widgets, data screens, options,
and settings.
Hold to view the menu.
GPS Status and Status Icons
The GPS status ring and icons temporarily overlay each data
screen. For outdoor activities, the status ring turns green when
GPS is ready. A flashing icon means the device is searching for
a signal. A solid icon means the signal was found or the sensor
is connected.
GPS
GPS status
Battery status
Smartphone connection status
Wi
‑
Fi
®
technology status
Heart rate status
Foot pod status
Running Dynamics Pod status
Speed and cadence sensor status
Power meter status
tempe
™
sensor status
VIRB
®
camera status
Going for a Run
The first fitness activity you record on your device can be a run,
ride, or any outdoor activity. You may need to charge the device
before starting the activity (
Charging the Device
, page 26
).
1
Select
START
, and select an activity.
2
Go outside, and wait while the device locates satellites.
3
Select
START
to start the timer.
4
Go for a run.
5
After you complete your run, select
STOP
to stop the timer.
6
Select an option:
•
Select
Resume
to restart the timer.
•
Select
Save
to save the run and reset the timer. You can
select the run to view a summary.
•
Select
Resume Later
to suspend the run and continue
recording later.
•
Select
Lap
to mark a lap.
•
Select
Discard
>
Yes
to delete the run.
Activities
Your device can be used for indoor, outdoor, athletic, and fitness
activities. When you start an activity, the device displays and
records sensor data. You can save activities and share them
with the Garmin Connect
™
community.
You can also add Connect IQ
™
activity apps to your device using
your Garmin Connect account (
Connect IQ Features
,
page 17
).
For more information about activity tracking and fitness metric
accuracy, go to
garmin.com/ataccuracy
.
Starting an Activity
When you start an activity, GPS turns on automatically (if
required). When you stop the activity, the device returns to
watch mode.
1
From the watch face, select
START
.
2
Select an activity.
3
If necessary, follow the on-screen instructions to enter
additional information.
4
If necessary, wait while the device connects to your ANT+
®
sensors.
5
If the activity requires GPS, go outside, and wait while the
device locates satellites.
6
Select
START
to start the timer.
NOTE:
The device does not record your activity data until
you start the timer.
Tips for Recording Activities
•
Charge the device before starting an activity (
Charging the
Device
, page 26
).
•
Select
to record laps.
•
Select
UP
or
DOWN
to view additional data pages.
Introduction
1
-t.
2.
Válasszuk a
Beállítások
>
Wi-Fi
>
Hálózataim
>
Hálózat hozzáadása
pontot.
A készülék megjeleníti a közelben lévő Wi-Fi hálózatokat.
3.
Válasszuk ki a kívánt hálózatot.
4.
Ha szükséges, adjuk meg a hálózat jelszavát.
A készülék csatlakozik a hálózathoz, a hálózat pedig hozzáadódik a mentett
hálózatokhoz. A következőkben amikor hatótávóságon belül kerül, a készü
-
lék automatikusan csatlakozik ehhez a hálózathoz.
Biztonsági és nyomon követési funkciók
Vigyázat!
A
Balesetfelismerés
és az
asszisztencia
egy kiegészítő funkciók, amelyek
-
re nem hagyatkozhatunk elsődleges sürgősségi segítségnyújtás végett. A
Garmin Connect alkalmazás nem értesíti a segélyszolgálatot helyettünk.
A Forerunner készülék biztonsági és nyom követési funkciókkal rendelkezik,
amelyeket a Garmin Connect alkalmazás segítségével kell beállítani.