background image

This allows you to keep your device up to date without 

connecting it to a computer.

1

Connect the device to a Wi

Fi network (

Connecting to a 

Wireless Network

, page 14

).

While connected to a Wi

Fi network, the device checks for 

available updates automatically and displays a notification 

when an update is available.

2

Select an option:
• When an update notification appears, swipe down from 

the top of the screen, and select 

An update is available.

.

• To manually check for updates, select   > 

About device 

System updates

.

The device displays available map and software updates. 

When an update is available, 

Update Available

 appears 

below Map or Software.

3

Select an option:
• To install all available updates, select 

Download

.

• To install only map updates, select 

Map

.

• To install only software updates, select 

Software

.

4

Read the license agreements, and select 

Accept All

 to 

accept the agreements.

NOTE: 

If you do not agree with the license terms, you can 

select Reject. This stops the update process. You cannot 

install updates until you accept the license agreements.

5

Using a USB cable, connect the device to external power, 

and select 

Continue

 (

Charging the Device

, page 15

).

For the best results, a USB wall charger that provides at least 

1 A power output is recommended. Many USB power 

adapters for smartphones, tablets, or portable media devices 

may be compatible.

6

Keep the device connected to external power and within 

range of the Wi

Fi network until the update process is 

complete.

TIP: 

If a map update is interrupted or canceled before it 

completes, your device may be missing map data. To repair 

missing map data, you must update the maps again.

Device Care

NOTICE

Avoid dropping your device.
Do not store the device where prolonged exposure to extreme 

temperatures can occur, because it can cause permanent 

damage.
Never use a hard or sharp object to operate the touchscreen, or 

damage may result.
Do not expose the device to water.

Cleaning the Outer Casing

NOTICE

Avoid chemical cleaners and solvents that can damage plastic 

components.

1

Clean the outer casing of the device (not the touchscreen) 

using a cloth dampened with a mild detergent solution.

2

Wipe the device dry.

Cleaning the Touchscreen

1

Use a soft, clean, lint-free cloth.

2

If necessary, lightly dampen the cloth with water.

3

If using a dampened cloth, turn off the device and disconnect 

the device from power.

4

Gently wipe the screen with the cloth.

Avoiding Theft

• Remove the device and mount from sight when not in use.

• Remove the residue left on the windshield by the suction cup.
• Do not keep your unit in the glove compartment.
• Register your device using the Garmin Express software 

(

garmin.com/express

).

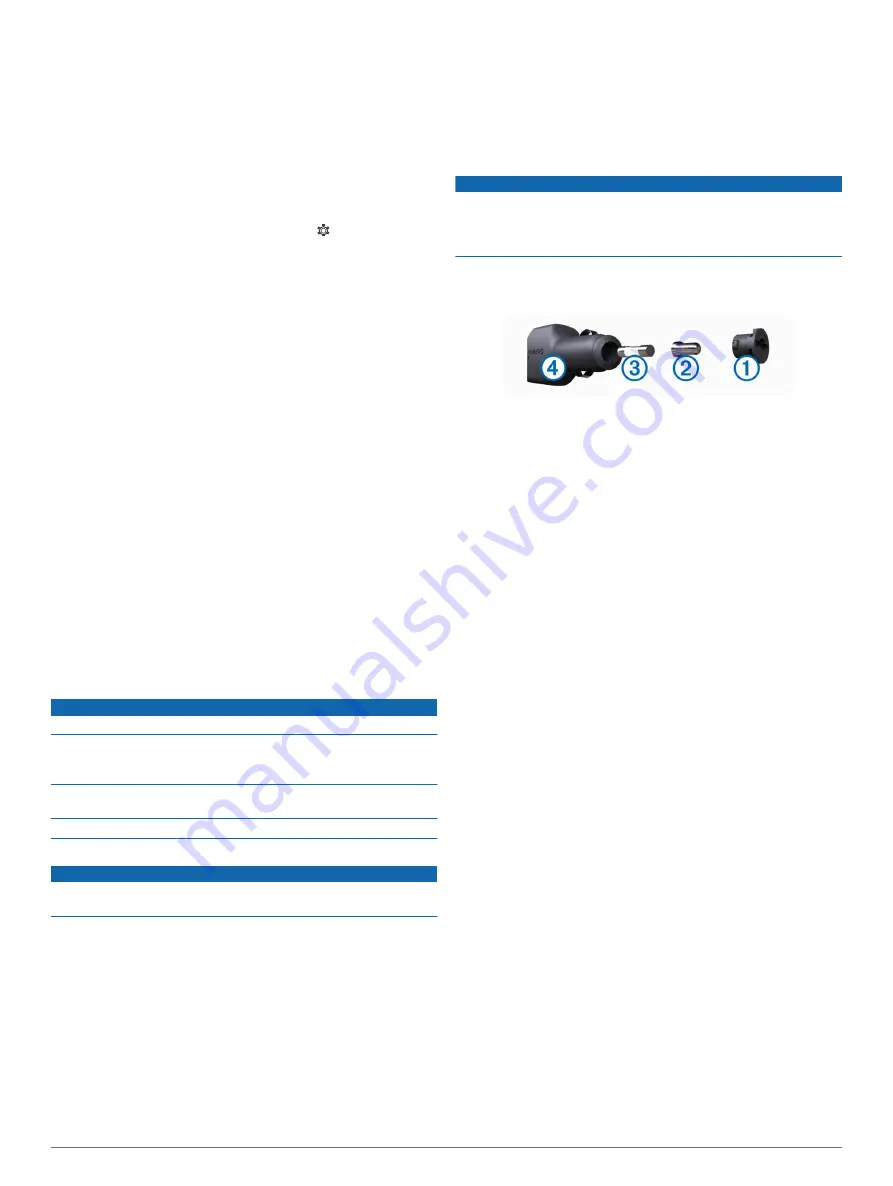
Changing the Fuse in the Vehicle Power 

Cable

NOTICE

When replacing the fuse, do not lose any of the small pieces 

and make sure they are put back in the proper position. The 

vehicle power cable does not work unless it is assembled 

correctly.
If your device does not charge in your vehicle, you may need to 

replace the fuse located at the tip of the vehicle adapter.

1

Rotate the end piece 

À

 counter clockwise to unlock it.

TIP: 

You may need to use a coin to remove the end piece.

2

Remove the end piece, the silver tip 

Á

, and the fuse 

Â

.

3

Insert a new fast-blow fuse that has the same current, such 

as 1 A or 2 A.

4

Place the silver tip in the end piece.

5

Push in the end piece and rotate it clockwise to lock it back 

into the vehicle power cable 

Ã

.

Resetting the Device

You can reset your device if it stops functioning.

Hold the power key for 12 seconds.

Removing the Device, Mount, and Suction 

Cup

Removing the Mount from the Suction Cup

1

Turn the device mount to the right or left.

2

Apply pressure until the socket on the mount releases the 

ball on the suction cup.

Removing the Suction Cup from the Windshield

1

Flip the lever on the suction cup toward you.

2

Pull the tab on the suction cup toward you.

Troubleshooting

The suction cup will not stay on my 

windshield

1

Clean the suction cup and windshield with rubbing alcohol.

2

Dry with a clean, dry cloth.

3

Mount the suction cup (

Mounting and Powering the Garmin 

fleet Device in Your Vehicle

, page 1

).

My device is not acquiring satellite signals

• Verify the GPS simulator is turned off (

Route Preference 

Settings

, page 14

).

• Take your device out of parking garages and away from tall 

buildings and trees.

• Remain stationary for several minutes.

16

Troubleshooting

Summary of Contents for Fleet 770

Page 1: ...GARMINFLEET 770 Owner sManual...

Page 2: ...t Garmin Express myTrends are trademarks of Garmin Ltd or its subsidiaries These trademarks may not be used without the express permission of Garmin The Bluetooth word mark and logos are owned by the...

Page 3: ...ing 8 Finding Parking Near Your Current Location 8 Understanding Parking Colors and Symbols 8 Search Tools 8 Finding an Address 8 Finding an Intersection 8 Finding a City 8 Finding a Location Using Co...

Page 4: ...15 Device Information 15 Viewing Regulatory and Compliance Information 15 Specifications 15 Charging the Device 15 Device Maintenance 15 Garmin Support Center 15 Updating Maps and Software Using a Wi...

Page 5: ...2 Press the mount onto the suction cup until it snaps into place NOTE The mount and suction cup may already be assembled in the package The Garmin logo on the mount should face right side up It is eas...

Page 6: ...cannot account for these restrictions or road conditions in all cases Always defer to all posted road signs and road conditions when making driving decisions Routing and navigation are calculated diff...

Page 7: ...age when you approach a road where there is risk of lateral wind Narrow road The device plays a tone and displays a message when you approach a road that may be too narrow for your vehicle Steep hill...

Page 8: ...ation of the road appears beside the map if available A colored line indicates the proper lane for the turn Viewing Turns and Directions While navigating a route you can view upcoming turns lane chang...

Page 9: ...p Tools page 9 2 Select an option To detour your route for a specific distance select Detour by Distance To detour around a specific road on the route select Detour by Road To find a new route select...

Page 10: ...deleting it 1 Select Navigation Route Preferences Custom Avoidances 2 Select an avoidance 3 Select Disable Deleting Custom Avoidances 1 Select Navigation Route Preferences Custom Avoidances 2 Select a...

Page 11: ...ected location Select to find parking areas near the location Select to view alternate routes to the locations Go Select to start navigating to the location using the recommended route Select to view...

Page 12: ...ere To Categories Coordinates 2 If necessary select and change the coordinate format or datum 3 Enter the latitude and longitude coordinates 4 Select View on Map Viewing Recently Found Locations Your...

Page 13: ...ns Displays a list of upcoming turns in your route Viewing Turns and Directions page 4 Trip Data Displays customizable trip data such as speed or mileage Viewing Trip Data from the Map page 10 Volume...

Page 14: ...e device turned on so it can accurately measure elapsed time during the trip From the map select Speed Viewing the Trip Log Your device keeps a trip log which is a record of the path you have traveled...

Page 15: ...oth connection and remain on the call or if you need privacy To use the dial pad select TIP You can use this feature to use automated systems such as voice mail To mute the microphone select To hang u...

Page 16: ...el Used field 4 Enter the amount of fuel purchased 5 If necessary select the fuel type To record the amount in liters select Gallons Liters Save To record the amount in gallons select Liters Gallons S...

Page 17: ...ect Select Destination 5 Choose a location for a destination and select Select 6 Select Add Location to add more locations optional 7 After you have added all the necessary locations select Next Save...

Page 18: ...hen disabled you must zoom in or out manually myMaps Sets which installed maps the device uses Enabling Maps You can enable map products installed on your device TIP To purchase additional map product...

Page 19: ...time format Device Settings Select About device System updates Allows you to update map and device software Status Displays the battery status and network information Legal Information Allows you to v...

Page 20: ...een using a cloth dampened with a mild detergent solution 2 Wipe the device dry Cleaning the Touchscreen 1 Use a soft clean lint free cloth 2 If necessary lightly dampen the cloth with water 3 If usin...

Page 21: ...ds You can purchase memory cards from an electronics supplier or purchase pre loaded Garmin mapping software www garmin com In addition to map and data storage the memory card can be used to store fil...

Page 22: ...nd longitude 8 locations 8 14 current 8 recently found 8 saving 8 searching for 6 8 M map layers customizing 10 map view 2 D 10 3 D 10 maps 4 9 10 14 data field 4 10 detail level 14 layers 10 purchasi...

Page 23: ...3 editing a trip 13 shaping points 13 troubleshooting 16 17 truck map 12 points of interest 6 profiles 2 3 trailer 2 turn list 4 U unit ID 15 up ahead 9 customizing 9 updating maps 15 software 15 V ve...

Page 24: ...support garmin com September 2017 190 02200 00_0A...

Reviews: