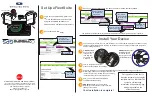
background image

2

Plug the vehicle power cable into the

port   on the mount.

3

If necessary, loosen the thumbscrew

on the suction cup arm   and the nut

on the ball mount  , and adjust the

mount for better viewing and

operation.

4

Tighten the thumbscrew on the

suction cup arm and the nut on the

ball mount.

5

Place the device onto the magnetic

mount.

6

Plug the other end of the vehicle

power cable into a power outlet in

your vehicle.

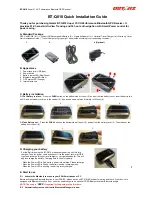
Installing the Screw-Down Mount

on the Dashboard

Before you can attach the screw-down ball

mount to your dashboard, you must select

a suitable location on the dashboard.

 WARNING

It is your responsibility to ensure the

mounting location complies with all

applicable laws and ordinances, and does

not block your view of the road during the

safe operation of your vehicle.

NOTICE

Avoid wires, gauges, air bags, air bag

covers, HVAC, and other items when

drilling pilot holes and attaching the mount

to the vehicle. Garmin

®

 is not responsible

for any damages or consequences arising

from the installation.

NOTICE

Garmin recommends professional

installation of the screw-down ball mount.

1

Place the mount   on the selected

location.

Quick Start Manual

3

EN

Summary of Contents for DEZL OTR800

Page 1: ...D ZL OTR800 OTR1000 LGV800 LGV1000 Quick Start Manual 2 Manuel de d marrage rapide 8 Gu a de inicio r pido 15...

Page 2: ...with 14 pin connector Speaker Mounting and Powering the Device in Your Vehicle WARNING This product contains a lithium ion battery To prevent the possibility of personal injury or product damage caus...

Page 3: ...ttach the screw down ball mount to your dashboard you must select a suitable location on the dashboard WARNING It is your responsibility to ensure the mounting location complies with all applicable la...

Page 4: ...third party mounting solutions 1 Remove the four screws securing the mount socket to the magnetic mount 2 Remove the mount socket 3 Secure the one inch ball mount to the magnetic mount using the screw...

Page 5: ...e notification panel or the settings menu 1 Select an option Swipe down twice from the top of the screen to expand the quick settings in the notification panel Select Settings Device Display Brightnes...

Page 6: ...ofile to edit 3 Select an option To edit the vehicle profile information select and select a field to edit To rename a vehicle profile select Rename Profile To delete the vehicle profile select Delete...

Page 7: ...at least 1 A power output is recommended 2 Connect the device to a Wi Fi network While connected to a Wi Fi network the device checks for available updates 3 Select Settings Updates The device checks...

Page 8: ...Power input Vehicle power using the included vehicle power cable AC power using an optional accessory for home and office use only Battery type Rechargeable lithium ion d zl OTR800 OTR1000 LGV800 LGV...

Page 9: ...rtains dispositifs m dicaux internes et appareils lectroniques comme les stimulateurs cardiaques les pompes insuline ou les disques durs des ordinateurs portables Maintenez l appareil distance des dis...

Page 10: ...cline toute responsabilit en cas de dommages ou autres cons quences d coulant de l installation AVIS Garmin recommande de faire appel un professionnel pour l installation de la rotule vis du support d...

Page 11: ...ce bouton pour modifier votre profil de v hicule Appuyez sur ce bouton pour afficher la m t o de votre position actuelle L application Garmin Drive est requise S lectionnez pour afficher les Smart No...

Page 12: ...ppareil ne peut donc pas tenir compte de ces restrictions ou de l tat des routes dans tous les cas Respectez toujours les panneaux de signalisation et adaptez toujours votre conduite aux conditions de...

Page 13: ...de v hicule s lectionnez Supprimer Navigation vers votre destination D marrage d un itin raire 1 S lectionnez O aller et cherchez une position 2 S lectionnez une position 3 S lectionnez Aller Votre it...

Page 14: ...es habituels impos s par votre fournisseur de services Internet s appliquent Contactez votre fournisseur de services Internet pour obtenir plus d informations sur les limites et frais de donn es 1 Con...

Page 15: ...jusqu au fond du menu 2 S lectionnez propos de l appareil Indications r glementaires Caract ristiques Plage de temp ratures de fonc tionnement De 20 55 C de 4 131 F Plage de temp ratures de char geme...

Page 16: ...Bluetooth word mark and logos are owned by the Bluetooth SIG Inc and any use of such word mark or logo by Garmin is under license Foursquare is a trademark of Foursquare Labs Inc in the U S and in ot...

Reviews: