background image

Adding a Vehicle Profile

You should add a vehicle profile for each camper to be used 

with your device.

1

Select 

Vehicle

.

2

Select your vehicle type:
• To add a motorhome with a permanently attached 

camper, select 

Motorhome

.

• To add a motorhome pulling a trailer, select 

Motorhome 

with Trailer

.

• To add a camper pulled behind a passenger vehicle, 

select 

Vehicle with Trailer

.

3

If necessary, select your trailer type:
• To add a camper pulled using a standard hitch, select 

Travel Trailer

.

• To add a camper pulled using a fifth-wheel hitch, select 

Fifth Wheel

.

NOTE: 

This trailer type is not available in all areas.

• To add a boat trailer pulled using a standard hitch, select 

Boat Trailer

.

• To add a trailer pulled using a standard hitch, select 

Trailer

.

4

Follow the on-screen instructions to enter the vehicle 

characteristics.

After you add a vehicle profile, you can edit the profile to enter 

additional detailed information (

Editing a Vehicle Profile

page 3

).

Car Profile

The car profile is a preloaded vehicle profile intended for use in 

an automobile without a trailer. While using the car profile, the 

device calculates standard automobile routes, and routing for 

large vehicles is not available. Some features and settings 

specific to large vehicles are not available while using the car 

profile.

Switching the Vehicle Profile

You can manually switch to another vehicle profile at any time.

1

Select an option:
• Select 

Vehicle

.

• Swipe down twice from the top of the screen, and select 

the vehicle profile icon, such as   or 

.

2

Select a vehicle profile.
The vehicle profile information appears, including 

measurements and weight.

3

Select 

Select

.

Editing a Vehicle Profile

You can change basic vehicle profile information or add detailed 

information to a vehicle profile, such as maximum speed.

1

Select 

Vehicle

.

2

Select the vehicle profile to edit.

3

Select an option:
• To edit the vehicle profile information, select  , and select 

a field to edit.

• To rename a vehicle profile, select   >   > 

Rename 

Profile

.

• To delete the vehicle profile, select   >   > 

Delete

.

Adding Propane Tanks

NOTE: 

This feature is not available on all product models.

When you add your propane tanks to your vehicle profile, the 

device avoids routing through areas with propane tank 

restrictions that may affect your route. The device also alerts 

you when you approach areas that require you to shut off your 

propane tanks.

1

From the vehicle profile, select   > 

Propane Tanks

 > 

Add 

Tank

.

2

Enter the weight of the propane tank, and select 

Save

.

Dash Cam

Aligning the Camera

 WARNING

Do not attempt to align the camera while driving.

You should align the dash camera each time you mount or 

reposition the device.

1

Select 

Dash Cam

.

2

Tilt the device to align the camera.
The crosshairs should point straight ahead, and the horizon 

line should be centered between the top and bottom of the 

screen.

TIP: 

If the suction cup appears in the dash cam field of view, 

you should move the hinged arm toward the suction cup.
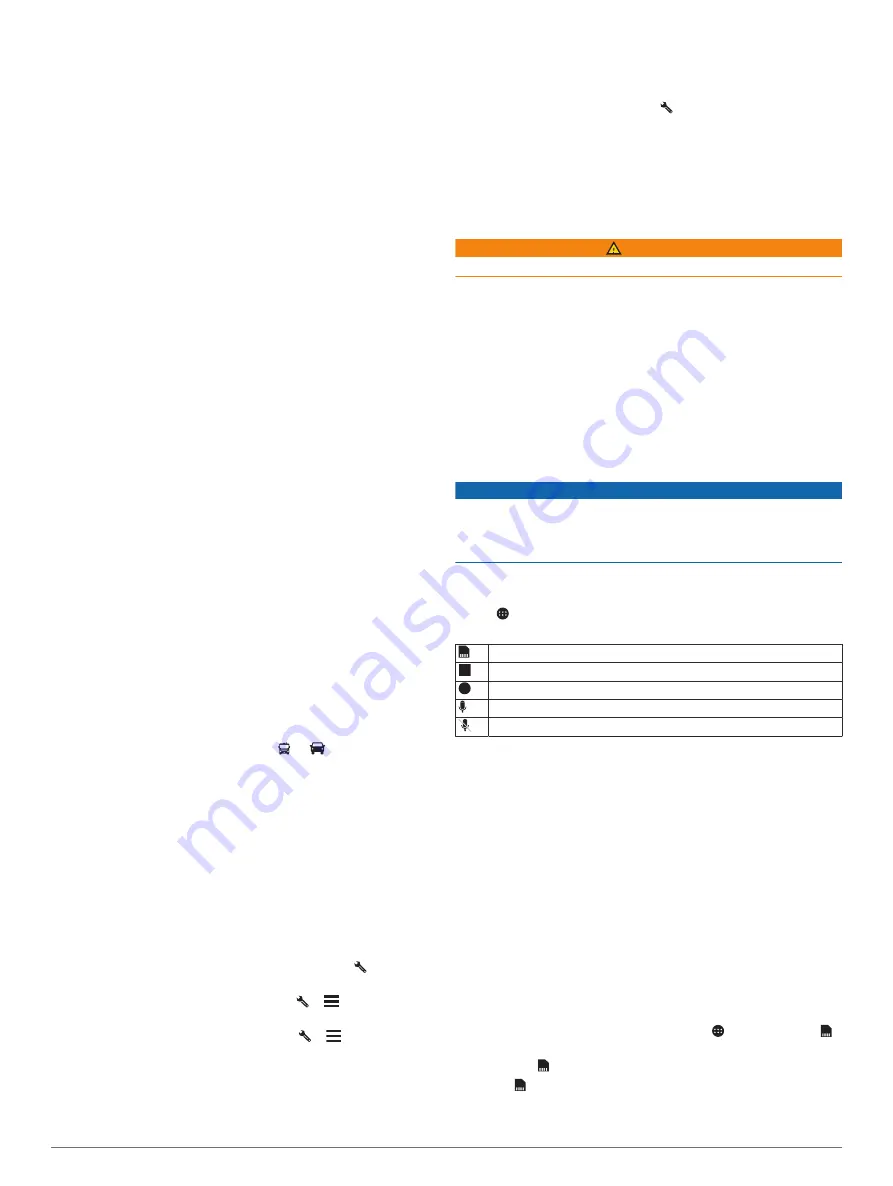
Dash Cam Controls

NOTICE

Some jurisdictions regulate or prohibit use of this device. It is 

your responsibility to know and comply with applicable laws and 

rights to privacy in jurisdictions where you plan to use this 

device.

You can control the dash cam using either the dash cam app or 

the notification panel.
Select   > 

Dash Cam

, or swipe down from the top of the 

screen.

Select to save a dash cam recording.
Select to stop dash cam recording.
Select to start dash cam recording.
Select to enable audio recording.
Select to disable audio recording.

Dash Cam Recording

• While the dash cam is recording, it records continuously, 

overwriting the oldest, non-saved video.

• You can start and stop dash cam recording using the dash 

cam controls (

Dash Cam Controls

, page 3

).

• If you enable the Auto Record option (

Dash Cam Settings

page 20

), the dash cam starts recording automatically when 

the device receives power through the powered mount. This 

is most useful when the mount is connected to an ignition 

switched power source.

• When the device is removed from the mount or the mount 

loses power, the dash cam stops recording automatically 

after a 15 second delay.

Saving a Dash Cam Recording

You can save a portion of the recorded video to prevent it from 

being overwritten by new video.

1

While the dash cam is recording, select   > 

Dash Cam

 >  .

The device saves the video footage before, during, and after 

you select  .

2

Select   again to extend the saved recording time (optional).
A message indicates the amount of video footage to be 

saved.

Dash Cam

3

Summary of Contents for Camper 785

Page 1: ...CAMPER785 RV785 RV700 Owner sManual...

Page 2: ...ay not be used without the express permission of Garmin ACSI is a trademark of Auto Camper Service International Holding B V Android is a trademark of Google Inc Apple iPhone and Mac are trademarks of...

Page 3: ...Parking Near a Specified Location 9 Understanding Parking Colors and Symbols 10 Viewing Recently Found Locations 10 Clearing the List of Recently Found Locations 10 Viewing Current Location Informati...

Page 4: ...Setting the Text Language 21 Date and Time Settings 21 Device Settings 21 Restoring Settings 21 Resetting Data and Settings 21 Device Information 22 Viewing E label Regulatory and Compliance Informati...

Page 5: ...t of direct sunlight Both the device and its mount contain magnets Under certain circumstances magnets may cause interference with some internal medical devices including pacemakers and insulin pumps...

Page 6: ...onal applications 3 Hold an application and drag it to a location on the home screen Viewing Notifications 1 Swipe down from the top of the screen The list of notifications appears 2 Select an option...

Page 7: ...s to your vehicle profile the device avoids routing through areas with propane tank restrictions that may affect your route The device also alerts you when you approach areas that require you to shut...

Page 8: ...ewing videos or photos 1 From the Garmin Drive app on your smartphone select Review Footage 2 Select an option To view a photo or video you saved select a file from the Saved Footage category To view...

Page 9: ...nsequences of using a red light or speed camera database NOTE This feature is not available for all regions or product models Information about red light and speed camera locations is available in som...

Page 10: ...e departures may not be detected when divider lines are obscured by rain fog snow extreme shadows sun or headlight glare road construction or any other visual obstruction Lane departures may not be de...

Page 11: ...ng a suggested search term select the term To search using the text you entered select 6 If necessary select a location Finding an Address NOTE The order of the steps may change depending on the map d...

Page 12: ...llow you to find public campgrounds near your location 1 Select Where To Ultimate Public Campgrounds 2 If necessary select Search Filters select one or more search filters and select Search 3 Select a...

Page 13: ...ore in a shopping mall or a specific terminal in an airport 1 Select Where To Enter Search 2 Select an option To search for the venue enter the name or address of the venue select and go to step 3 To...

Page 14: ...int to a location a category or a search tool The Where To menu can contain up to 36 shortcut icons 1 Select Where To Add Shortcut 2 Select an item Removing a Shortcut 1 Select Where To Remove Shortcu...

Page 15: ...1 Select Where To Go Home 2 If necessary enter your home location Editing Your Home Location 1 Select Where To Set Home Location 2 Enter your home location Your Route on the Map As you travel the devi...

Page 16: ...e 11 You can manually shape your route to change its course This allows you to direct the route to use a certain road or go through a certain area without adding a destination to the route 1 Touch any...

Page 17: ...device calculates a route it avoids these areas and roads unless no other reasonable route is available Avoiding a Road 1 Select Settings Navigation Route Preferences Custom Avoidances 2 If necessary...

Page 18: ...r road or route in each of the three categories While you are not traveling the map tool shows the three category names 2 Select an option If the map tool shows categories select a category to view a...

Page 19: ...road conditions and weather radar to your device Viewing the Weather Forecast page 18 Smart Notifications Displays phone notifications and messages on your device This feature is not available for al...

Page 20: ...ge The device reads the notification using text to speech technology This feature is not available for all languages To listen to the notification using a voice command say Play Message NOTE This opti...

Page 21: ...fic and Smartphone Features page 15 2 On your Garmin device select Settings Navigation Traffic and verify the Traffic check box is selected Receiving Traffic Data Using a Traffic Receiver NOTICE Heate...

Page 22: ...Location 2 Select an option To view weather for a favorite city select a city in the list To add a favorite city select Add City and enter a city name Viewing the Weather Radar Before you can use thi...

Page 23: ...ed when you optimize the order While editing a trip select Optimize Order Discovering Attractions Along Your Trip The device can suggest interesting or popular attractions to add to your trip 1 While...

Page 24: ...aps Sets which installed maps the device uses Enabling Maps You can enable map products installed on your device TIP To purchase additional map products go to http buy garmin com 1 Select Settings Nav...

Page 25: ...to disable audible alerts during specific times or events Default notification ringtone Sets the default notification ringtone sound on your device Adjusting Sound and Notification Volume 1 Select Set...

Page 26: ...ate your device conveniently without connecting it to a computer You can connect the device to a computer and update it using the Garmin Express application garmin com express This option allows you t...

Page 27: ...ect Download for Windows To install on a Mac computer select Download for Mac 3 Open the downloaded file and follow the on screen instructions to complete the installation Device Care NOTICE Avoid dro...

Page 28: ...teady power source select to manually hide the camera Switching Cameras When multiple backup cameras are transmitting to your device you can switch between the views from the cameras 1 Select Rear Vie...

Page 29: ...the silver tip and the fuse 3 Insert a new fast blow fuse that has the same current such as 1 A or 2 A 4 Place the silver tip in the end piece 5 Push in the end piece and rotate it clockwise to lock...

Page 30: ...the Fuse in the Vehicle Power Cable page 25 Verify the vehicle is turned on and is supplying power to the power outlet Verify the interior temperature of the vehicle is within the charging temperature...

Page 31: ...y formatting the memory card Formatting the Dash Cam Memory Card page 4 and then if necessary replace the memory card Replacing the Dash Cam Memory Card page 4 Update your device to the latest softwar...

Page 32: ...eocaching 9 going home 11 GPS 2 simulator 21 H hands free phone calls 15 headset pairing 16 home editing location 11 going 11 home screen 2 customizing 2 I icons status bar 2 ID number 21 intersection...

Page 33: ...eceiver 17 searching for delays 15 traffic cameras viewing 19 20 travel history 21 trip information resetting 14 viewing 14 trip log viewing 14 trip planner 19 editing a trip 19 shaping points 19 Trip...

Page 34: ...support garmin com June 2019 190 02505 00_0A...

Reviews: