Connecting to a Paired Phone
Before you can connect to your phone, you must pair your
phone to your device.
When you connect to your phone using Bluetooth wireless
technology, you can share scores and other data to Garmin
Connect. You can also view phone notifications on your device.
1
On your phone, enable Bluetooth wireless technology.
2
On your device, select
Setup
>
Bluetooth
>
Connection
>
On
to enable Bluetooth wireless technology.
3
Select
Notifications
to show or hide phone notifications.
Phone Notifications
NOTE:
Phone notifications require an Apple® iPhone®
equipped with Bluetooth 4.0 wireless technology and iOS® 7 or
later.
When your phone receives messages, it sends notifications to
your device.
Viewing Notifications
Before you can view notifications, you must connect to your
paired phone (
).
1
Select >
Notifications
.
2
Select a notification.
3
Select
or to scroll through the contents of the
notification.
Appendix
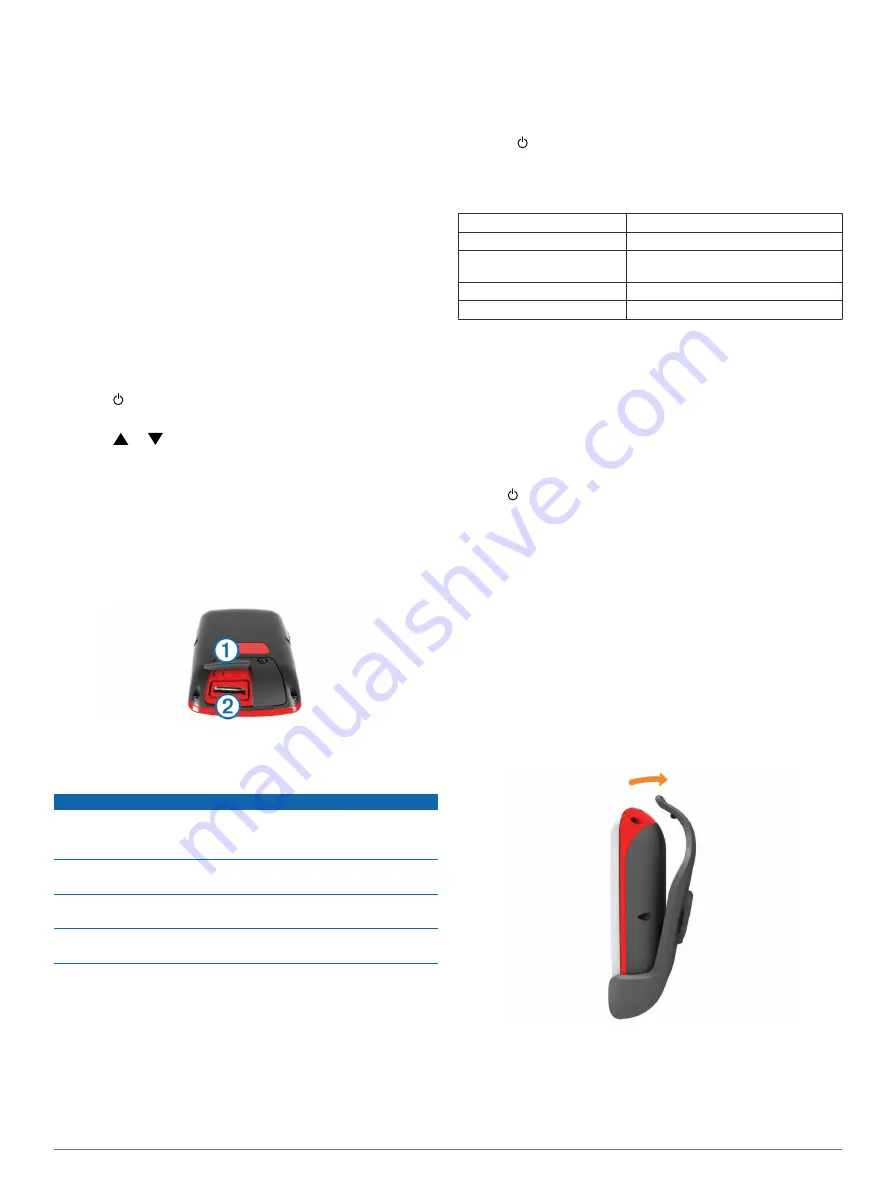
Installing a Memory Card
You can install a microSD™ memory card for additional storage
or pre-loaded maps.
1
Pull up the weather cap
À
from the microSD card slot
Á
.
2
Press in the card until it clicks.
Device Care
NOTICE
Do not store the device where prolonged exposure to extreme
temperatures can occur, because it can cause permanent
damage.
Never use a hard or sharp object to operate the touch screen,
or damage may result.
Avoid chemical cleaners and solvents that can damage plastic
components.
Secure the weather cap tightly to prevent damage to the mini-
USB port.
Cleaning the Screen
Before you can clean the screen, you should have a soft, clean,
lint-free cloth and water, isopropyl alcohol, or eyeglass lens
cleaner.
Apply the liquid to the cloth, and gently wipe the screen with the
cloth.
Cleaning the Device
1
Wipe the device using a cloth dampened with a mild
detergent solution.
2
Wipe it dry.
Using the Backlight
• At any time, tap the touchscreen to turn on the backlight.
NOTE:
Alerts and messages also activate the backlight.
• Select to turn on the backlight and adjust the brightness.
• Change the backlight timeout (
).
Specifications
Battery Type
Lithium-polymer
Battery Life
Up to 15 hours
Operating Temperature
Range
From -4°F to 140°F (from -20°C to
60°C)
Charging Temperature Range From 32°F to 113°F (from 0°C to 45°C)
Water Resistance
IPX7
Calibrating the Touchscreen
If the touchscreen does not seem to be responding properly,
you can calibrate it.
1
Select
Setup
>
Display
>
Calibrate Screen
.
2
Follow the on-screen instructions.
Clearing User Data
NOTE:
This deletes all user-entered data.
1
Hold to turn off the device.
2
Place your finger on the top left corner of the touchscreen.
3
While holding your finger on the touchscreen, turn on the
device.
4
Select
Yes
.
Using the Clip
NOTE:
Your clip may look slightly different from the image.
You can use the clip to attach the device to your belt, pocket, or
bag.
1
Slide the bottom of the device into the bottom of the clip.
NOTE:
If you place the device into the clip upside-down, it
does not lock into place and could fall out of the clip easily.
2
Press the top of the device into the top of the clip until it
clicks.
3
To remove the device, pull up the top of the clip while
pressing on the back of the device, and slide the bottom of
the device out of the bottom of the clip.
Appendix
5


