background image

Quest Owner’s Manual 

29

U

SING


THE

 M

AIN

 P

AGES

 > 

M

AP

 P

AGE

Panning the Map

You can pan the map with the map pointer   to view areas of the 

map that are not visible on the screen. As you pan past the edge of 

the screen, the map moves to provide continuous map coverage. 

The position icon   indicates your present location and may not 

be visible on the screen when you pan the map. 

To pan the map: 

  Press up, down, right, or left on the 

Rocker

 pad. 

  The map pointer moves the map so you can view different 

parts of the map.

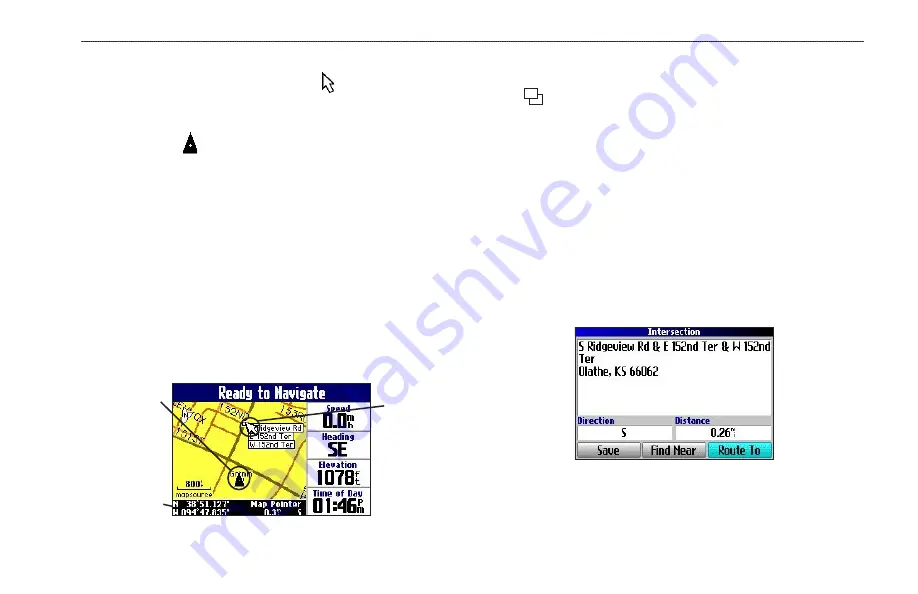
As you move the pointer, the distance and bearing from your 

present location to the pointer appear in the distance bar. The map 

pointer’s location coordinates also appear in the bar.  When you 

zoom while panning the map, the map pointer stays centered on the 

screen.

Distance bar

Position icon

Map pointer

To re-center your location on the screen:

  When you are finished panning the Map, press the 

Page 

 key. The map automatically moves to show your present 

location.

Use the pointer to select on-screen map features and review the 

item directly from the map. 

To view details about an on-screen point:

1.  Use the 

Rocker

 pad to move the pointer to the location or 

map item. If several items are grouped closely together, 

zoom in closer for a better view.

2.  Press 

OK

 to view more information about the point. The 

information and on-screen buttons vary depending on the 

type of item selected. 

Summary of Contents for 190-00556-10

Page 1: ...Quest and Quest 2 pocket sized navigator owner s manual ...

Page 2: ...c storage medium to be viewed and to print one copy of this manual or of any revision hereto provided that such electronic or printed copy of this manual must contain the complete text of this copyright notice and provided further that any unauthorized commercial distribution of this manual or any revision hereto is strictly prohibited Information in this document is subject to change without noti...

Page 3: ...ibes the Map page and other main pages of your Quest Customizing your Quest explains how to change your Quest s settings to meet your specific needs Understanding GPS describes the basics of GPS navigation and the features on the GPS Information page Appendix contains additional mounting instructions specifications and regulatory information Index provides key words to help you find information Manua...

Page 4: ...olume 6 Turning Off Satellite Reception for Indoor Use 6 Using the Keys 7 Selecting Options and Entering Data 8 Using the On screen Keyboard 8 Basic Operation 9 Finding Places and Routing to Them 9 Advanced Search Methods and Tips 10 Finding an Address or Intersection 11 Finding a City 12 Finding an Exit 12 Finding Recently Found Places 13 Planning a Trip 14 My Locations 15 Saving Your Favorite Pl...

Page 5: ...omizing the Route Settings 38 Customizing the Units Settings 39 Changing the Time Settings 39 Changing the Track Setup 40 Customizing the Welcome Page 41 Viewing Software and Unit Information 41 Understanding GPS 42 The GPS Information Page 42 Sky View and Signal Strength Bars 43 Satellite Status Bar 44 Poor Satellite Reception Menu 44 Appendix 45 Quest Shortcuts 45 Data Fields 45 Adding Maps to Y...

Page 6: ...nged use of the unit s controls while driving Pull over in a safe and legal manner before attempting such operations When navigating carefully compare information displayed on the Quest to all available navigation sources including information from street signs visual sightings and maps For safety always resolve any discrepancies or questions before continuing navigation The Quest contains a non u...

Page 7: ...gh the Quest is a precision navigation device any navigation device can be misused or misinterpreted and therefore become unsafe Map Data Information One of the goals of Garmin is to provide customers with the most complete and accurate cartography that is available to us at a reasonable cost We use a combination of governmental and private data sources which we identify in product literature and ...

Page 8: ... when you leave your vehicle Using the Quest Responsibly The Quest is equipped with a Safe Mode feature to improve driver safety When your vehicle is moving the Safe Mode disables all functions that require significant operator attention and could become a distraction when driving Read the warnings on pages iv v to learn how to install and use your Quest safely and responsibly Battery Temperature W...

Page 9: ...EST UNIT OVERVIEW Introducing the Quest Power Speaker connector External antenna connector Back View USB connector Power Key Flip up GPS antenna Position the antenna parallel to the surface of the road Keypad 256 Color high resolution TFT display Front View ...

Page 10: ...tional instructions Turn on the Quest Make certain the antenna is unobstructed as it looks for satellites For example it cannot establish a satellite fix if your vehicle is parked in a garage Position the antenna so that it is parallel to the surface of the road for optimal signal reception When your Quest has established a satellite fix it displays a Ready to Navigate message Step 2 Press the FIND ...

Page 11: ... press the OK key Information about the restaurant appears on a page similar to the one shown below Highlight Route To to create a route to this restaurant Then press the OK key Step 5 To create a route to this restaurant highlight the Route To button located at the bottom of the page in Step 4 and then press OK Your Quest calculates the route and then provides directions ...

Page 12: ...indshield or an in screen heating system To snap the cradle on the suction mount 1 Align the ball on the end of the suction mount with the socket hole on the back of the cradle 2 Press firmly to snap the ball into the socket To insert the Quest in the cradle Suction cup Lever Release tab Cradle Suction cup tab 1 Flip up the antenna 2 Angle the Quest forward as shown above Fit the bottom of the Ques...

Page 13: ...uction cup mount on your windshield Select a suitable location on your dashboard to place the mounting disk Select a location where the unit has an unobstructed view of the sky and does not interfere with the driver s view of the road or obstruct any controls in the vehicle WARNING The mounting disk affixes to your dashboard with permanent adhesive that is extremely difficult to remove after it is i...

Page 14: ...lso press and hold the Speak key to open the volume slider Press the Rocker pad right to raise the volume or left to lower it You can quickly press the Speak key to adjust the volume to a pre set level low medium and high Turning Off Satellite Reception for Indoor Use You can set your Quest for indoor use which stops satellite reception As a result it conserves the battery and speeds up the search...

Page 15: ...ta entry and restore the previous value Rocker pad press to move the highlight and move map pointer any direction OK press to select items Press OK to reveal information pages when panning the Map page To save your current location in My Locations press and hold OK FIND press to search for cities addresses and other points of interest Press FIND twice to activate the Recent Finds menu Press and ho...

Page 16: ...etters to lower case and numbers to symbols The on screen keyboard opens when you need to enter data such as entering an address or changing the name of a saved location The on screen keyboard is used in a variety of places throughout the Quest Its appearance may alter depending on your purpose for using it but it always functions in the same way Use the Rocker pad to select a letter or number and...

Page 17: ...the highway Find Menu Press down on the Rocker pad to see more Find categories To find a place and route to it 1 Press the FIND key The Find Menu appears 2 Highlight a category to help you find your destination such as Food Drink Lodging Addresses or All Points of Interest Press OK A list of places near your current location appears 3 Highlight the place and press OK An information page appears 4 Hi...

Page 18: ...an find places that are beyond your current location by panning to a particular area on the map Open the Map page and pan the map to the location Press the FIND key and all find options appear that are near the map pointer See page 29 for information about panning the map Finding Places Near this Place After you have found a place open the item s information page To find another place such as a hotel...

Page 19: ...tate and press OK 3 To search all cities highlight Search All Cities and press OK To spell the city name or enter a postal code highlight Spell City press OK and enter the city name or postal code NOTE Not all map data provides postal code searching 4 Enter the address number and street using the on screen keyboard For intersections you only need to enter street names 5 A list of addresses or inte...

Page 20: ...s and interstates To find an exit 1 Press the FIND key highlight Exits and press OK All exits on the highway or interstate that are closest to your current location are listed 2 To search for a particular exit press MENU highlight Select Exit Road and press OK Enter the name of the road using the on screen keyboard 3 If you know you want to stop at an exit that has a particular type of service such...

Page 21: ... route to this place highlight Route To and press OK The Quest only stores places that you actually view For example suppose you search for a restaurant by name and five names appear If you view information on two of them then these two restaurants are stored in your Recent Finds list Deleting Recently Found Places If you want to delete a place from the Recent Finds list highlight the place s name ...

Page 22: ...then press OK In our example Bed and Breakfast Kansas City is the lodging place 4 From the Bed and Breakfast information page highlight Find Near and press OK Then highlight Food Drink and press OK 5 A list of all eating establishments near Bed and Breakfast Kansas City appears Highlight the name of the restaurant and then press OK 6 To save the restaurant to your My Locations list highlight Save ...

Page 23: ...n Item from the Find Menu As discussed in the previous sections you can save items you have found using the Find Menu To save a place from the Find Menu 1 Press FIND Highlight the search category and press OK 2 Highlight the place you want to save and press OK 3 From the information page highlight Save and press OK Where Am I You will never be lost with your Quest Use the Where Am I feature to find...

Page 24: ...reen OK button and press the OK key when you are finished Entering a Location s Coordinates You can manually enter location coordinates to create a location This method can be useful for creating a location at a specific latitude longitude position from a paper map or chart To enter a location s coordinates 1 Press and hold the OK key Highlight Save and press OK or use your favorite method discussed...

Page 25: ...d Vacation locations by pushing a few buttons To create a saved location category 1 Press the FIND key Highlight My Locations and press OK 2 Highlight the saved location you want to edit and press OK 3 Highlight the Categories field and press OK 4 Highlight Edit and press OK 5 Highlight Add New and press OK 6 Use the on screen keyboard to enter the name of the new category Highlight Done and press ...

Page 26: ...en deleting by category highlight the category you want to delete and press OK 5 Highlight Yes and press the OK key to confirm Highlight No and press OK to exit without deleting Finding My Locations When you save an item it is saved in the My Locations category of the Find Menu To find a location you have saved open the My Locations category of the Find Menu To find a saved location 1 Press the FIND ...

Page 27: ...ns and press OK A Route Options menu appears 2 Highlight Set Home Location and press OK 3 Highlight one of the three options and press OK 4 Find your Home location using the selected option Your Home location is set To route Home Press and hold the FIND key The Quest automatically creates a route to your Home location Changing Your Home Location If you travel frequently you may want to change your...

Page 28: ...he FIND key highlight Where Am I and press OK 2 Highlight TracBack and press OK 3 If you want to travel to the beginning of your track highlight Yes and press OK To select a spot along your track to travel to highlight No and press OK Use the Rocker pad to select the point to which you want to travel and press OK 4 A TracBack Preference window appears Highlight the preferred method and press OK If...

Page 29: ...point or turn appear in the top text bar Rotating compass ring Bug indicator Data fields Bearing pointer Text bar If the arrow points up you are going in the correct direction If the arrow points any direction other than up turn toward the arrow until it points up then continue in that direction NOTE You must be moving for the compass to update and display your heading accurately You can change the...

Page 30: ...ns described to the right and press OK Select your starting location 4 From the Route Planner page highlight Select your destination and press OK Highlight one of the options and press OK Select your ending location Highlight Navigate to start navigating this route If you want to stop a route select Stop Navigation from the Route Options menu To resume the route select Resume Navigation Finding Ro...

Page 31: ...our saved routes appears 3 Highlight the name of the route and press OK An information page for your selected route appears 4 To activate the route highlight Navigate and press OK 5 If you want to change the route by adding via points use the Rocker pad to highlight the Via Points box and press OK See Adding Via Points in this section for more information Deleting a Saved Route You can delete a si...

Page 32: ...oute Options and press OK 2 Highlight Detour and press OK 3 Highlight a detour distance and press OK Your Quest makes every possible attempt to get you back on the original route at your requested distance however the distance may be longer if no other roads can take you back to your original route Sometimes the route you are currently taking might be the only reasonable option If so you will not ...

Page 33: ... the route 1 Press MENU highlight Route Options and press OK 2 Highlight Route Planner and press OK 3 Highlight the route you want to arrange and press OK 4 Press MENU highlight Optimal Via Order and press OK The unit rearranges all of your extra stops based on your route preference Faster Time Shorter Distance or Off Road See page 38 for more information on route preferences If you change your ro...

Page 34: ...he Avoid box Avoidances Page To avoid a road 1 Press and hold MENU to open the Route Options menu 2 Highlight Avoidances and press OK 3 Highlight the Add button and press OK 4 Highlight Road Avoidance and press OK to select a street to avoid on your routes A map appears enabling you to mark a start point on a road 5 Use the Rocker pad to move the map pointer to the beginning point of the road you ...

Page 35: ... to avoid 7 A map of the avoided area appears Press OK The Avoidances page shown to the right lists the avoided area with a default name Area 000 After you enter the avoid areas and roads your Quest avoids these roads areas unless no other roads are available until you remove them from the Custom Avoidances list or until you uncheck them To uncheck an avoidance select the check box to the left of ...

Page 36: ...bar indicates that the Quest is attempting to locate satellites After the Quest locates satellites and establishes a fix on your location the text bar reads Ready to Navigate Data fields Text bar Position icon You are here Zoom range Zooming In and Out of the Map The map has many zoom ranges from 20 ft to 500 mi Zoom in and out of the map by pressing the IN and OUT keys The current zoom range is dis...

Page 37: ...pointer appear in the distance bar The map pointer s location coordinates also appear in the bar When you zoom while panning the map the map pointer stays centered on the screen Distance bar Position icon Map pointer To re center your location on the screen When you are finished panning the Map press the Page key The map automatically moves to show your present location Use the pointer to select on...

Page 38: ...ge the map orientation settings see page 34 North Up Track Up Data Fields The Map page displays data fields on the right hand column of the page Information in these fields changes depending on whether you are navigating a route or just traveling with the Quest turned on Data fields also appear on the Trip Information page page 33 and the Compass page page 21 For a complete list and description of da...

Page 39: ...age opens and announces the same instructions for an upcoming turn up to three times Immediately after you make a turn the Next Turn page announces the next turn and the distance to the turn So if the next turn is not for 20 miles you do not need to worry about navigation instructions for quite a while As you approach the upcoming turn the Next Turn page appears again This message is announced in ...

Page 40: ...provides step by step route instructions from start to finish Press Page to open the Current Route page The Current Route page displays directions for your entire route You can look beyond the next turn and even get an estimated idea of what time you will reach an upcoming turn provided you do not make stops along the way You can move through the entire list of turns by using the Rocker pad Highlig...

Page 41: ...it is connected to an external power source and is fully charged Trip Information Page To reset the trip data or the maximum speed 1 Press Page to open the Trip Information page 2 Highlight the Trip or Max buttons and press OK A message appears asking if you want to reset the data 3 Highlight Yes and press OK The data is reset To change the data fields 1 Press Page to open the Trip Information page...

Page 42: ...ections Layout Tab Navtext displays or hides the navigational text Turn Pointer displays or hides the turn pointer that appears on the Map page when you are navigating Data fields displays or hides data fields on the Map page If you choose to hide the data fields on the Map page the turn pointer appears in the lower right hand side of the page Map Tab Map Detail adjusts the amount of detail that is d...

Page 43: ...d on the Map page The Line Point City and Area tabs contain two common settings Text Size and Hide Above Text Size specifies how large or small the names of items appear on the map If you do not want the name of an item to appear on the Map page select Off in the Text Size field Names with Medium and Large letters also appear in bold Hide Above specifies the maximum zoom range at which a map item app...

Page 44: ... shows a bright and lighter background Nighttime shows a black background for easier viewing during the night Auto allows the Quest to automatically switch between the two at sunrise and sunset Custom allows you to create your own color scheme for a variety of objects such as labels buttons and text bars To customize the colors 1 Highlight Custom for the Color Mode and press OK 2 Highlight an item...

Page 45: ...vigation as described above It does not give chimes Button Only The unit only speaks when the Speak key is pressed External Power Lost if Turn Off is set the unit shuts down after 30 seconds when the Quest loses external power If Stay On is set the Quest runs on battery power when external power is lost Text Language changes all on screen text to the selected language Changing the text language do...

Page 46: ...Time Routes are faster to drive but may be longer in distance Shorter Distance Routes are shorter in distance but may take more time to drive Off Road The route is a direct line from your current location to your destination This is useful when you are traveling outside of map areas or where no roads exist Prompted You are asked to select the route preference option before the route is calculated ...

Page 47: ...tical Speed displays vertical speed in feet minute meters minute or meters second Elevation displays elevation in feet or meters Datum allows you to select from over 100 different map datums to match almost any paper map or chart Use the default setting if you are unfamiliar with map datums To restore these settings press the MENU key highlight Restore Settings and press OK Changing the Time Setti...

Page 48: ...w track points to replace the oldest track points once the log is full If set to Off no new tracks are added until the Track log is cleared Record Interval sets the interval at which track points are recorded With Auto track points are recorded using a formula and the setting you choose in the Resolution field Resolution selects the frequency at which you want track points to be recorded based on h...

Page 49: ...st again your message appears Default Welcome Page Customized Welcome Page To use the default Welcome page again repeat the above process and clear the text you entered previously Viewing Software and Unit Information The About Quest page displays the software version that is currently loaded in the Quest It also shows the Quest s unit ID number which is used for registration and identification pur...

Page 50: ... receiver must be locked on to at least three satellites to calculate a 2D location latitude and longitude and track movement With four or more satellites in view the receiver can determine your 3D location latitude longitude and altitude After your location has been determined the GPS unit can calculate other information such as speed bearing track trip distance distance to destination sunrise an...

Page 51: ...speed by selecting and using the best satellites in view Sky View and Signal Strength Bars The sky view and signal strength bars indicate the satellites that are currently visible and which satellites are being used to calculate a position fix The signal strength bars also indicate the quality of each satellite signal The sky view provides an overhead view of each satellite position relative to you...

Page 52: ...mine a position fix From the Poor Satellite Reception menu you can turn off GPS when using the unit indoors update your approximate location or continue to search for the satellites Updating your approximate location ensures that the Quest is searching for the correct satellites and is useful if you have traveled over 500 miles with the unit turned off To select a new location 1 Press the MENU key ...

Page 53: ...aring compass direction from your location to your destination Appears only on the Compass page Course direction from your starting location to a destination Appears only on the Compass page Distance Destination distance to your destination Distance Next distance to your next turn Elevation elevation of your current location Heading current direction of travel Not available on the Trip Information...

Page 54: ...n To Course direction of travel to get back on course Appears only on the Compass page Trip Odometer running total of distance traveled since the Trip Computer was last reset Trip Time Moving length of time in motion since the Trip Computer was last reset Trip Time Stopped length of time stopped or stationary since the Trip Computer was last reset Trip Time Total total length of time that the Ques...

Page 55: ...ee page 50 NOTE When you transfer additional maps to your Quest the existing maps you previously downloaded are automatically deleted Therefore you must transfer them again at the same time through the MapSource software that is on your computer See the MapSource Owner s Manual for more information Controlling Map Views on the Map Page You can view a list of your map families on the MapSource Info...

Page 56: ...lies so that you can view detail from the other one Changing Map Families When Finding Places If your Quest contains map families that have overlapping information you may need to specify a different map family In most cases the Quest knows which map family to use for this particular search To change the map family 1 Press the FIND key highlight a category and press OK 2 Press the MENU key highlig...

Page 57: ...Velocity 0 05 m s steady state Dynamics Performs to specifications to 6 g s Interface USB 1 1 device Data Storage Indefinite no memory battery required Map Storage Internal Quest Available storage for uploaded maps Quest 2 Full map coverage Power Specifications Source 12 24 VDC with car adapter up to 36 V and internal lithium ion battery Battery Life3 Up to 20 hours typical use Usage 6 watts maximum ...

Page 58: ...t Garmin Europe Ltd at 44 0870 8501241 Software License Agreement BY USING THE QUEST YOU AGREE TO BE BOUND BY THE TERMS AND CONDITIONS OF THE FOLLOWING SOFTWARE LICENSE AGREEMENT PLEASE READ THIS AGREEMENT CAREFULLY Garmin grants you a limited license to use the software embedded in this device the Software in binary executable form in the normal operation of the product Title ownership rights and...

Page 59: ... turning the equipment off and on the user is encouraged to try to correct the interference by one of the following measures Reorient or relocate the receiving antenna Increase the separation between the equipment and the receiver Connect the equipment into an outlet on a circuit different from that to which the receiver is connected Consult the dealer or an experienced radio TV technician for hel...

Page 60: ...AND EXCLUSIVE REMEDY FOR ANY BREACH OF WARRANTY To obtain warranty service contact your local Garmin authorized dealer or call Garmin Product Support for shipping instructions and an RMA tracking number The unit should be securely packed with the tracking number clearly written on the outside of the package The unit should then be sent freight charges prepaid to any Garmin warranty service station...

Page 61: ... Finds 13 Route 23 Saved Location 18 Via Point 25 Detours 24 Directions to Me 10 Display Setup 36 E Edit a Saved Location 17 Elevation 39 Entering Data 8 Exits Finding 12 External Power Lost 37 F Faster Time 38 FCC 51 Finding Places 9 14 Addresses 11 Cities 12 Exits 12 Intersections 11 My Locations 18 Recent Finds 13 Find Key 7 Find Menu 9 Find Near 10 Frozen Screen vi Fuse 12 Volt Adapter 49 G GP...

Page 62: ... 17 Edit 17 Screen Brightness 36 Select Exit Road 12 Select Map Set 48 Serial Number 50 Shortcuts for the Quest 45 Shorter Distance 38 Show Map 10 Signal Strength Bars 43 Simulator Mode 6 Sky View 43 Software Version 41 Speaker Volume 6 Speak Key 7 Specifications 49 Storage vi Street Detail Level 34 System Setup 37 T Text Language 37 Text Size 35 Time Zone 39 TracBack 20 Track Log 20 Recording 40 S...

Page 63: ......

Page 64: ...garmin com Copyright 2006 Garmin Ltd or its subsidiaries Garmin International Inc 1200 East 151st Street Olathe Kansas 66062 U S A Garmin Europe Ltd Unit 5 The Quadrangle Abbey Park Industrial Estate Romsey SO51 9DL U K Garmin Corporation No 68 Jangshu 2nd Road Shijr Taipei County Taiwan www garmin com Part Number 190 00556 10 Rev B ...

Reviews: