


ENGLISH
73
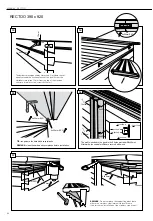
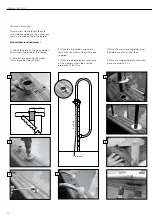
Before you join the connectors, you must
screw the PVC elbow (7) onto the return
opening. Do this as follows. Screw the
PVC elbow carefully onto the return piece
with some Teflon on the thread and en-
sure that this is done in one fluid move-
ment, without stopping or unscrewing
and with the outlet pointing downwards
at a right angle. You must then tighten
the ring with the proper spanner, while
holding the return piece in place on the
inside of the pool. This is to ensure that
the return piece remain in position.
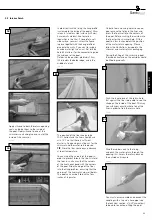
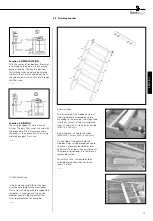
In general, the semi-flexible connector
tubes need to be shortened straight and
square. Prepare the connectors 1, 3, 4
and 6 as follows.
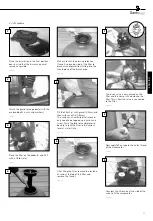
Couplings
Unscrew the nut completely from the
fitting. Slide the nut with the insert over
the flexible tube. Then slide the white
clamp over the tube until approximately
2 cm of tube sticks out below the white
clamp.
Now push the tube into the fitting up
to the edge and press the white clamp
down onto the fitting. Place the seal into
the fitting.
Tighten the nut of the fitting.
This way it will be perfectly waterproof.
If you have a coupling without a rubber
packing, you are advised to apply Teflon
to the thread or nipple in order to main-
tain it’s waterproof capacity.
Taps
Prepare the connectors to the tap in the
same way as the couplings, but in both
directions from the tap.
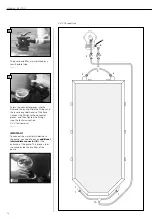
Connecting the filter unit to the pool.
Follow the drawing. Connect the 2 skim-
mers with the semi-flexible connection
tube to the T-joint (9) (glue). Glue to the
remaining end of the T-joint a semi-
flexible connection tube, connect to the
pump and place a ball-valve in-between
(4, 5, 6, 8, 9). 4, 5 and 9 should have
been coupled after the placement of
the skimmers, in order to continue
filling the pool.
Then, connect the 2 water return devices
to the T-joint (10) (glue). Glue to the
remaining end of the T-joint a semi-
flexible connection tube, connect to
the filter and fit a ball valve to this con-
nection too (1, 2, 3, 10). 1, 2 and
10 should have been coupled already
after fitting the return devices,
in order to continue filling the pool.
After installation, the filter needs to be
backwashed automatically; in this pro-
cess the filter sand is rinsed to prevent
impurities from entering the pool.
Afterwards, you place the valve in the
filter position and let the pump run; the
needle of the manometer indicates the
nominal pressure to which the filter
is exposed. Write down this pressure
(normally between 0.6 and 1.1 bar).
Summary of Contents for RECTOO
Page 1: ...RECTOO www gardipool com Montage handleiding Notice de montage Manual...
Page 2: ......
Page 82: ...82...
Page 83: ...83...


