


ENGLISH
69
2.3 Interior finish
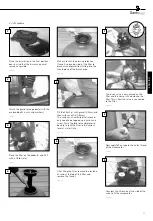
Apply silicone to both the return opening
seals, and glue them to the inside of
the pool. Apply silicone to one of the
skimmers seals and glue one seal of the
inside of the skimmer.
_____
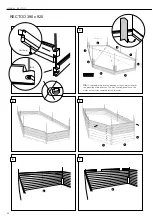
In order to attach the lining, the hung-profile
is screwed to the inside of the pool at 20cm
intervals. (stainless steel screws 4x30mm)
Ensure walls are dust-free to avoid ir-
regularities in the liner. If you prefer a soft
side surface, you must screw the fleece
in place together with the hung profile or
glue onto the walls. If you want to include
an underwater light, you must first drill the
hole (25 mm dia.) for the connector to guide
the cable out of the pool.
Determine the position, preferably 70 cm
(28 in) below the border edge, and in the
middle of a plank.
_____
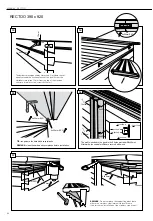
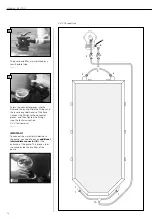
The position of the liner needs to be
100% correct and the liner should have
min. 18°C so that there is sufficient
elasticity. An opening must be cut for the
skimmer and the water return device.
TIP
: Store the liner some days in advance
at room temperature.
You can tape the corners of the pool in
order to prevent folds in the liner. Unfold
the liner in such a way that the corners
of the liner correspond with the corners
of the pool. Slide the edge of the liner
into the Hung-profiles, ensuring that the
corners of the liner match up well below.
The pool can now be filled with a few
inches of tap water.
On bare feet and using a plastic squee-
gee, remove the folds in the liner and
press the liner well into the corners of
the pool. Before making the incision into
the liner for the skimmer hole, fill the
pool to a few inches below the position
of the water return opening. Please
follow the illustrations included in the
skimmer and water return’s packaging.
During the filling of the swimming pool
the wood structure on the outside should
be filled in gradually.
Push the inner piece of the return hole
(2x) against the liner to be able to see the
shape on the inside of the pool. This way
you will know exactly where to cut the
liner in order to free the return hole.
_____
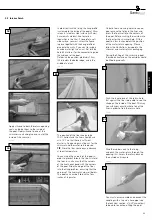
Glue the rubber seals to the lining,
and push the water return through the
opening (2x). Screw the return back on
the outside until secure.
_____
You must now assemble and connect the
coupling with a tap via a hosepipe (see
the technical section:
2.4.3 Connection
),
to be able to continue filling the pool.
18
21
19
20
22
23
Summary of Contents for RECTOO
Page 1: ...RECTOO www gardipool com Montage handleiding Notice de montage Manual...
Page 2: ......
Page 82: ...82...
Page 83: ...83...


