background image

51.7cc 2 Stroke Petrol Backpack Blower

AFTER SALES SUPPORT

e-mail: [email protected]

1800 909 909

MODEL: №. EB-500-E  •  03/2018  •  60099

(toll free)

AFTER SALES SUPPORT

(toll free)

51.7cc 2 Stroke Petrol Backpack Blower


e-mail: [email protected]

1800 909 909

MODEL: №. EB-500-E   •  03/2018  •  60099

22

23

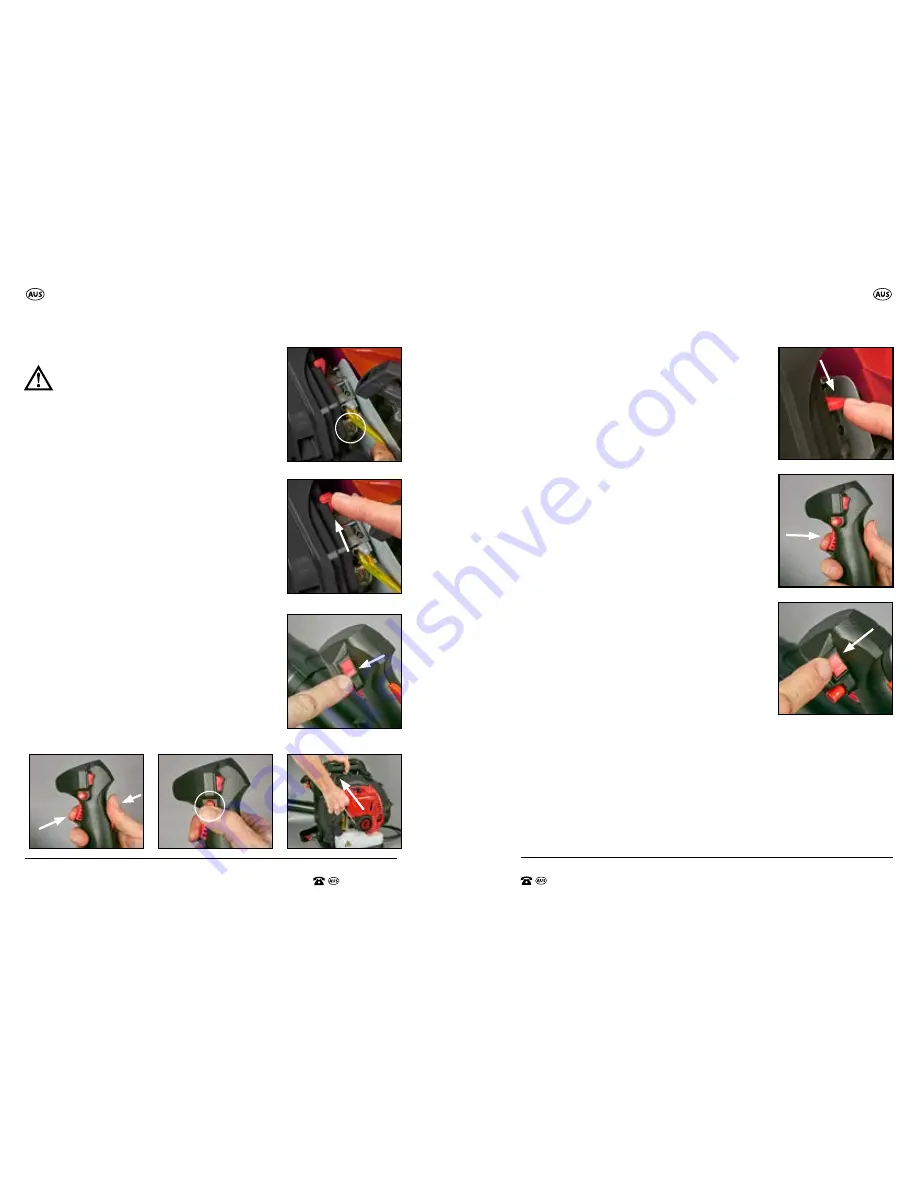
6.    Pull the recoil starter (21) until the engine 

sounds like it wants to run or starts.

7.    Slowly move the choke lever (red) (22) halfway 

down. If the engine is not running re-try to start 
in the half way choke position (Fig AB).

8.    Allow the engine to run for approximately 20 sec 

in the half choke position and then slowly move 
to the full run position.

9.    Allow the engine to run for 10 seconds to let it 

warm up.  At this stage, the backpack blower can 
now be placed on the users back with the straps 
in secure position.  Refer to the following page 
for securing the shoulder straps.

10.  Depress the safety lever (10) and slightly 

squeeze the throttle trigger (8), and then release 
the trigger. This will disengage the throttle lock 
button (11) and allow the blower to idle at the 
correct speed (Fig AC).

   To increase the engine speed, increase pressure 

on the throttle trigger (8).

   To decrease the engine speed, reduce pressure 

on the throttle trigger (8).

   Release throttle trigger (8) completely to return 

to idle.

   NOTE:  If the engine stalls, move the choke lever 

(red) (22) back to the full choke position and 
repeat from point 4 unless the engine is already 
warm.  
If already warm, start in the half or no choke position.

AD.

AB.

AC.


Starting the Blower

 WARNING: Before beginning the starting 

operation, place the blower on a sturdy surface 

sitting upright.  DO NOT start the blower with 

the unit already placed on the users back.

1.   Press the primer (23) 4 to 5 times or until there are no 

air bubbles visible in the fuel discharge line (Fig U).


NOTE: The primer is located at the rear of the unit 

underneath and behind the air filter cover, and just 

above the fuel tank (19) (Fig V).


NOTE: This is not necessary if the engine is warm.

2.   If the engine is cold, move the choke lever (red) (22) 

upwards to the cold start position  (choke closed) 

(Fig W).

3.   Press the “START” symbol on the stop/start switch (9) 

to turn the ignition ON (Fig X).

4.   Engage the throttle lock button (11) by fully 

depressing the safety lever (10) and the throttle 

trigger (8). Press the throttle lock button (11) and 

hold inward. Release the throttle trigger (8). The 

throttle lock button (11) is engaged now as the 

throttle trigger (8) is slowly released and will remain 

engaged until the throttle trigger (8) is depressed 

again (Fig Y/Z).

   NOTE:  Point 3 is not required if the engine is warm 

or is being restarted.

5.   Sit the blower upright on the ground, using one 

hand to hold the top of the plastic harness (4) 

securing the blower on the ground, and using your 

other hand, pull at a steady and medium rate on the 
recoil starter (21) (Fig AA).

V.

W.

X.

Y.

Z.

AA.

Summary of Contents for 60099

Page 1: ...ertoolsupport com Read all safety warnings and all instructions thoroughly before operating this product Ensure you keep your manual in a safe place for future reference IM ed 10 03 2018 60099 51 7CC...

Page 2: ...re about the Aldi product you have purchased Depending on your tarif you may be charged for the connection Pack contents parts 2 Description of symbols 3 General safety warnings 4 Additional safety ru...

Page 3: ...and correct use of the Blower on pages 21 24 as well as the maintenance instructions on pages 26 29 Contents of carton 2 3 The rating plate on your product may show symbols These represent important...

Page 4: ...ituations Dress properly Do not wear loose clothing or jewellery Keep your hair clothing and gloves away from moving parts Loose clothes jewellery or long hair can be caught in moving parts If devices...

Page 5: ...g the fuel Add fuel before starting the engine Never remove the cap of the fuel tank or add fuel while the engine is running or when the engine is hot If fuel is spilled do not attempt to start the en...

Page 6: ...d of the engine in any way Stop the engine and remove the spark plug cover in these cases Before any maintenance repairing or checking operations If you leave the blower unattended If the blower vibra...

Page 7: ...y from flammable liquids Keep your distance The blower emits exhaust fumes Ensure bystanders keep a safe distance Fill with Fuel oil mix before starting the engine Never open the cap of the fuel tank...

Page 8: ...handle with fitting clamp 8 Throttle trigger 9 Stop Start switch 10 Safety lever 11 Throttle lock button 12 Elbow tube 13 Flexible pipe with 2 x adjustable clamps 14 Upper blow tube 15 Middle blow tu...

Page 9: ...nd of the elbow tube 12 approximately 3cm until it hits the last raised ridge on the end of the elbow tube 12 Fig C 4 Secure the adjustable clamp on the flexible pipe 13 using the screwdriver end of t...

Page 10: ...pins on each side of the end of the upper blow tube 14 with the 2 x channels on the middle blow tube 15 Before pushing the 2 tubes together ensure the assembly screw is on the underside of the middle...

Page 11: ...leaded fuel and a good grade of 2 stroke oil for 2 stroke engines 2 Place the plastic fuel mixing bottle on a level surface Fill with fresh unleaded fuel in the container to the top 1100ml marker show...

Page 12: ...e you are wearing suitable clothing no loose jewellery and be cautious of hair entanglement Long hair should be suitably protected Choke control If the engine is cold you will need to use the choke co...

Page 13: ...e choke lever red 22 back to the full choke position and repeat from point 4 unless the engine is already warm If already warm start in the half or no choke position AD AB AC Starting the Blower WARNI...

Page 14: ...Long hair should be suitably protected Keep a gap between the air intake and clothing and body parts as blocking the intake will reduce the performance of the blower and may result in injury Be aware...

Page 15: ...ly with the supplied spark plug spanner 28 NOTE If your spark plug becomes worn replacements are available for purchase or can be purchased from most hardware stores or mower type repair shops Refer t...

Page 16: ...period of time proceed as follows Give the petrol blower an overall cleaning and a thorough check Empty the fuel tank 19 completely then clean the carburettor and lines by running the blower until it...

Page 17: ...It has been manufactured under stringent GARDENLINE Quality Standards to meet superior performance criteria You will find your new 51 7cc 2 Stroke Petrol Backpack Blower easy and safe to operate and w...

Page 18: ...Gripping handle 10 9 m s2 Uncertainties 1 5 m s2 Nett Weight 9 76 kg Product Dimensions 154cm x 43cm x 45cm 5 This product complies with EN15503 A2 2015 If you have any issues with the operation of yo...

Page 19: ...oducts are developed to our stringent quality specifications If you are not entirely satisfied with this product please return it to your nearest ALDI store within 60 days from the date of purchase fo...

Reviews: