EN
9
3. OPERATION
DANGER! Risk of injury!
Cut injury when the product starts accidentally.
v
Wait for the cutting filament to stop and disconnect the
product from the mains before you connect, adjust or
transport the product.
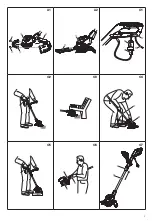
To connect the trimmer [ Fig. O1 ]:
DANGER! Electric shock!
To avoid damage to the mains cable the extension cable must
be inserted into the cable lock.
v
Before you operate the trimmer insert the extension cable into
the cable lock.
1. Loop the extension cable
(8)
, insert the loop into the cable lock
(9)
and
pull tight.
2. Connect the plug
(10)
of the trimmer into the socket
(11)
of the extension
cable
(8)
.
3. Connect the extension cable
(8)
to the mains.
To set the working position:
Working position 1 [ Fig. O2 ]:
For standard trimming.
Working position 2 [ Fig. O3 /O4 ]:
Trimming beneath obstacles.
The tube can be lowered from standard position 1 to two lowered
positions 2 or 3 for trimming beneath obstacles.
1. Put the trimmer on the floor.
2. Hold the trimmer by the tube
(7)
with both hands so that you can push
the unlock button
(12)
with one finger.
3. Push the unlock button
(12)
and lower the tube
(7)
to the required
position.
4. Release the unlock button
(12)
and let the tube
(7)
engage again.
Working position 3 (only for Art. 9872 / 9874) [ Fig. O5 /O6 ]:
Cutting at lawn edges.
CAUTION! The trimmer may only be used when the trimmer head
is locked at 0° or 90°.
To rotate the trimmer head
(1)
to 90°, the tube must be in standard
position 1.
1. Hold the trimmer by the tube
(7)
with both hands so that you can push
the unlock button
(13)
with one finger.
2. Push the unlock button
(13)
and rotate the trimmer head
(1)
from 0°
to 90° until it engages.
3. Release the unlock button
(13)
and let the tube
(7)
engage again.
To adjust the tube length [ Fig. O7 ]:
DANGER!
The product must not be used when the tube is completely
inserted (transport position).
1. Loosen the clamping sleeve
(6)
.
2. Pull out the tube
(7)
to the required length.
3. Tighten the clamping sleeve again
(6)
.
To adjust the position of the additional handle [ Fig. O8 ]:
The position of the additional handle can be adjusted to your body height.
1. Pull the lever
(14)
.
2. Tilt the additional handle
(15)
to the desired position.
3. Release the lever
(14)
again.
If the trimmer is correctly set to the body height, the posture is upright
and the trimmer head in working position 1 is tilted forwards slightly.
v
Hold the trimmer by the main handle
(16)
and additional handle
(15)
in
such a manner that the trimmer head is tilted forwards slightly.
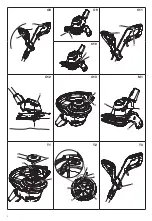
To adjust the plant guard:
– Work position [ Fig. O9 ]
– Park position [ Fig. O10 ]
v
Pull off the plant guard
(5)
and put it on into the required position until
it engages.
To start the trimmer [ Fig. O11 ]:
DANGER! Risk of injury!
Risk of injury if the product does not stop when you
release the start lever.
v
Do not bypass the safety devices or switches. For example do
not attach the start lever to the handle.
To start:
1. Hold the additional handle
(15)
with one hand.
2. Hold the main handle
(16)
with the other hand and pull the start lever
(17)
.
The trimmer starts.
CAUTION! Avoid contact of the cutting filament with hard objects
(walls, stones fences etc.) to prevent the cutting filament from wearing
or breaking.
To stop:
v
Release the start lever
(17)
.
The trimmer stops.
To extend the cutting filament (Tip mechanism) [ Fig. O12 / O13 ]:
The tip mechanism operates when the motor operates.
The best result occurs only with the maximum cutting filament length.
During first operation, it can be necessary to extend the cutting filament
many times.
Only for Art. 9872 / 9874: The cutting filament must not be extended in
working position 3.
1. Start the trimmer.
2. Hold the trimmer head
(1)
parallel to the ground and shortly tap onto
a solid surface (avoid constant pressure for extended periods).
The cutting filament
(18)
is automatically extended with a mechanism
that can be heard and adjusted to the correct length with the filament
limiter
(19)
. If necessary tap many times again and again.
4. MAINTENANCE
DANGER! Risk of injury!
Cut injury when the product starts accidentally.
v
Wait for the cutting filament to stop and disconnect the
product from the mains before you maintain the product.
To clean the trimmer [ Fig. M1 ]:
DANGER! Risk of injury!
Risk of injury and risk of damage to the product.
v
Do not clean the product with water or with a water jet
(in particular high-pressure water jet).
v
Do not clean with chemicals including petrol or solvents.
Some can destroy critical plastic parts.
The airflow slots must always be clean.
1. Clean the airflow slots
(20)
with a soft brush (do not use a screwdriver).
2. Clean all movable parts after each operation. Especially remove any
grass and dirt from the protective cover
(2)
.
5. STORAGE
To put into storage:
The product must be stored away from children.
1. Disconnect the trimmer from the mains.
2. Clean the trimmer (see 4. MAINTENANCE).
3. Store the trimmer in a dry, enclosed and frost-free place.
Disposal:
(in accordance with RL2012/19/EC)
The product must not be disposed of to normal household waste.
It must be disposed of in line with local environmental regulations.
IMPORTANT!
v
Dispose of the product through or via your municipal recycling
collection centre.


