background image

72

13. Options

13.1. Anti-Theft Protection 

(Fig. D)

To protect your Water Computer against theft, the GARDENA anti-theft 
protection 

F

(1815 - 00 .791. 00) is available at GARDENA Service.

The bracket on the anti-theft protection is fitted onto the back of the unit.
Note that the screw included cannot be loosened once it has been 
screwed in. The bracket can be used, for example, to attach a chain.

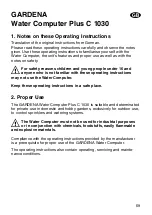
13.2  GARDENA Soil Moisture Sensor 

(Fig. E)

Together with the GARDENA Soil Moisture Sensor (Art. No. 1188) water-
ing is controlled considering the soil moisture.

Assembly 

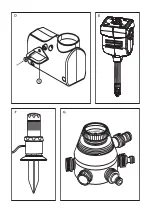
The Soil Moisture Sensor is connected to the socket 

0

on the back of 

the control unit (Fig. A).

How it Works

If the connected Soil Moisture Sensor indicates there is sufficient moisture
then the watering program is either interrupted or not initiated.

Note : Manual watering (man On / Off) is still possible.

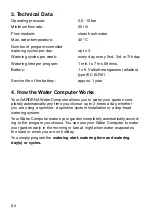
13.3  GARDENA Rain Sensor 

(Fig. F)

Together with the GARDENA Rain Sensor (Art. No. 1189) watering is 
controlled considering natural precipitation.

Assembly 

The Rain Sensor, as an alternative to the Soil Moisture Sensor, can be
connected to the connection socket 

0

on the back of the control unit 

(Fig. A).

How it Works

If the rain sensor indicates an adequate amount of rain, then the watering
program is interrupted or not initiated.

Note : Manual watering (man On / Off) is still possible.

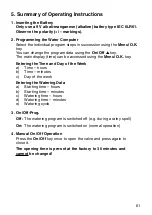
13.4  GARDENA Automatic Water Distributor 

(Fig. G)

Connecting the GARDENA Automatic Water Distributor (Art. No. 1198)
allows you to control up to 6 watering lines with your Water Computer 
Plus C 1030.
Each output can be watered every 2nd day. Therefore, 3 outputs can be
watered every day every 8 hours.
This is ideal where there is an insufficient amount of water or where in-
dividual areas of the garden have varying water requirements. It allows 
all watering lines to be operated one after another.

Summary of Contents for C 1030 plus

Page 1: ...C 1030 Plus P Instruções de utilização Computador de rega C 1030 Plus D Betriebsanleitung Bewässerungscomputer C 1030 plus GB Operating Instructions Water Computer Plus C 1030 PL Instrukcja obsіugi Komputer nawadniaj cy C 1030 plus Art 1810 GARDENA ...

Page 2: ...instrucciones 6 22 Garantía 94 P Breves instruções de utilização 25 Instruções de utilização 23 40 Garantia 94 D Kurz Betriebsanleitung 43 Betriebsanleitung 41 58 Garantie 95 G Summary of Operating Instructions 61 Operating Instructions 59 75 Guarantee 95 p Skrуcona instrukcja uїytkowania 78 Instrukcja obsіugi 76 93 Gwarancja 96 ...

Page 3: ......

Page 4: ......

Page 5: ...ing instructions may not use the Water Computer Keep these operating instructions in a safe place 2 Proper Use The GARDENA Water Computer Plus C 1030 is suitable and determinated for private use in domestic and hobby gardens exclusively for outdoor use to control sprinklers and watering systems AThe Water Computer must not be used for industrial purposes or in conjunction with chemicals foodstuffs...

Page 6: ...x 1 year 4 How the Water Computer Works Your GARDENA Water Computer allows you to water your garden com pletely automatically any time you choose up to 3 times a day whether you are using a sprinkler a sprinkler system installation or a drip head watering system Your Water Computer waters your garden completely automatically accord ing to the program you choose You can use your Water Computer to w...

Page 7: ...using the Menu O K key Entering the Time and Day of the Week a Time hours b Time minutes c Day of the week Entering the Watering Data a Starting time hours b Starting time minutes c Watering time hours d Watering time minutes e Watering cycle 3 On Off Prog Off The watering program is switched off e g during a rainy spell On The watering program is switched on normal operation 4 Manual On Off Opera...

Page 8: ...rs Hours of the current time Minutes Minutes of the current time Seconds Dots between the hours and minutes flash when you have entered or changed the current time hour minute day of the week Day Indicates the current day of the week Mo Tu etc date time 4 START TIME Watering Starting Time Hours Hour for the watering starting time Minutes Minute for the watering starting time Seconds Dots between t...

Page 9: ...ontrol unit B Connection socket Socket to connect the control unit C Sleeve nut incl filter To connect the water computer to the tap 6 4 Accompanying Accessories D G Adapter for sleeve nut To connect the water computer to taps with a G thread E GARDENA threaded tap connector Fits GARDENA System hose connectors 6 5 Option F Anti theft protection With special one way screw and bracket Available from...

Page 10: ...to be connected to taps with a G thread 26 5 mm If you are using the adaptor screw the adaptor onto the tap before screwing the Water Computer onto the adaptor Warning Attach and screw on manually Do not use pliers 3 Checking the New Battery To check the new battery turn on the tap and set the Water Computer to On valve opens and then shortly afterwards to Off valve closes If the battery capacity ...

Page 11: ... Entering the Current Data Time Day 1 Press Menu O K 1 second The hours TIME flash 2 Enter the hours using On Off e g 17 00 3 Press Menu O K to allow you to enter the minutes Range 0 23 4 Enter the minutes using On Off e g 23 press Menu O K to allow you to enter the weekday Monday Mo is followed by Tuesday Tu etc 5 Enter the weekday using On Off e g Fr for Friday 6 Press Menu O K to confirm the en...

Page 12: ...tes for the starting time START TIME using Menu O K Range 0 23 2 Enter the minutes for the starting time using On Off e g 30 Confirm the data you have entered and move to the watering time hour using Menu O K Range 00 59 3 Enter the hours for the watering time RUN TIME using On Off e g 0 hours Confirm the data you have entered and move to the watering time minutes using Menu O K Range 0 7 ...

Page 13: ... K Range 00 59 The maximum watering time you can set is 7 hours and 59 minutes 8 3 Setting the Water Cycles 1 Enter the watering cycles using On Off e g watering every 24 hours 24 h 2 Confirm the data you have entered and move to On Off Prog using Menu O K You can set the watering for every 8 12 24 hours 8h 12h 24h or every 2 3 or 7 days 2nd 3rd 7th ...

Page 14: ...hen you have finished programming the computer the clock is running Note You can move to the next program level current data watering data On Off Prog normal display at any time during programming by pressing the Menu O K key If there is an interval between data entry of more than 60 seconds the water computer automatically leaves the programming mode and the LCD shows the current time normal disp...

Page 15: ...ff key 1 without influencing the program data starting time watering time and watering days 9 Read Change Program You can run through the program levels to check the data you have entered by repeatedly pressing the Menu key and select and check the program steps by pressing O K You can change the watering programs as described under Programming 10 Manual Program Independent man On Off Operation Af...

Page 16: ...he Battery If you exchange the battery within 100 seconds the data you have entered will be saved program saved When the battery is removed the LCD display extinguishes and programs will not run while the battery is being changed When you have inserted a new battery we recommend that you check the data as described under Read Change Program If you do not insert a new battery within 100 seconds or ...

Page 17: ...d to the Water Computer during operation Only use the Water Computer outdoors Warning The Water Computer must not be used indoors The Water Computer must be stored in a dry place away from frost before the frosty season begins The cover provided for the operating display must be used as shown in Fig B To protect the operating display against the weather the cover must be flipped over when you have...

Page 18: ...anual watering man On Off is still possible 13 3 GARDENA Rain Sensor Fig F Together with the GARDENA Rain Sensor Art No 1189 watering is controlled considering natural precipitation Assembly The Rain Sensor as an alternative to the Soil Moisture Sensor can be connected to the connection socket 0 on the back of the control unit Fig A How it Works If the rain sensor indicates an adequate amount of r...

Page 19: ...me time days Not able to open Weak battery Insert a new alkaline manually using Batt indicator appears battery man key Tap turned off Turn on tap Watering not Weak battery Insert a new alkaline initiated Batt indicator appears battery Watering data starting Check data and time duration days complete if necessary not complete On Off Prog active Restart the program set to Off Set to On see On Off Pr...

Page 20: ... and O K keys there was no longer Re enter data as an opening pulse described If you have any problems with your Water Computer please contact our Customer Service We expressly point out that in accordance with the product liability law we are not liable for any damage caused by our units if it is due to improper repair or if parts exchanged are not original GARDENA parts or parts approved by us a...

Reviews: