background image

16

GB

Master Channel : 

Connecting valves :

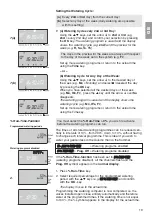
The GARDENA extension modules 

Art. 1277

with 2 channels are

available as an optional extra. Up to 4 expansion modules can be
connected and in this way 12 channels can be controlled via the
base unit. 

1. Break off bar 

4

from the watering controller (or already con-

nected expansion module). 

2. Insert connection links 

8

into the watering controller (or an

expansion module already connected) and push the expansion
module on. 

3. Secure expansion module via the clamps 

9

.

4. Connect the expansion module cable 

5

using the connector 

6

(if connecting another expansion module, connect the expan-
sion modules using the expansion module connector 

7

). 

The expansion modules are detected immediately by the 
watering controller when connected.

5. Push on cover of watering controller and the expansion module. 

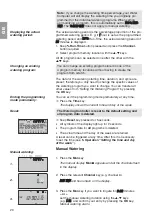
The master channel is a channel that can be operated at the same
time as other channels. This is important, for example, if you want
to use a pump to supply your irrigation system with water and if
the pump should always be activated each time an irrigation valve
is activated. The master channel closes 20 seconds before the end
of the program so that the system is not under pressure. 

The pump can be operated, for example, using the

GARDENA

Pump Control Art. 1273

that is connected to the master channel. 

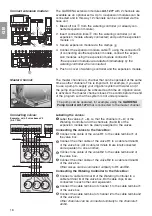
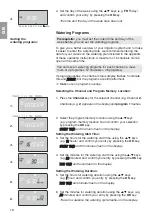
Labelling the valves : 

1

Label the valves (

1 - 6

), so that the channels (

1 - 4

) of the

Watering Controller and the channels (

5

and 

6

) of the 

expansion module can be clearly assigned to the valves. 

Connecting the valves to the Valve Box : 

2

Connect one cable of the valve 

V1

to the cable terminal 

1

of 

the valve box. 

3

Connect the other cable of the valve 

V1

to a cable terminal 

C

of the valve box (All 4 cable terminals 

C

are interconnected 

and equivalent to one another). 

4

Connect one cable of the valve 

V2

to the cable terminal 

2

of 

the valve box. 

5

Connect the other cable of the valve 

V2

to a cable terminal 

C

of the valve box. 
Other valves can be connected similarly to 

V1

and 

V2

Connecting the Watering Controller to the Valve Box : 

6

Connect a cable terminal 

C

of the Watering Controller to a

cable terminal 

C

of the valve box. Both cable clips 

C

are

connected to each other and equivalent.

7

Connect the cable terminal of channel

1

to the cable terminal 

1

of the valve box. 

8

Connect the cable terminal of channel

2

to the cable terminal 

2

of the valve box. 
Other channels can be connected similarly to the channels

1

and 

2

Connect extension module : 

7

5

4

6

8

9

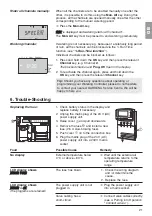
Example : with 2 valve boxes V3 
(Art. 1255)

Summary of Contents for 4040

Page 1: ...ode d emploi Programmateur NL Gebruiksaanwijzing Besproeiingscomputer S Bruksanvisning Kontrollpanel DK Brugsanvisning Vandingskontrol system FIN Brugsanvisning Kastelunohjauslaite N Brugsanvisning Vanningstimer kontrollenhet I Istruzioni per l uso Centralina E Manual de instrucciones Programación de riego P Instruções de utilização Comando de rega ...

Page 2: ...ring Controller 13 2 Safety Instructions 14 3 Function 14 4 Putting into Operation 15 5 Operation 17 6 Trouble Shooting 21 7 Putting Out of Operation 22 8 Technical Data 22 9 Service Warranty 23 1 Where to Use Your GARDENA Watering Controller The watering controller is suitable for indoor and outdoor use This Watering Controller is part of a garden irrigation system Recommended accessories the wat...

Page 3: ...ously the Reset key cannot be locked A Manual Control Display The display shows Man when manual control is activated B Channel Mode Display Modes open locked and program overlap C Watering Display If a channel is just being opened the drops on the watering display flash alternately H I G F E B C D 9 0 5 7 2 3 4 1 6 8 A The Watering Controller must only be used for controlling 24 V AC valves Please...

Page 4: ...wer failure occurs 1 Raise cover 1 and pull downwards 2 Insert the cable of the power supply unit into the 24VAC terminals and screw tight The wiring diagram is located inside the cover 1 3 Insert cables for the valves e g 7 wire GARDENA connection cable Art 1280 for up to 6 valves in the clips with the numbers and C and screw tight see also Connect valves 4 If necessary insert the sensor cable e ...

Page 5: ...the program so that the system is not under pressure The pump can be operated for example using the GARDENA Pump Control Art 1273 that is connected to the master channel Labelling the valves 1 Label the valves 1 6 so that the channels 1 4 of the Watering Controller and the channels 5 and 6 of the expansion module can be clearly assigned to the valves Connecting the valves to the Valve Box 2 Connec...

Page 6: ...above into the mounting plate 8 so that its back is against the mounting plate and into the mountings for the expansion modules if applicable 5 Operation Time and Day of the Week You must set the current time and day of the week before you can set the watering programs Valves which are already open are closed automatically after one minute if the time is changed 1 Plug in the power supply unit wit...

Page 7: ... 1 Press the Channel key for the relevant channel e g Channel 2 Channels e g 2 appears in the display and program 1 flashes 2 Select the program memory location using the keys e g program memory location 3 and confirm your selection by pressing the OK key START TIME and the hours flash on the display Setting the Watering Start Time 3 Set the hours for the watering start time using the keys e g 16 ...

Page 8: ...l the desired days of the week e g Mo We Fr press the key until the arrow ê over Su disappears The watering program is saved and the display shows the watering cycle e g Mo We Fr Set up more watering programs or return to the actual time using the Time key You must select the Run Time 0 you wish to activate before the watering programs can run The times of all stored watering programmes can be red...

Page 9: ...you want to change You can transfer all other values from Setting the Watering Program by pressing the OK key You can exit the programming mode prematurely at any time v Press the Time key The display shows the current time and day of the week The Watering Controller is reset to the default setting and all program data is deleted v Keep Reset key pressed for 5 seconds All symbols of the display li...

Page 10: ...Watering Controller please do not hesitate to contact your nearest GARDENA Service Centre We will be happy to help you 6 Trouble Shooting 1 Check battery status in the display and replace battery if necessary 2 Unplug the mains plug of the 24 V AC power supply unit 3 Raise cover 1 and pull downwards 4 Remove the fuse 0 and install a new fuse 2 5 A slow blowing fuse 5 Push cover 1 on to the connect...

Page 11: ...entre The product must not be added to normal household waste It must be disposed of properly 8 Technical Data Power supply from power supply unit 24V AC 900 mA sufficient for 6 GARDENA Watering Valves Art 1278 Power supply for memory in case of mains power failure Alkaline battery 9V IEC 6LR61 Life of the battery At least 1 year to retain data if there is a mains failure Operating temperature ran...

Page 12: ...e operating instructions Neither the purchaser or a non authorised third party have attempted to repair the unit GARDENA will not replace Watering Controllers with defects result ing from incorrect installation of the battery or leaking batteries This manufacturer s guarantee does not affect the user s existing warranty claims against the dealer seller If you have any problems with your watering c...

Reviews: