background image

Docking the Laptop

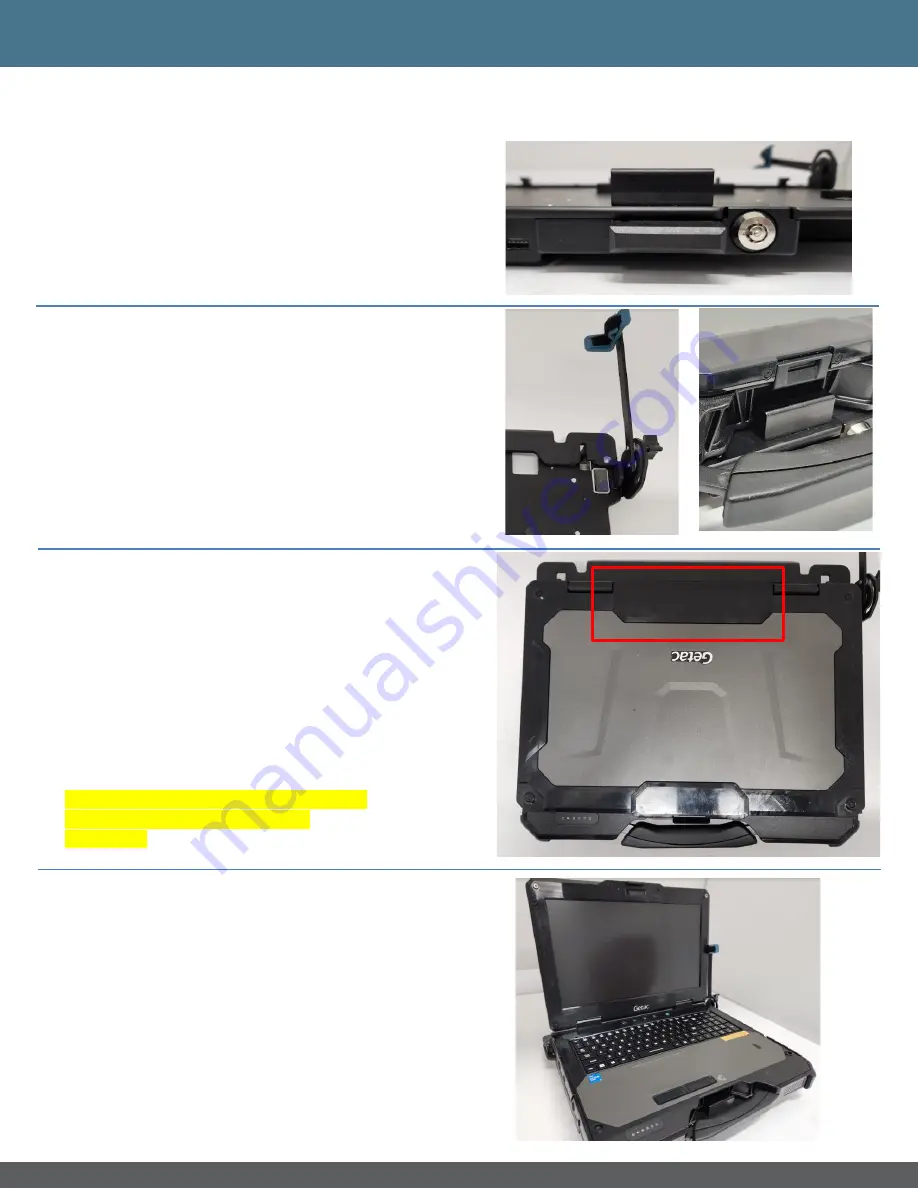
Step 1:
Ensure that the dock is unlocked and unlatched. If 
locked, insert key and rotate lock 90 degrees 
counter-clockwise. If latched, push the front release 
latch such that the back hooks move all the way out. 
An audible noise will be heard once fully un-latched

Step 2:
Lose the side knob, and rotate the screen support to 
the back, so that it will not block the laptop while 
docking.

Lead the front of the laptop into the front hooks on 
the dock such that the pockets on the laptop line up 
with the front hooks. The guide tabs should help 
align the laptop as well. Take care while positioning 
the laptop to ensure proper alignment and to prevent 
damage

Step 3:
Push on the back center of the laptop so that rear 
hooks latch*. A click sound should be heard when 
the rear hooks latch. 

The laptop can be docked into the dock with lid
open or close. If the lid is open, make sure that no 
keys are pressed while docking

Step 4:
Gently position the screen to a desired location. 
Rotate and slightly pull the screen support arm, so 
that the tab rests against the side of the laptop 
screen. Adjust screen support tension with the 
adjustment knob as needed.

Step 5:
For additional security and theft deterrence, insert 
and rotate key 90 degrees clockwise and remove the 
key to lock the laptop in the docking station. The 
laptop is only fully secure once the key is removed.

5

*Do not force docking if resistance is felt. 
Stop and check alignment before 
proceeding

Summary of Contents for TrimLine 7300-0600-03

Page 1: ...n LLC Description Part Number Getac X600 No RF Vehicle Docking Station 7300 0600 00 Getac X600 Tri RF Vehicle Docking Station 7300 0600 03 Getac X600 No RF Vehicle Docking Station with Power Adapter 7...

Page 2: ...on and laptop for any defect before using the dock or docking the laptop Do not use if damaged Do not attempt to dock a computer or dock with wet contacts Environmental Storage 40 C to 85 C 40 F to 18...

Page 3: ...guide are of Tri Pass Thru TPT docking station model Part 7300 0600 03 However processes and information relate to other variants of the same dock mentioned in previous page Front Clamps Front Releas...

Page 4: ...g plate attached External Antenna WIFI optional USB 3 0 x3 Cable Management Bracket Mounting Plate VESA 75mm 20 hardware included USB C 2 0 4 VGA port can only work alone once HDMI or DP port plug in...

Page 5: ...proper alignment and to prevent damage Step 3 Push on the back center of the laptop so that rear hooks latch A click sound should be heard when the rear hooks latch The laptop can be docked into the...

Page 6: ...t block the laptop of removing from the dock Use your thumb to push in the front release latch on the front of the dock This will push the rear clamps out and the laptop will eject with a small click...

Page 7: ...e ends to another suitable location in the vehicle The standard mounting bracket that comes with the vehicle dock features an industry standard VESA 75mm bolt pattern It must first be removed from the...

Page 8: ...A CISPR 32 EN 50498 MIL STD 810H CHG1 RoHS 2011 65 EU E Mark Made in Canada This device complies with Part 15 of the FCC Rules Operation is subject to the following two conditions 1 this device may n...

Reviews: