background image

USING THE TOUCH SCREEN

OPERATION - Power

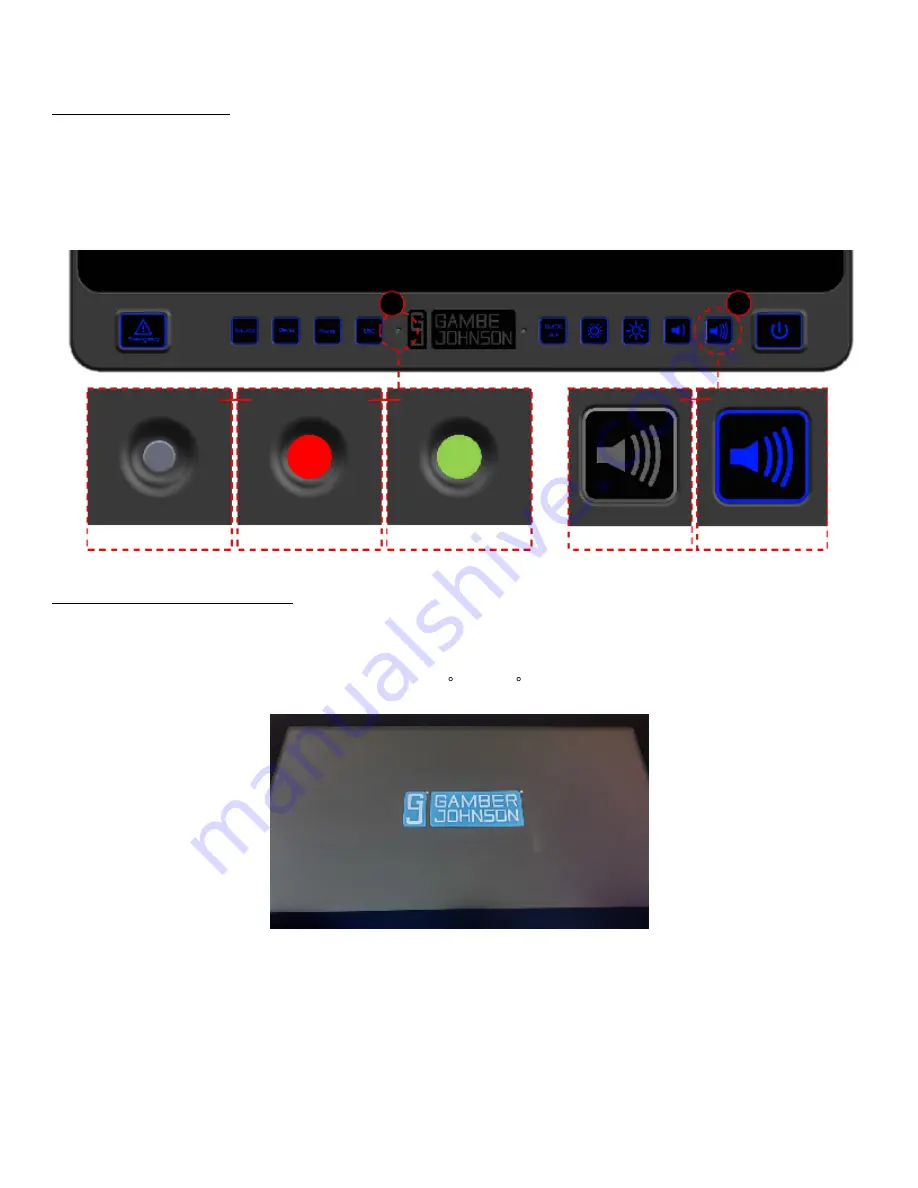
Upon applying power, the Power Indicator Light should be green. If there is no light, there is 

1.

no power to the screen.The POWER button can be used to turn off the screen, and the Power 

Indicator Light will turn red. The screen will power off if no input is detected for 15 minutes.

When there is power, the buttons will have a blue backlight. This can be toggled off in the 

2.

MENU settings.

6 / 9

OPERATION - Touch Screen

Plug and play supports Windows (XP or newer), Android, Linux, Mac OS/iOS platforms.

1.

There will be a start-up image, for about two seconds, showing the Gamber-Johnson logo. If 

2.

the environment is too hot or cold, the screen will stay on this start-up page until the 

temperature is within the usable range, -20 C to 70 C.

Power - NONE

Power - OFF

Power - ON

Backlight - OFF

Backlight - ON

1

2

The brightness of the screen will automatically adapt based on ambient light using the Auto 

3.

Brightness Sensor. This feature can be toggled off in the MENU settings, and the 

BRIGHTNESS buttons can be used to quickly adjust the brightness.

The Speakers on the back will function based on the input devices settings. Please reference  

4.

those settings before using the VOLUME buttons to adjust the screen speaker volume.

The screen is a 5-point capacitive input. It will be highly responsive to user input and supports 

5.

multi-finger gestures. It will not work with gloves.

The front of the screen is water resistant and can be cleaned. Do not use abbrasive materials.

6.

Summary of Contents for 7160-1451

Page 1: ...nstructions on features set up and operation of any computer or connected device please refer to the manual provided with those products This touch screen is designed to be used with a variety of mounting systems Installation instructions for other Gamber Johnson products are provided with each individual product 1 9 INSTALLATION INSTRUCTIONS Product Revision Form Printing Spec PS 001 7160 1451 13...

Page 2: ...an cause hazardous sparks resulting in electrical fires or flying molten metal After Installation Test the touch screen to ensure it is working properly Do not use the screen if the power cable or plug is damaged 1 Do not use the screen if water contacts the rear of the screen the ports or the 2 speakers Immediately disconnect power and ensure the system is dried File these instructions in a safe ...

Page 3: ... Quick Buttons Provides quick access to adjust screen settings See page 5 Hanging Bracket Mounting Pattern VESA 75mm pattern 1 4 20 threads Part Number Label Provides information on the product Reference this information regarding any service needs Port Identification Ports see page 4 Speakers Two 5W speakers Cable Tie Bracket Provides a location to secure each cable See page 4 Mounting Bolts Four...

Page 4: ...rts are not being used 1 REQUIRED Use zip ties to secure each cable to the specific strain relief feature on the screen 2 OPTIONAL Use zip ties to secure bundled cables for improved routing Cables route past mounting equipment USB3 0 Type C Fast Charging 1 5 A Used for touch USB port and video function PORT IDENTIFICATION Emergency Power On Off Volume Volume Brightness Brightness Black Out Source ...

Page 5: ...k cable to the ground INSTALLATION Mounting It is required to secure and zip tie the ports listed on page 4 to guarantee performance 1 If mounting to a Gamber Johnson clevis use the Hanging Bracket to place the screen and 2 support the weight while attaching the Mounting Bolts included with screen If mounting to other equipment remove and toss the Hanging Bracket and screws 3 RED WIRE to power BLA...

Page 6: ...too hot or cold the screen will stay on this start up page until the temperature is within the usable range 20 C to 70 C Power NONE Power OFF Power ON Backlight OFF Backlight ON 1 2 The brightness of the screen will automatically adapt based on ambient light using the Auto 3 Brightness Sensor This feature can be toggled off in the MENU settings and the BRIGHTNESS buttons can be used to quickly adj...

Page 7: ...Audio will still function when the screen is in Black Out mode The button backlight will remain on Brightness Press this button to lower the brightness of the screen The low is 50 nits Brightness Press this button to raise the brightness of the screen The high is 1000 nits Volume Press this button to lower the volume of the screen speakers Volume Press this button to raise the volume of the screen...

Page 8: ...tness Auto Brightness Touch Rating Screen Surface Speakers Mounting Compatibility Warranty 11 16Vdc 12Vdc 5A 13 74 349 0mm W x 9 93 252 2mm H x 1 57 39 9mm D 6 75 lbs 3 06kg 20 C to 70 C 4 F to 158 F 40 C to 85 C 40 F to 185 F 1920 x 1080 16 9 50 to 1000 nits Yes can be turned off 5 point capacitive Anti glare Anti reflective 85 viewing 5W each x2 VESA 75mm 1 4 20 thread Windows XP or newer Androi...

Page 9: ...n 7160 1451 00 13 3 TOUCH SCREEN Certifications EN 55032 2015 AC 2016 Class B EN 55035 2017 This device complies with Part 15 of the FCC Rules Operation is subject to the following two conditions 1 This device may not cause harmful interference and 2 this device must accept any interference received including interference that may cause undesired operation 9 9 ...

Reviews: