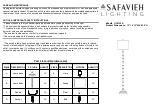
Assembly Instructions
Operation Instructions
page 3
•
Follow the Operation Instructions to install
the bulb and turn the unit on.
•
Assemble the Fixture (B) to one of the pole
sections (C) by twisting clockwise.
•
Assemble the second pole section (C) to
the first one using the threaded coupler
(D) and twisting clockwise.
NOTE: the threaded coupler (D) should be
preinstalled in one of the pole sections (C).
Stake Mount Installation
•
Attach the stake (F) to the bottom of pole
section (C) by twisting clockwise.
•
Push the lamp into the ground in the
desired mounting location.
Flat Mount Installation
•
Attach the flat mount (E) to the bottom of
pole section (C) by twisting clockwise.
•
Please the lamp in the desired mounting
location.
•
Using the flat mount (E) as a template
mark and drill three 10mm holes in the
concrete.
•
Insert the concrete anchors into the holes
and place the lamp over the anchors.
•
Secure the lamp to the anchors by
tightening the three nuts on the anchors
using a 14mm wrench.
•
Place the lamp head upside down and
remove the fixture (B) from the top (A) by
removing the four screws.
•
Insert the GS Solar LED Bulb into the
fixture by twisting clockwise.
•
Move the operation switch to the Low
or High position according to your
preferences:
Low = softer light, longer duration
High = brighter light output
•
Re-attach the fixture (B) to the top (A) and
secure using the four screws.
•
Your lamp will operate automatically at
dusk.
Replacement Parts
Replacement Batteries and Bulbs are
available at www.gamasonic.com or via our
Toll Free number: +1-800-835-4113.
Your Lamp can use the following bulbs:
A60WW20W – included bulb with Warm
White LEDs (2700K)
A60BW20W – bulb with Bright White LEDs
(6000K)
Your lamp uses three of the following
battery:
GS32V30
x 3
A
B
Φ
10mm
14mm
x 3
A
B
Φ
10mm
14mm
x 3
A
B
Φ 10mm
14mm
A
F
E
B
C