background image

5

Important information


WARNING:

 Read all instructions

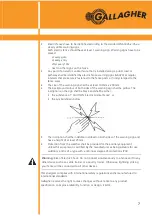
Do NOT touch the fence with the head, mouth, neck or torso.  Do not climb over, 

• 

through or under a multi-wire electric fence.  Use a gate or a specially designed 
crossing point.
Do NOT become entangled in the fence.  Avoid electric fence constructions that 

• 

are likely to lead to the entanglement of animals or persons.
Energizer must be installed in a shelter and the supply cord must not be handled 

• 

when the ambient temperature is below +5 deg C.
Electric animal fences shall be installed and operated so that they cause no 

• 

electrical hazard to persons, animals or their surroundings.
It is recommended that, in all areas where there is a likely presence of 

• 

unsupervised children who will be unaware of the dangers of electric fencing, 
that a suitably rated current limiting device having a resistance of not less than 
500 ohms be connected between the energizer and the electric fence in this area.
The appliance is not intended for use by young children or infirm persons without 

• 

supervision.
Young children should be supervised to ensure that they do not play with the 

• 

appliance.
Do not place combustible materials near the fence or energizer connections.  In 

• 

times of extreme fire risk, disconnect energizer.
Regularly inspect the supply cord and energizer for any damage.  If found 

• 

damaged in any way, immediately cease use of the energizer and return it to a 
Gallagher Authorised Service Centre for repair in order to avoid a hazard.
Refer servicing to a Gallagher Authorised Service Centre.

• 

Check your local council for specific regulations.

• 

An electric animal fence shall not be supplied from two separate energizers or 

• 

from independent fence circuits of the same energizer.
For any two separate electric animal fences, each supplied from a separate 

• 

energizer independently timed, the distance between the wires of the two 
electric animal fences shall be at least 2.5 m. If this gap is to be closed, this shall 
be effected by means of electrically nonconductive material or an isolated metal 
barrier.
Barbed wire or razor wire shall not be electrified by an energizer.

• 

A non-electrified fence incorporating barbed wire or razor wire may be used 

• 

to support one or more off-set electrified wires of an electric animal fence. The 
supporting devices for the electrified wires shall be constructed so as to ensure 
that these wires are positioned at a minimum distance of 150 mm from the 
vertical plane of the non-electrified wires. The barbed wire and razor wire shall be 
earthed at regular intervals.
Follow the energizer manufacturer’s recommendations regarding earthing.

• 

The energizer earth electrode should penetrate the ground to a depth of at least 

• 

1 m (3 ft) and not be within 10 m (33 ft) of any power, telecommunications or 
other system.

Summary of Contents for 083091

Page 1: ...Trusted Worldwide Pond Garden Kit Wall Aviary Kit Installation Instructions Installatie instructies Instructions d installation Installationsanleitung ENG NED FRA DEU Installation instructions...

Page 2: ...lst every effort has been made to ensure accuracy neither Gallagher Group Limited nor any employee of the company shall be liable on any ground whatsoever to any party in respect of decisions or actio...

Page 3: ...uw Gallagher spanningsgever 36 Handige accessoires en test uw Gallagher omheining 38 Onderdelen Midden Deutsch Wichtige Informationen 40 Arbeitsweise des Elektrozaunger tes 45 Aufbauen Ihres Garten un...

Page 4: ...4...

Page 5: ...nd energizer for any damage If found damaged in any way immediately cease use of the energizer and return it to a Gallagher Authorised Service Centre for repair in order to avoid a hazard Refer servic...

Page 6: ...0 3 4 8 If connecting leads and electric animal fence wires are installed near an overhead power line their height above the ground shall not exceed 3m This height applies either side of the orthogona...

Page 7: ...ack and shall be either the substance of CAUTION Electric Animal Fence or the symbol shown below The inscription shall be indelible inscribed on both sides of the warning sign and have a height of at...

Page 8: ...e instructions SERVICE OF DOUBLE INSULATED APPLIANCES In a double insulated controller two systems of insulation are provided instead of grounding No equipment grounding means is provided in the suppl...

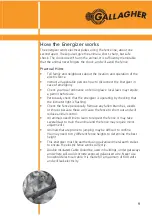
Page 9: ...ng by checking that the indicator light is flashing Check the fence periodically Remove any fallen branches weeds or shrubs because these will cause the fence to short out and will reduce animal contr...

Page 10: ...e garden with your pet when you first switch on the fence When it gets a shock shout no Your voice together with the pulse from the fence will tell your pet it s been bad in touching the fence It is i...

Page 11: ...hapes or over mounds Tie the Polywire to the top clip on the first post Ensure the wire does not touch any other fences or bushes Pass the wire through the top clips on each post then down and back th...

Page 12: ...before the nearest post clip to where you want the gate handle to be Tie one end of the wire to the post clip the end of the wire that will continue around the fence and the other end to the small lo...

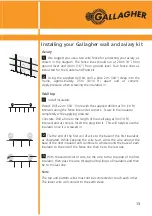
Page 13: ...ng pressure Concrete Drill a hole to the length of the wall plug at 3m 10 ft intervals and at corners Insert the plug into it This will help secure the insulator once it is screwed in Tie the end of t...

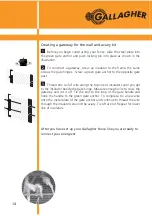
Page 14: ...Thread one coil of wire along the top line of insulators until you get to the insulator beside the gate hinge Measure enough wire to cross the gateway and cut it off Tie the end to the loop of the ga...

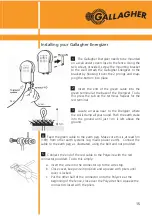
Page 15: ...he soil is damp all year round Push the earth stake into the ground until just 1cm is left above the ground Feed the green cable to the earth peg Make sure this is at least 5m 16ft from other earth sy...

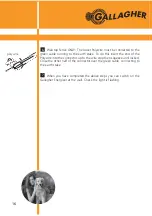
Page 16: ...do this insert the end of the Polywire into the connector up to the wire stop then squeeze until locked Close the other half of the connector over the green cable connecting to the earth stake When yo...

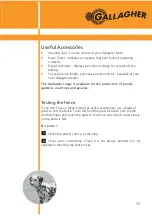
Page 17: ...gher dealer The Gallagher range is available for the protection of ponds gardens wall tops and aviaries Testing the fence If you don t have a fence tester see useful accessories use a blade of grass t...

Page 18: ...18...

Page 19: ...laats in de buurt van de afrastering of van de aansluitingen van het schrikdraadapparaat geen brandbaar materiaal Ontkoppel in tijden van extreem brandgevaar het schrikdraadapparaat Controleer regelma...

Page 20: ...idingen en draden van een elektrische afrastering mogen niet over bovengrondse stroom of communicatieleidingen heen lopen Indien mogelijk moeten afrasteringen niet onder bovengrondse hoogspanningsleid...

Page 21: ...kdraadapparaat in voorziet Indien een elektrische afrastering een publiek pad kruist moet een spanningsvrije poort in de elektrische afrastering worden geplaatst of moet er een overstapplaats aangebra...

Page 22: ...matie uit de Internationale Publicatie 60335 2 76 ed 2 0 2002 Alle extracten vallen onder copyright IEC Geneva Switzerland All rights reserved Meer informatie mbt IEC is beschikbaar op www iec ch Het...

Page 23: ...elampje knippert Controleer de afrastering regelmatig Verwijder alle afgevallen takken onkruid of struiken want deze kunnen de uitschakeling van de afrastering veroorzaken en de controle over de diere...

Page 24: ...ief zet Roep nee als het dier een impuls krijgt Uw stem tezamen met de impuls vertellen hem dat het slecht is om de omheining aan te raken Het is in het belang van de training van uw huisdier dat er k...

Page 25: ...ichter bij elkaar te plaatsen Bevestig de kunststofdraad aan het bovenste veertje van de eerste paal De draad mag niet in contact met een andere omheining of gras begroeiing komen Haal de draad door h...

Page 26: ...RVS veertje door Hier komt dan de handgreep voor de doorgang Maak het ene uiteinde van de draad vast aan het RVS veertje op de paal En het andere uiteinde aan het bevestigingsoog van de handgreep Haak...

Page 27: ...ggen iedere 3 m en op alle hoeken Schroef de isolatoren in de oranje pluggen Bevestig het uiteinde van de eerste rol kunststofdraad aan de onder kant van de eerste isolator zoals aangegeven op de teke...

Page 28: ...gang Trek een draad door het oog van de isolator totdat u bij de beves tigde poortgreepanker komt Meet ruim voldoende draad af en knip de draad door Bevestig de draad aan het bevestigingsoog van de ha...

Page 29: ...is Druk de aardpen in de grond totdat deze nog ongeveer 1 cm boven de grond uitsteekt 2 3 1 Geleid de groene draad naar de aardpen De aardpen dient minimaal 5 meter van iedere andere aardingsinstalla...

Page 30: ...n worden Doet u de kunststofdraad in de connector en knijp deze dicht totdat deze gesloten is De andere helft van de connector sluit u aan op de groene kabel die naar de aardpen loopt Als u de bovenst...

Page 31: ...r Het Gallagherprogramma is beschikbaar voor de bescherming van vijvers tuinen schuttingen en voli res Het testen van de omheining Als u geen omheiningstester heeft zie handige accessoires gebruik dan...

Page 32: ...32 1 6 7 8 9 10 11 12 13 14 15 17 16 2 3 4 5 Petmaster Kit Parts Onderdelen Bestandteile Contenu de kit...

Page 33: ...ngsbeugel voor schrikdraadapparaat 1 Schraubbolzen und Mutter f r die Erdungsstange 2 Bohrer 3 Orangener D bel 4 Erdungsstange 5 Zaunpfosten 6 Clip f r die Zaunpfosten 7 Verbindungsklemme 8 Rotes Kabe...

Page 34: ...34...

Page 35: ...tallez le hors de la port e des enfants Les jeunes enfants doivent tre surveill s pour garantir qu ils ne jouent pas avec l appareil Ne pas placer de mati re inflammable pr s de la cl ture ou des bran...

Page 36: ...ommunication a riennes Le croisement avec des lignes d alimentation a riennes doit tre vit dans la mesure du possible Si ce type de croisement est in vitable il doit tre effectu sous la ligne d alimen...

Page 37: ...dentifi es conform ment la Norme EN60335 2 76 par des plaquettes de signalisation parfaitement visibles Chaque cl ture lectrique doit comprendre au minimum une plaquette de signalisation Ces plaquette...

Page 38: ...rmettre de reproduire les informations contenues dans sa Publication Internationale 60335 2 76 ed 2 0 2002 Tous ces extraits sont la propri t de l IEC Gen ve Suisse Tous droits r serv s Des informatio...

Page 39: ...s herbes ou arbrisseaux qui peuvent causer un court circuit et mettre en p ril la surveillance de vos animaux Tous les animaux ont besoin d un certain temps pour apprendre respecter la cl ture L accou...

Page 40: ...branchez pour la premi re fois la cl ture Lorsqu il re oit une correction criez non Votre intonation associ e a l impulsion de la cl ture signifiera votre animal qu il n a pas bien agi en s approchan...

Page 41: ...seriez un terrain irr gulier ou accident Attachez le fil synth tique au clip sup rieur du premier piquet Assurez vous que le fil lectrique ne touche pas d autre cl ture ni l herbe ou autre v g tation...

Page 42: ...e porte sectionner le fil juste avant le clip le plus pr s de l endroit o vous souhaitez installer votre porte Attachez une extr mit du fil au clip du piquet et l autre au petit illeton de la poign e...

Page 43: ...n B ton Percez un trou de la longueur de la cheville tous les 3 m tres ainsi qu aux angles Ins rez y la cheville orange Visser les isolateurs Attachez l extr mit de la premi re bobine de fil la base d...

Page 44: ...rieure d isolateurs jusqu l isolateur jouxtant la charni re de la porte Pr voyez suffisamment de fil pour traverser la porte et coupez l exc dent Attachez l extr mit l illeton de la poign e de porte e...

Page 45: ...isser d pas ser que 1cm hors du sol 1 2 3 Installation d un lectrificateur Gallagher Reliez le c ble vert la tige de terre Assurez vous qu elle soit au moins 5 m tres d autres syst mes de mise la terr...

Page 46: ...xtr mit du fil synth tique dans le connecteur jusqu l arr t puis pressez le connecteur jusqu ce qu il soit fermement scell Refermez l autre moiti du connecteur sur le c ble vert rejoignant la tige de...

Page 47: ...r La gamme Gallagher est disponible pour la protection des bassins des jardins des palissades et des voli res Tester la cl ture Au cas o vous ne disposeriez d aucun testeur voir accessoires utiles uti...

Page 48: ...48...

Page 49: ...der Elektrozaunger te Anschl ssen lagern In Zeiten hoher Brandgefahr Elektrozaunger t ausschalten Kontrollieren Sie Stromkabel und Elektrozaunger t regelm ig auf eventuelle Sch den Falls Sie Sch den i...

Page 50: ...twinklig dazu erfolgen Wenn Zaunzuleitungs und Zaundr hte in der N he einer Freileitung installiert werden sollten folgende Mindestabst nde eingehalten werden Minimal Abst nde von Elektroz unen zu Hoc...

Page 51: ...haben Warnzeichen m ssen platziert werden an jedem Tor an jedem Zugangspunkt in Intervallen die 10m nicht berschreiten angrenzend zu allen Zeichen Jeder Teil der entlang einer ffentlichen Stra e oder...

Page 52: ...e sind vorbehalten Weitere Informationen ber die IEC sind unter www iec ch verf gbar Die IEC bernimmt keine Verantwortung f r die Platzierung und in welchen Zusammenh ngen die Ausz ge und Inhalte vom...

Page 53: ...ioniert indem Sie auf die blinkende Anzeigeleuchte achten Pr fen Sie den Zaun regelm ig Entfernen Sie abgefallene ste Unkraut oder Str ucher da diese im Zaun einen Kurzschluss ausl sen und so die Zaun...

Page 54: ...chalten des Ger tes die ersten Male bei Ihrem Haustier im Garten Wenn Ihr Haustier einen Impuls gekommen hat rufen Sie laut nein Ihre Stimme in Verbindung mit dem Impuls wird dem Tier verdeutlichen da...

Page 55: ...n m ssen Binden Sie den Zaundraht an den obersten Clip des ersten Pfostens Versichern Sie sich da der Draht B sche oder andere Z une nicht ber hrt F hren Sie den Draht durch den obersten Clip eines je...

Page 56: ...geplanten Torgriff nahe eines Pfostens Binden Sie das Ende des Drahtes an den Clip am Pfosten dieses Drahtst ck sollte am Zaun entlangf hren Das andere Ende befestigen Sie an der kleinen se des Torgr...

Page 57: ...in die L cher Beton Mauerwerk Bohren Sie in die Mauerkrone L cher in der L nge der D bel Tun Sie dies an jeder Ecke und an den Geraden der Mauer im Abstand von etwa 3 m Dr cken Sie die orangen D bel...

Page 58: ...eihe bis Sie zu dem Isolator kommen der die Torangel bildet Schneiden Sie den Draht so durch da Sie damit noch bis zur gegen berliegenden Torseite kommen und das Tor schlie en k nnen Binden Sie das En...

Page 59: ...gen 1 2 3 Verbinden Sie das gr ne Kabel mit der Erdungsstange Versichern Sie sich da die Erdungsstange mindestens 5 m von anderen Erdungssystemen z B Erdung des Hauptstromkreises entfernt ist Verbinde...

Page 60: ...drahtes in die Verbindungsklemme bis zum Kabelstop und dr cken die Verbindungsklemme zusammen bis die Abdeckung fest verschlossen ist Schlie en Sie die andere H lfte der Verbindungsklemme um das mit d...

Page 61: ...ten Mauer und Holzzaunkronen sowie Vogelh usern Testen des Elektrozaunes Wenn Sie keinen Zauntester haben siehe unter N tzliches Zubeh r benutzen Sie einen Grasstengel f r das Testen des Zaunes Daf r...

Page 62: ...62...

Page 63: ...63...

Page 64: ......

Reviews: